English - 7 -
)RUDQ\KHOSFRQFHUQඈQJVHWXSDQGXVHRI\RXU79SOHDVHFDOOWKH&XVWRPHU+HOSOඈQH
stunning image quality by combining HDR and wide
colour gamut imaging technologies. By increasing the
brightness of the original signal and using a higher
G\QDPLF FRORXU DQG FRQWUDVW UDQJH 'ROE\ 9LVLRQ
presents amazing true-to-life images with stunning
detail that other post-processing technologies in the
TV aren’t able to produce. Dolby Vision is supported
YLDQDWLYHDQGPDUNHWDSSOLFDWLRQV+'0,DQG86%LQ-
puts. When the input source is set to the related HDMI
input press the Menu button and set the HDMI EDID
Version option in the TV Options>Settings>Device
Preferences>Inputs menu as EDID 2.0 or Auto EDID
LQRUGHUWRZDWFK+'5+/*FRQWHQWLIWKH+'5+/*
content is received through an HDMI input. The source
device should also be at least HDMI 2.0a compatible in
this case. In the Picture ModePHQXWZRSUHGH¿QHG
picture modes will be available if Dolby Vision content
is detected: Dolby Vision Bright and Dolby Vision
Dark. Both allow the user to experience the content
LQWKHZD\WKHFUHDWRURULJLQDOO\LQWHQGHGZLWKGLႇHUHQW
ambient lighting conditions. To change the Picture
Mode setting press the Menu button while watching the
Dolby Vision content and go to Picture menu. While
ZDWFKLQJ 'ROE\ 9LVLRQ &RQWHQW YLD DQ DSSOLFDWLRQ
H[FHSW<RX7XEH1HWÀL[DQG0XOWL0HGLD3OD\HU\RX
will not be able to access the Picture menu and set
the Picture Mode.
Stand Installation &
Wall Mounting
Assembling / Removing the pedestal
Preparations
Take out the pedestal(s) and the TV from the packing
case and put the TV onto a work table with the screen
SDQHOGRZQRQWKHFOHDQDQGVRIWFORWKEODQNHWHWF
8VHDÀDWDQG¿UPWDEOHELJJHUWKDQWKH79
Do not hold the screen panel part.
Make sure not to scratch or break the TV.
Assembling the pedestal
1. Place the stand(s) on the stand mounting
pattern(s) on the rear side of the TV.
2. Insert the screws provided and tighten them gently
XQWLOWKHVWDQGLVSURSHUO\¿WWHG
Removing the pedestal from the TV
Be sure to remove the pedestal in the following way
when using the wall-hanging bracket or repacking
the TV.
Put the TV onto a work table with the screen panel
down on the clean and soft cloth. Leave the stand(s)
protruding over the edge of the surface.
8QVFUHZWKHVFUHZVWKDW¿[LQJWKHVWDQGV
Remove the stand(s).
When using the wall mount bracket
Your TV is also prepared for a VESA-compliant wall
PRXQWEUDFNHW,ILWLVQRWVXSSOLHGZLWK\RXU79FRQWDFW
your local dealer to purchase the recommended wall-
hanging bracket.
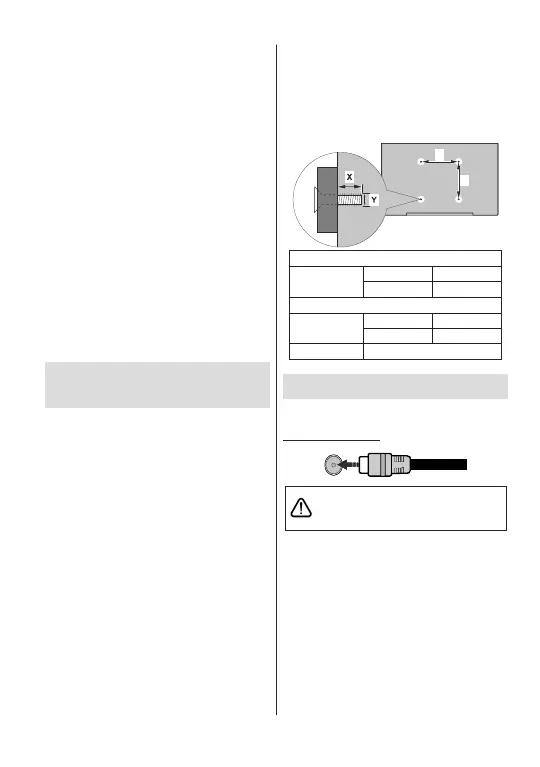
Holes and measurements for wall mount bracket
installation;
VESA WALL MOUNT MEASUREMENTS
,ŽůĞWĂƩĞƌŶ
Sizes (mm)
WH
200 200
^ĐƌĞǁ^ŝnjĞƐ
>ĞŶŐƚŚ;yͿ
min. (mm) 10
max. (mm) 13
dŚƌĞĂĚ;zͿ M6
Antenna Connection
Connect the aerial or cable TV plug to the AERIAL
INPUT (ANT) socket located on the rear side of the TV.
Rear side of the TV
$17
,I\RXZDQWWR FRQQHFWDGHYLFHWRWKH79PDNH
VXUHWKDWERWKWKH79DQGWKHGHYLFHDUHWXUQHGRႇ
before making any connection. After the connection
LVGRQH\RXFDQWXUQRQWKHXQLWVDQGXVHWKHP
English - 8 -
)RUDQ\KHOSFRQFHUQඈQJVHWXSDQGXVHRI\RXU79SOHDVHFDOOWKH&XVWRPHU+HOSOඈQH
Other Connections
,I\RXZDQWWRFRQQHFWDGHYLFHWRWKH79PDNHVXUHWKDWERWKWKH79DQGWKHGHYLFHDUHWXUQHGRႇEHIRUHPDNLQJ
DQ\FRQQHFWLRQ$IWHUWKHFRQQHFWLRQLVGRQH\RXFDQWXUQRQWKHXQLWVDQGXVHWKHP
Connector Type Cables Device
COMPONENT
Component
Video
Connection
(back)
VGA to Component Connection Cable
HDMI
Connection
(back&side)
VGA
Connection
(back)
AUDIO IN
VGA/
Component
Audio
Connection
(back)
Component/VGA Audio Cable
SPDIF
SPDIF
(Optical Out)
Connection
(back)
COMPOSITE
Composite
(Audio/Video)
Connection
(back)
Audio Video Cable
HEADPHONE
Headphone
Connection
(side)
USB
Connection
(side)
CI
Connection
(side)
CAM
module
LAN
Ethernet
Connection
(back)
LAN / Ethernet Cable
To enable VGA/Component audio,
you will need to use the back audio
inputs with a VGA/Component audio
cable for audio connection. When
using the wall mounting kit (contact
your dealer to purchase one, if not
supplied), we recommend that you
plug all your cables into the back of
the TV before mounting on the wall.
Insert or remove the CI module only
when the TV is SWITCHED OFF. You
should refer to the module instruction
manual for details of the settings. The
USB inputs on the TV support devices
up to 500mA. Connecting devices that
have current value above 500mA may
damage your TV. When connecting
equipment using a HDMI cable to your
79 WR JXDUDQWHH VXFLHQW LPPXQLW\
against parasitic frequency radiation
and trouble-free transmission of high
GH¿QLWLRQVLJQDOVVXFKDV.FRQWHQW
you have to use a high speed shielded
(high grade) HDMI cable with ferrites.
 Loading...