MU1H-1002GE23 R0315 12 Honeywell GmbH
GB
7. Assembly
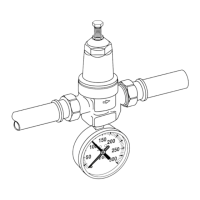
7.1. Installation guidelines
• Horizontal and vertical installation possible
• Provide shut-off valve
• If there are system parts on the outlet side which could
become overloaded with impermissibly high pressure in
the event of incomplete closure of the pressure reducing
valve, a safety valve must be fitted in accordance with
DIN EN 806-2 in conjunction with DIN 1988-200. The
outlet pressure of the pressure reducing valve in these
cases must be set at least 20% below the set pressure of
the safety valve.
• The installation location be be frost-proof and easily
accessible
- Pressure gauge must be easily visible
- The degree of soiling on the transparent filter bowl must
be easily visible
- Easy to maintain and clean
• For domestic water installations in which a high level of
protection from soiling is required, a fine filter should be
installed upstream of the pressure reducing valve
• Calm-down distance of 5xDN before the pressure
reducing valve (in accordance with EN 806-2)
7.2. Assembly instructions
1. Rinse pipeline well
2. Plug in venturi nozzle (only 1
1
/
4
" / 2")
3. Install pressure reducing valve
• Observe flow direction
• Install free of tension and bending stresses
4. Screw in the sealing plugs manually
8. Start-up
8.1. Set the outlet pressure
8.1.1. D06F/D06F-LF, D06FN, D06FI
1. Close the shut-off valve on the input side
2. Reduce the pressure on the output side (e.g. by draining
water)
3. Close the shut-off valve on the output side
4. Loosen slotted screw
• Do not unscrew the slotted screw
5. Slacken the pressure spring
• Turn the adjuster knob (grey) anti-clockwise (-) as far as
it will go
6. Slowly open the shut-off valve on the input side
7. Turn the adjuster knob until the setting scale displays the
desired value
8. Re-tighten the slotted screw
9. Slowly open the shut-off valve on the output side
8.1.2. D06FH
1. Close the shut-off valve on the input side
2. Reduce the pressure on the output side (e.g. by draining
water)
3. Close the shut-off valve on the output side
4. Loosen the slotted screw and unscrew completely
5. Remove the red handle
6. Slacken the pressure spring
• Turn the adjuster knob (grey) anti-clockwise (-) as far as
it will go
7. Slowly open the shut-off valve on the input side
8. Turn the adjuster knob until the setting scale displays the
desired value
9. Replace the red handle
10. Re-tighten the slotted screw
11. Slowly open the shut-off valve on the output side
9. Maintenance
According to DIN EN 806-5, the following works must be
performed:
9.1. Inspection
9.1.1. Pressure reducing valve
1. Close the shut-off valve on the output side
2. Check the outlet pressure with zero flow using a pressure
gauge
• If the pressure increases gradually, then the tap is
either soiled or defective. In this case, carry out
maintenance and cleaning
3. Slowly open the shut-off valve on the output side
9.2. Maintenance
9.2.1. Pressure reducing valve
9.2.1.1. D06F, D06F-LF, D06FN, D06FI
1. Close the shut-off valve on the input side
2. Reduce the pressure on the output side (e.g. by draining
water)
3. Close the shut-off valve on the output side
4. Loosen slotted screw
• Do not unscrew the slotted screw
5. Slacken the pressure spring
• Turn the adjuster knob (grey) anti-clockwise (-) as far as
it will go
6. Unscrew the spring bonnet
• Use double ring wrench ZR06K
Set the outlet pressure at least 1 bar below the inlet
pressure.
We recommend entering into a maintenance contract
with an installation company
Interval: 1 x yearly
In accordance with DIN EN806-5 and VDI 3810-2,
Pressure reducing valves must be inspected and
serviced annually.
Filter inserts must be replaced at six-monthly intervals.
Maintenance works must be carried out by an
installation company.
Caution!
There is a pressure spring in the spring bonnet. If the
pressure spring is projected, it can cause injuries.
• Ensure that the pressure spring is not tensioned!
 Loading...
