HP D2D4300 Series
WARNING! Daisy-chaining Capacity Upgrade Kits is not supported. Each Capacity Upgrade
Kit must be directly connected to one of the RAID cards on the HP D2D4300 Backup System. Each
kit is supplied with two cables; the longer cable is suitable for connecting lower shelves as shown
in the figure below.
1. To ensure correct keying, first connect the supplied cable to the P1 connector on the top I/O
module (I/O-A) on the rear of the Capacity Upgrade Kit.
NOTE: Always use the P1 connector; do not use the P2 connector.
2. Connect the other end of each cable to the connector on the RAID card.
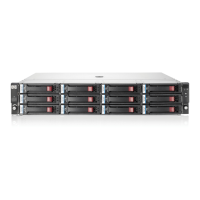
HP D2D4324 Backup System
This product has three RAID cards and there are four connectors on each card. Always use
the top connector (port 1E) and never connect more than one shelf to the RAID card. Only
three expansion shelves may be connected.
Figure 4 Cabling the Capacity Upgrade Kit to the HP D2D4324 Backup System
2. P1 connector (on I/O-A)1. Power connectors
4. Port connector on RAID card3. Power on/off button
HP D2D4312 Backup System
This product has two RAID cards and there are two connectors on each card. It does not matter
which connectors are used, but only three expansion shelves may be connected.
Connecting the Capacity Upgrade Kit to the HP D2D Backup System 9
 Loading...