Do you have a question about the HP Pavilion dv3 and is the answer not in the manual?
Details on Intel Core 2, Pentium, and Celeron processors available for HP Pavilion dv3.
Information on Intel PM45, GM45, and ICH9m Southbridge chipsets used in the dv3 models.
Specifications for NVIDIA GeForce G 105M and ATI Mobility Radeon HD4550 graphics.
Details on 13.4-inch AntiGlare, BrightView, and touch screen display assemblies.
Identifies external components on the top surface of the laptop, including antennas and webcam.
Details on display-related external components like internal display switch, antennas, and webcam.
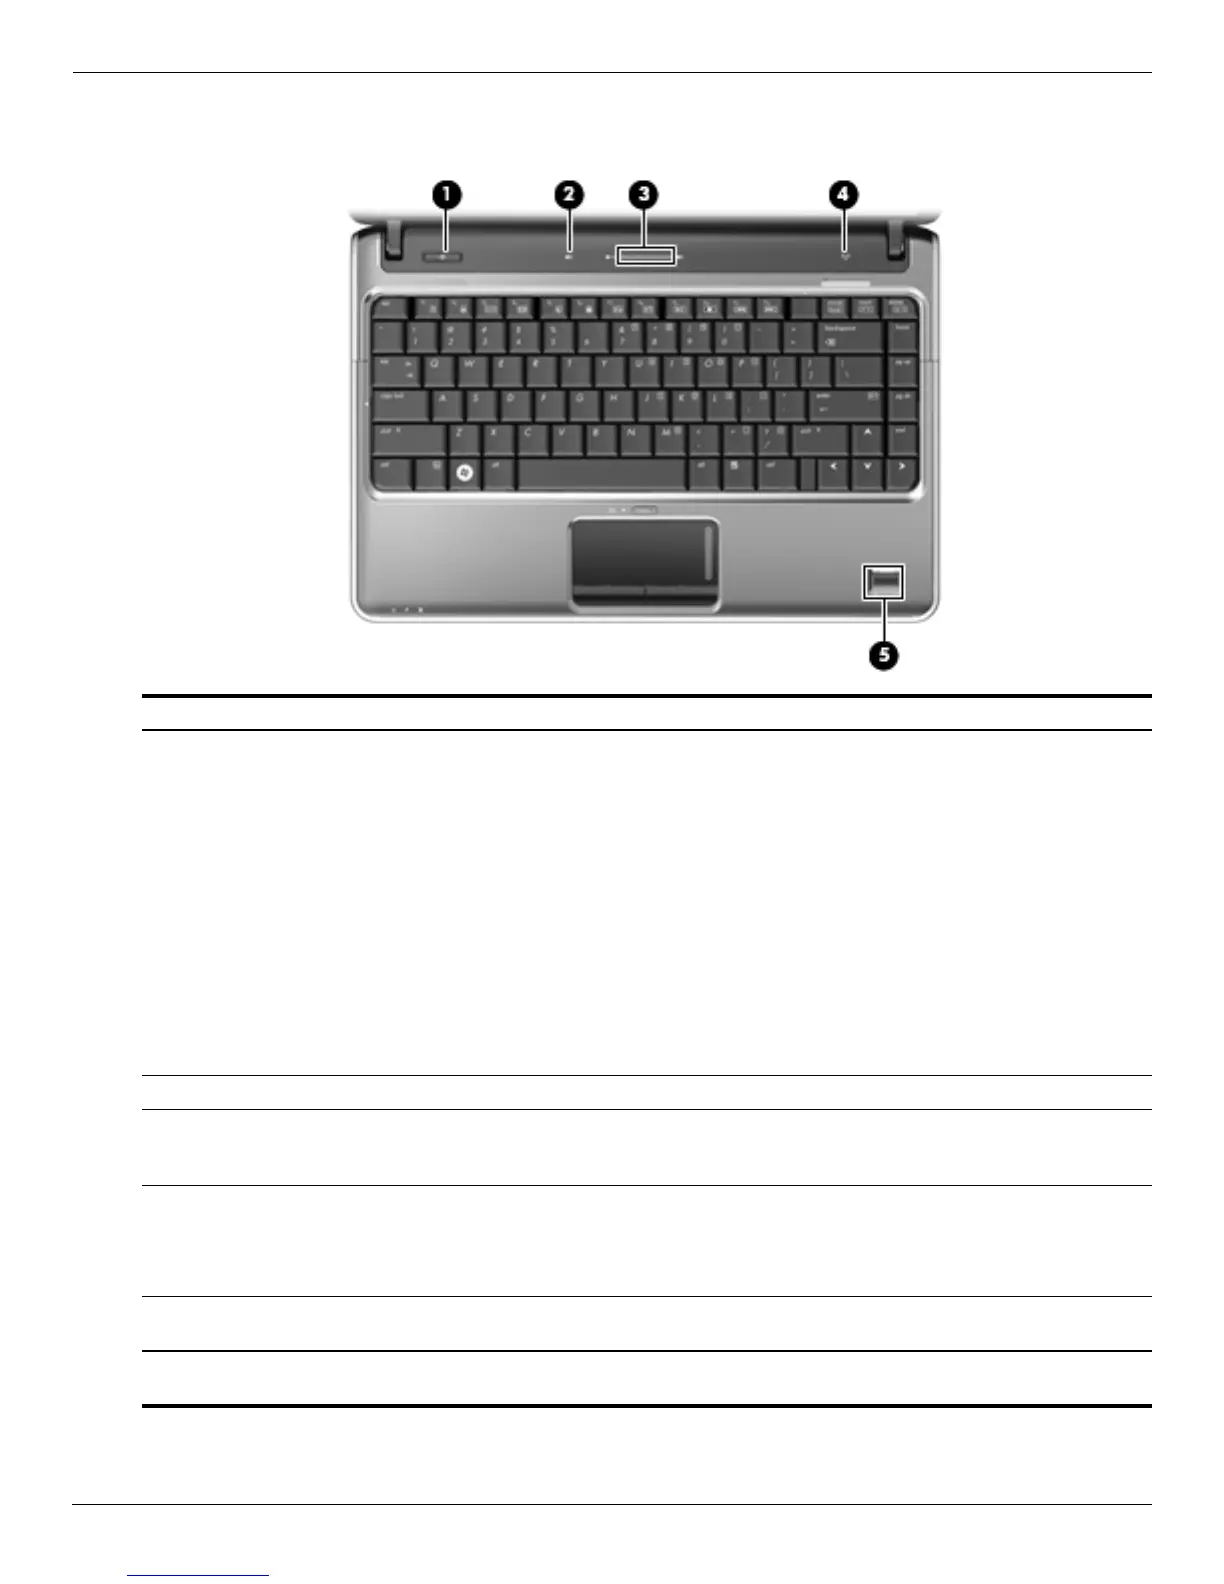
Identifies power button, volume controls, wireless button, and fingerprint reader.
Explains the function of various keys on the keyboard, including ESC, Fn, and function keys.
Describes the function of indicator lights such as Caps Lock, Power, Wireless, and Battery.
Details on the touchpad, touchpad buttons, and touchpad scroll zone.
Identifies external components located on the front of the computer.
Identifies external ports and features on the right side of the computer.
Identifies external ports and features on the left side of the computer.
Identifies external components located on the bottom of the computer.
Explains where to find the product name, serial number, part number, and warranty period.
Illustrates the main internal components of the computer for part identification.
Covers essential tools, service considerations, plastic parts, and cable handling.
Lists the necessary tools for component removal and replacement.
Provides important guidelines for handling components and preventing damage.
Precautions for handling fragile drive components to prevent damage.
Explains electrostatic discharge (ESD) and its prevention methods.
Recommends grounding equipment like wrist straps and floor mats for ESD prevention.
Details the steps for replacing individual computer components.
Information on locating and reporting the computer's serial number for service.
Instructions for replacing adhesive-backed rubber feet on the base enclosure.
Step-by-step procedure for removing and installing the computer battery.
Procedure for removing and installing the hard drive, including cover removal.
Instructions for removing and installing RAM modules, noting primary and expansion slots.
Procedure for removing and installing the Wireless LAN module.
Instructions for removing and installing the Wireless Wide Area Network module.
Procedure for removing and installing the SIM card slot board.
Instructions for removing and installing the Real-Time Clock (RTC) battery.
Procedure for removing and installing the optical drive (CD/DVD/Blu-ray).
Step-by-step guide for removing and installing the keyboard.
Procedure for removing and installing the switch cover, including the power button.
Instructions for removing and installing the speaker assembly.
Procedure for removing and installing the entire display assembly.
Instructions for removing and installing the top cover, including touchpad and cables.
Procedure for removing and installing the fingerprint reader board.
Instructions for removing and installing the LED board.
Procedure for removing and installing the Bluetooth module.
Instructions for removing and installing the audio board.
Procedure for removing and installing the USB board.
Instructions for removing and installing the power connector and cable.
Procedure for removing and installing the system board.
Instructions for removing and installing the fan and heat sink assembly.
Procedure for removing and installing the computer processor.
Explains how to access the ROM-based Setup Utility and its purpose.
Provides guidance on navigating and interacting with the Setup Utility.
Step-by-step instructions for changing the display language in the Setup Utility.
Details on using keyboard keys for navigation and selection within the utility.
Guide on how to view system details like time, date, and hardware information.
Instructions for resetting Setup Utility settings to their factory defaults.
Explains how to exit the utility with or without saving changes.
Overview of the available options and menus within the Setup Utility.
Details the options available in the Main menu of the Setup Utility.
Describes security-related settings like Administrator and Power-On passwords.
Covers settings for language, button sounds, virtualization, and power saving.
Options for running system diagnostics, such as hard disk and memory tests.
Provides physical and environmental specifications for the computer.
Details the technical specifications for the 13.4-inch display.
Details the technical specifications for the 13.3-inch display.
Lists specifications for various hard drive capacities and types.
Technical details for the Blu-ray ROM DVD±R/RW SuperMulti DL drive.
Technical details for the DVD±RW and CD-RW SuperMulti Double-Layer drive.
Details the Direct Memory Access (DMA) channels and their system functions.
Defines memory addresses and their corresponding system functions.
Lists hardware interrupts (IRQ) and their associated system functions.
Details the Input/Output (I/O) addresses and their system functions.
Specifications for Phillips PM2.0x6.0 captive screws used in the computer.
Specifications for Phillips PM3.0x4.0 screws used in the computer.
Specifications for Phillips PM2.0x4.0 screws used in the computer.
Specifications for Phillips PM2.5x3.0 screws used in the computer.
Specifications for Phillips PM2.0x8.0 screws used in the computer.
Specifications for Phillips PM2.0x3.0 screws used in the computer.
Specifications for Phillips PM2.5x6.0 screws used in the computer.
Specifications for Phillips PM2.5x4.0 screws used in the computer.
Specifications for Phillips PM2.0x6.0 screws used in the computer.
Specifications for Phillips PM2.0x7.0 captive screws used in the computer.
Overview of backup and recovery features available in Windows Vista.
General recommendations and tools for safeguarding system information.
Instructions for creating recovery discs to restore the system to factory state.
Guidance on when and how to back up important system files and data.
Explains how to create and use system restore points to revert changes.
Steps for recovering the system using recovery discs or dedicated partitions.
Detailed steps to restore the system using created recovery discs.
Procedure for system recovery using a dedicated partition on the hard drive.
Overview of backup and recovery features available in Windows 7.
Instructions for creating recovery discs for Windows 7.
Guidance on backing up system files and data in Windows 7.
Steps to create a system backup using Windows Backup and Restore feature.
Explains creating and restoring system points in Windows 7.
Pin assignment details for the microphone input jack.
Pin assignment details for the headphone output jack.
Pin assignments for the external monitor (VGA) connector.
Pin assignments for the High-Definition Multimedia Interface (HDMI) connector.
Pin assignments for the RJ-45 network connector.
Pin assignments for the USB connector.
General requirements for power cord sets applicable worldwide.
Country-specific requirements and accredited agencies for power cord sets.
Guidelines for proper disposal of computer batteries.
Information on recycling display components, including cautions about mercury.
Step-by-step instructions for disassembling the display assembly for recycling.


