10/18
8.8. Electronic interface, audible and visual
warnings
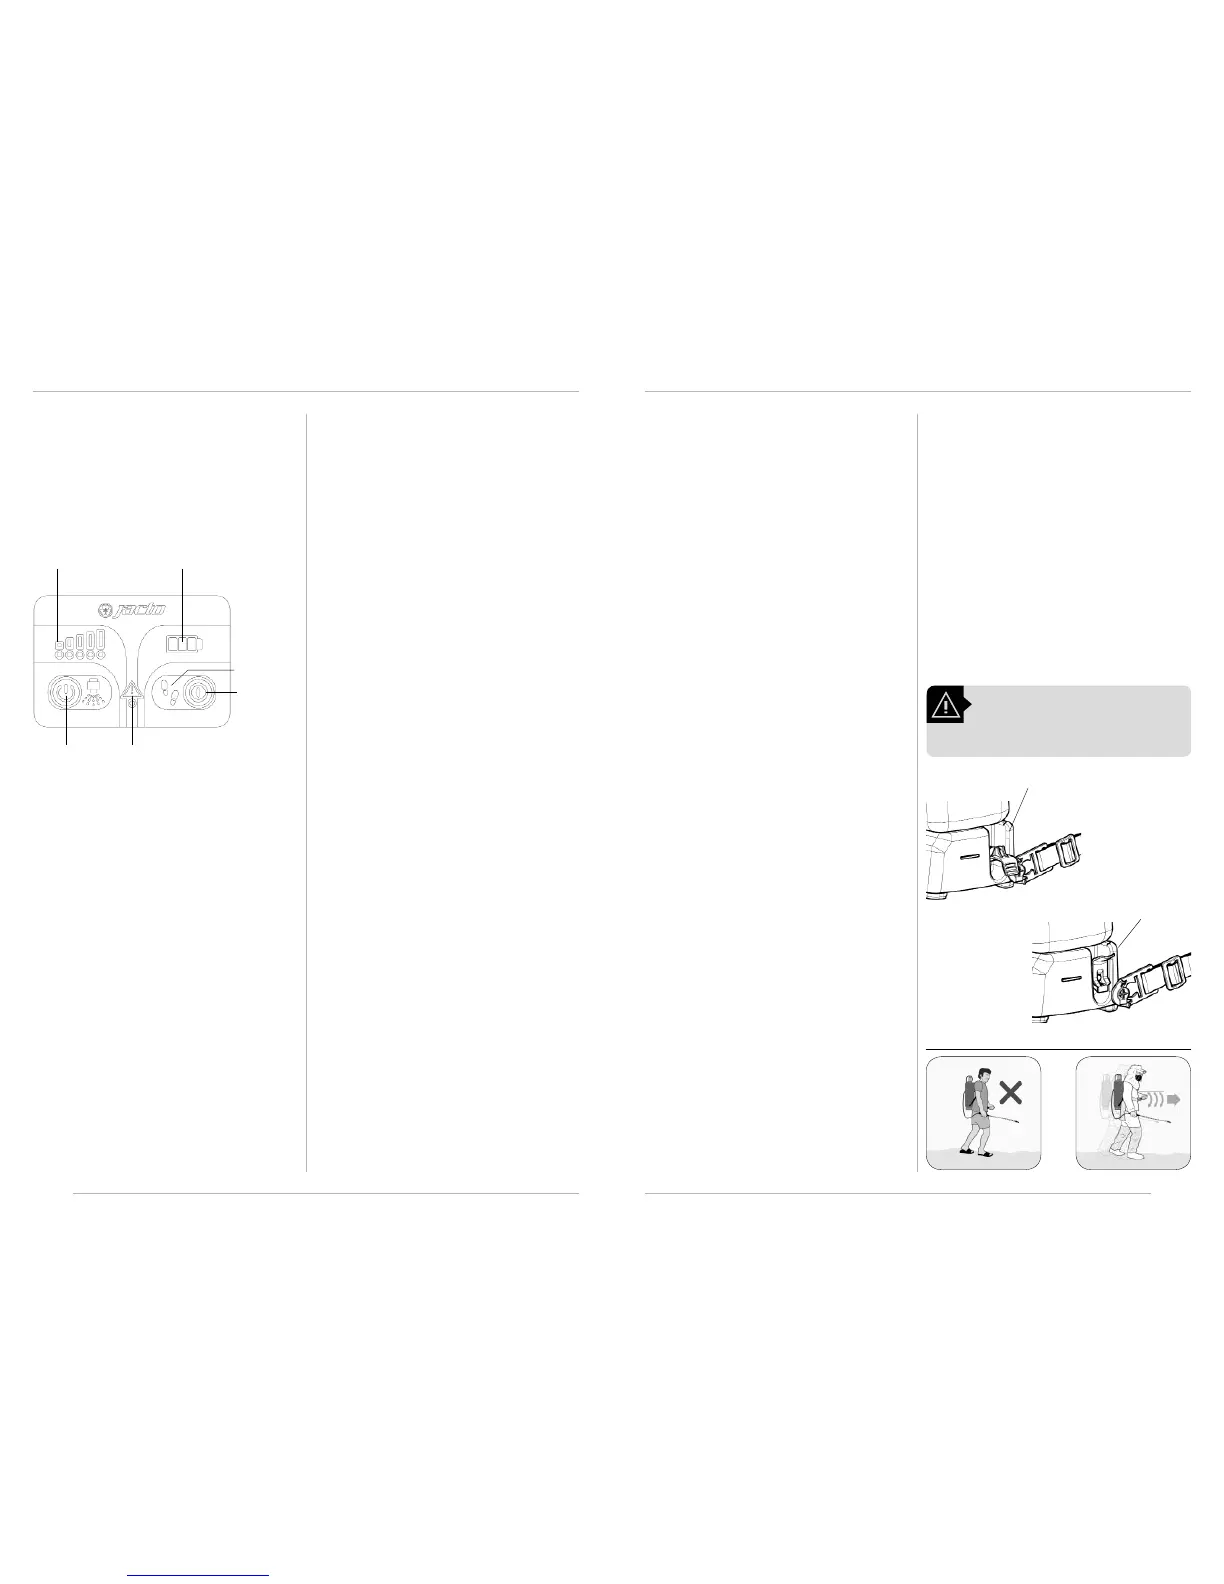
The following picture shows the electronic interface with but-
tons (green and red), pressure level indicator lights ( ve levels),
battery level indicator lights (three levels) and warning indicator
light.
The sprayer has 5 pressure levels, where the leftmost light indi-
cates the lowest pressure and rightmost light indicate the high-
est pressure. The resulting pressure at the end of the nozzle will
depend on the selected nozzle.
Warning Indicator
Red
Button
Walking
pace timer
Green Button
The battery level indicator has three levels:
• Three lights on = battery charge higher than 80%.
• Two lights on = battery charge between 80% and 50%.
• One light on = battery charge between 50% and 15%.
• All lights o = battery discharged.
The autonomy of the battery pack (number of hours of spray-
ing with a single battery charge) depends on the pressure lev-
el and selected nozzle (the higher the pressure, the lower the
autonomy). Use this indicator to estimate the battery autonomy
for your spraying condition by checking the remaining battery
charge regularly.
Pressure Level Indicator Battery Level Indicator
While operating the sprayer, the possible audible/visible warn-
ings can occur, in case a faulty condition is detected:
• Three short beeps repeated every ve seconds and warning
light is on = Pump, motor or wiring critical failure. Contact
technical assistance.
• Five short beeps repeated every thirty seconds and all battery
level indicator lights are o = Low battery (only a few minutes
left to spray), recharge as soon as possible.
• Three lights of the battery level indicator are blinking and
warning light is on = Battery overvoltage (user attempted to
connect a battery di erent from the original one). If battery
voltage is too high, electronic interface will completely shut-
o to avoid permanent damage.
8.9. Turn On/Off the sprayer and select
pressure level
To turn on the sprayer and select pressure level:
NOTE: Before starting to spray, retighten the hose clamps to
avoid contamination of the operator and of the environment.
1. Install a charged battery pack.
2. Press Green Button once. Electronic interface will turn on
showing all lights on. Then, the electronic interface will
show battery charge status and pump will turn on in the
minimum pressure level.
3. Direct the spray lance to a safe position and open the trig-
ger valve to begin spraying.
4. Press Green Button to choose di erent pressure levels.
When the maximum pressure level is reached, the pres-
sure setting will return to the minimum setting if the
Green Button is pressed again.
8.10. Activate/Deactivate pressure lock
The Pressure Lock is a feature that allows the farm manager to
lock the sprayer in a chosen pressure level. This avoids misuse
of the equipment and all users will spray with the same pressure
level thus guaranteeing better spray uniformity. Once locked,
the pressure level is not changeable when Green Button is
pressed, nor when the sprayer is turned o , nor when the bat-
tery is removed.
To activate the Pressure Lock:
1. Select the desired pressure level (1 to 5).
2. Press Green Button and hold it pressed for 10 seconds.
When Pressure Lock is activated, pressure level indicator
will blink.
NOTE: The sprayer can still be turned o by holding the Red But-
ton.
To deactivate the Pressure Lock:
1. Press the Green Button three times and then press the Red
Button once. This must be done in less than 3 seconds.
When the Pressure Lock is deactivated, pressure level in-
dicator will stop blinking.
8.11. Set up walking pace timer
To turn o the sprayer:
1. Shut o the trigger valve. The internal pump pressure
switch will automatically turn o the pump (the sprayer is
said to be in idle state). However, the electronic interface
will remain on.
2. Press the Red Button and hold it pressed for 3 seconds. All
lights in the electronic interface will be o .
3. Direct the spray lance to a safe position and open the trig-
ger valve to release pressure before storing the sprayer.
4. Remove and store the battery pack in safe place.
NOTE: If the sprayer is left in idle state for more than 10 minutes,
the electronic interface will turn o automatically.
11/18
8.12. Total labor time indicator
The Total Labor Time Indicator shows how many hours the spray-
er has been working since the rst use. The hours are only in-
cremented in the Total Labor Time Indicator when the electronic
interface is on.
To view the total labor time:
1. Turn on the electronic interface, by pressing the Green
Button once.
2. Press Green Button and Red Button together and hold
them pressed for 10 seconds.
3. The lights (the same lights used for pressure level indica-
tion) will blink according to the code below:
• No lights blinking = Total labor hour is less than 300 h.
• One light blinking = Total labor hour is more than 300 h and
less than 700 h.
• Two lights blinking = Total labor hour is more than 700 h and
less than 1000 h.
• Three lights blinking = Total labor hour is more than 1000 h
and less than 1300 h.
• Four lights blinking = Total labor hour is more than 1300 h
and less than 1600 h.
• Five lights blinking = Total labor hour is more than 1600 h.
NOTE: Press any button to return to normal operation mode. If
none of the buttons are pressed, the electronic interface will au-
tomatically exit the Total Labor Time Indicator after 15 seconds.
8.13. Activate/Deactivate agitation system
The Agitation System ensures that there is no signi cant varia-
tion between initial concentration of agrochemical (when tank is
full) and nal concentration (when tank is almost empty). This is
especially important if wettable powder agrochemicals are used.
When the agitation is activated, part of the pump’s ow will be
directed to the tank, forcing the mixture to circulate.
Basic recommendations:
• Turn on the Agitation System by moving the agitation lever
to the horizontal position, as shown in A. It is recommended
that agitation is kept on while transporting the sprayer from
the lling area to the area being sprayed. This will maintain
uniform chemical concentration until the beginning of the
application.
• Turn o the Agitation System to begin spraying by returning
the lever to the vertical position, as shown in B. This ensures
higher pressure at the end of the nozzle.
• Periodically turn on the Agitation System when spraying wet-
table powder or chemical products that easily settle out of
solution.
NOTE: Pressure in the spraying nozzle will be weaker while the
Agitation System is activated.
WARNING!
The sprayer may not work properly if this
procedure is not performed.
A
B
The Walking Pace function is a useful timer that can assist user
to calibrate the sprayer or keep a uniform walking speed while
spraying. When the Walking Pace function is activated, user will
notice an audible beep, indicating the correct moment to step
forward (as an example). The audible beeps can be used for oth-
er purposes, such as spot chemical application. In this case, the
beep can indicate the correct moment to proceed to another
plant.
To set up the Walking Pace timer:
1. Press Red Button once. An audible beep will be heard and
it corresponds to a speed of 0.62 MPH (1 km/h).
2. Press Red Button again to adjust the Walking Pace to 1.24
MPH (2 km/h).
3. Press Red Button again to adjust the Walking Pace to 1.86
MPH (3 km/h).
4. Press Red Button again to adjust the Walking Pace to 2.49
MPH (4 km/h).
5. Press Red Button again to turn-o the Walking Pace func-
tion.
8.14. Application
Wear appropriate protective clothing
 Loading...