MOTOR START NIET : Aan/uit schakelaar of stroomonderbreker is in UIT stand; Zekeringen gesprongen of thermische
overbelasting beveiliging open; Geblokkeerde motoras; Motor wikkelingendoorgebrand; Defecte startschakelaarin de motor;
Losgekoppelde of defecte bedrading.
MOTOR BEREIKT NIET VOLLE SNELHEID : Lage spanning; Motor wikkelingen aangesloten voor verkeerde spanning.
MOTOR OVERVERHIT (beveiliging schakelt uit) : Lage spanning; Motor wikkelingen aangesloten voor verkeerde spanning;
Onvoldoende ventilatie.
POMP LEVERT GEEN WATER : Pompniet gereedvoor aanzuiging; Gesloten klep inaanzuig ofafvoer leiding; Lekkage van lucht
in het aanzuig system; Schoepenwiel verstopt.
LAGE POMP CAPACITEIT : Klep in aanzuig of afvoer leiding gedeeltelijk gesloten; Aanzuig of afvoerleiding gedeeltelijk
verstopt; Aanzuig of afvoerleiding te smal; Pomp loopt op verminderde snelheid (zie boven); Verstopte mand in skimmer of
haar in pluis filter; Filter vuil; Schoepenwiel verstopt.
LAGE POMP DRUK : Pomp loopt op verminderde snelheid (zie boven); Afvoer klep of inlaat aansluitingen te wijd geopend.
HOGE POMP DRUK : Afvoerklep of inlaat aansluitingen te veel gesloten; Retour leidingen te smal; Filter vuil.
LAWAAIERIGE POMP EN MOTOR : Verstopte mand in skimmer of haar in pluis filter; Defecte motor lagers;
Klep in aanzuigleidinggedeeltelijk gesloten; Aanzuigleiding gedeeltelijkverstopt; Water stofzuigerslang verstopt of tesmall;
Pomp niet juist ondersteund.
LEKKAGE VAN WATER BIJ DE AS: As afdichting dient vervangen te worden.
BELLEN BIJ DE INLAAT AANSLUITINGEN : Lekkage van lucht in de aanzuigleiding bij verbindingen of klep steel; Deksel van
haar en pluis filter niet luchtdicht; Restrictie in aanzuig leiding; Laag water nivo in zwembad.
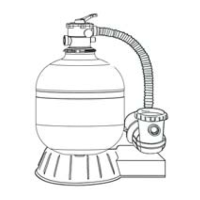
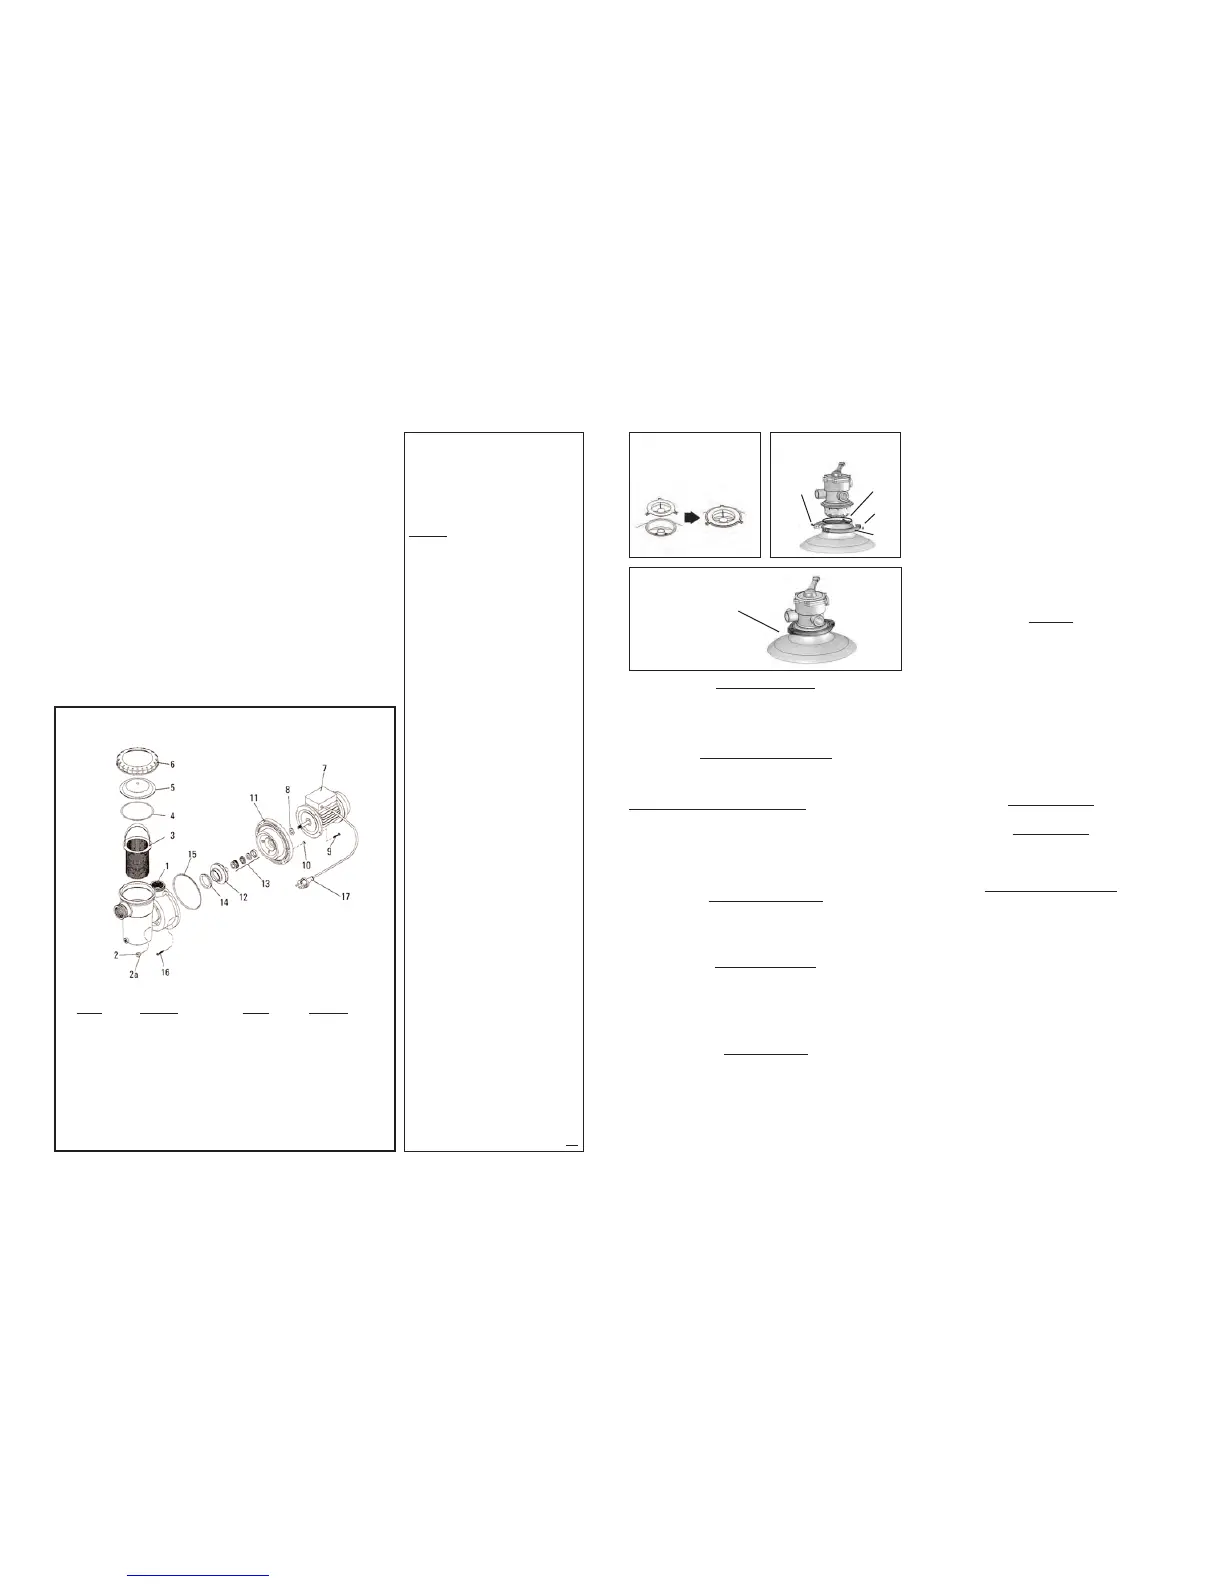
Nummer Beschrijving
1 Body filter/pomp
2 Aftapplugs (2)
2a Pakkingen aftapplugs (2)
3 Filtermandje
4 O-ring
5 Filterdeksel
6 Filter Ring-lok
7 Motor
8 Olieslingerschijf
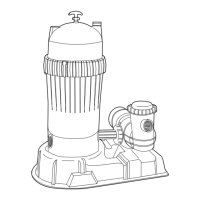
FIGUUR 1 - Componenten
Nummer
Beschrijving
9 Schroeven (4)
10 Zeskantmoeren (6)
11 Haak
12 Waaier van de water
pomp
13 Asafdichting
14 Oog afdichtring
15 Pakking
16 Schroeven (6)
17 Stroomsnoer
16
PLUMBING CONNECTIONS
The provision of gate valves and unions in the pump suction and pool return lines of a per-
manent installation will make servicing easier and prevent loss of water while routine main-
tenance is in progress. Pump Installation: Follow the instructions supplied with the pump.
Connect the pipes to the filter system as shown on page 3. Do not use pipes
smaller than the connections provided. Support the plumbing so that it puts no strain on ei-
ther the pump or the filter.
FOR SOLVENT WELD CONNECTIONS
Rigid or flexible PVC pipe can be used. Pipe ends should be clean and free of any debris
caused by the cutting operation. Besure that the proper adhesive is used on the type ofpipe
specified. Recommended Adhesives: These are examples only and are not
intended to restrict brands:
PVC-PVC Joint
PVC-ABS Joint
Uni-Weld Pool-Tite 2000 Uni-Weld Pool-Tite 2000
Suregard Flex 20 Suregard Weld-All No. 5
IPS Weld-On 705 PS Weld-On 794
Note: A primer will assure that adhesive joints are superior. Suregard P-3000 has
a purple tracer to qualify in areas where codes specify a primer must be used.
Caution: We recommend that you consider climatic conditions when applying adhesives.
Certain atmospheric situations, such as high moisture content, make the adhesive action of
certain glues less effective. Check the manufacturer’s instructions.
FOR THREADED CONNECTIONS
Use only
Teflon tape or equivalent on threaded plumbing connections. Other pipe compounds
may
damage threads. We do not recommend the useof silicone or petroleum based compounds.
DO NOT OVER-TIGHTEN: HAND-TIGHTEN PLUS 1/2 TURN IS SUFFICIENT.
FILTER PLUMBINGIf the filter isequipped withunion connections, union adaptersare needed
to complete plumbing connections and may need to be ordered separately.
ELECTRICAL INSTALLATION
CAUTION: NEVER RUN THE PUMP WITHOUT WATER IN THE PUMP CASE, because lack of
water can damage the shaft seal. Check that the information on the motor nameplate of the
filter pump corresponds to the power supply. Employ a competent electrician to make the
wiring installation in accordance with the localelectrical code. Every motorrequires a fused
disconnect switch. Install a ground fault circuit interrupter for maximum safety. In-ground
pump motors operate on either 115V or 230V single-phase power, cord connected above-
ground pump motors are suitable for 115V only. Follow the motor
manufacturer’s instructions for making the connections to the electrical supply.
START-UP PROCEDURE
After completing the preceding items and filling the pool with water, put the system into op-
eration as described below. When the filter system is below deck level, always close the
gate valves in the pump suction and pool return lines before you remove the cover from the
hair and lint strainer. Re-open the valves before you re-start the pump.
1a. Forin-ground pools. Setthe dial valve to WINTERIZE.Remove the coverfrom the hair and
lint strainer, and fill the pump with water. Refit the cover and strainer
Ring-Lok
TM
- hand tighten only - do not re-tighten strainer Ring-Lok
TM
during operation.
1b. For above-ground pools. When the water level in the pool reaches the skimmer and re-
turn fitting, the filter and pump will begin filling with water. Some air may be trapped in the
pump or filter, but will be removed when the pump is started. Removing the
pressure gauge temporarily while the filter is filling with water will also help remove any
trapped air. Replace the pressure gauge when a steady stream of water appears.
2. Set the dial valve to DRAIN position.
3. Perform pump start-up.
4. After a good flow has been established, continue pumping for one minute or until waste-
water is clear, then stop the pump.
5. Set the dial valve to BACKWASH, and start the pump. The pump should deliver a trong
stream of water as soon asit has removed the air from the suction system. Should the pump
fail to prime within two or three minutes, stop the pump and repeat steps 1 and 2.
6. After a proper flow of clean water has been established, operate the filter with the dial
valve setto DRAIN, WHIRLPOOL andRINSE forONE minute eachin that order. Stop thepump
before changing valve positions.
7. Set the dial valve back to FILTER. After the filter has operated for about 10 minutes, check
the pool return fitting for air bubbles. A continuous flow of air indicates a leak in the suction
system, which must be corrected immediately.
NORMAL FILTER OPERATION
Set the dial valve to FILTER, and start the pump.
BACKWASH
Do a backwash from the bottom drain at least once a week and every time the pressure
gage reads 0.4 to 0.55 bar above normal.
1. Stop the pump.
2. Close the valve at the pump suction. (If equipped).
3. Set the dial valve to TEST.
4. Remove the cover from the hair and lint strainer. Lift out the basket and empty it. Refit the
cover and strainer Ring-Lok
TM
- hand-tighten only - do not re-tighten strainer
Ring-Lok
TM
during operation.
5.
Re-open the valve at the pump suction and re-start the pump with the dial valve set at FILTER.
6. Once airin the system has been removed and asteady flow of water hasresumed, turn off
the pump and change the dial valve to BACKWASH.
7. Re-start the pump and backwash for about THREE minutes, or until the
backwash water is clear.
8. Stop the pump. If the dial valve is equipped with RINSE, set the dial valve to RINSE.
Re-start the pump and run for 20 seconds.
9. Stop the pump. Set the dial valve back to FILTER. Re-start the pump.
NOTE: Do not vacuum when in BACKWASH position.
VACUUMING THE POOL
LIGHT SOIL: set dial valve to FILTER. HEAVY SOIL: set dial valve to DRAIN.
DRAINING THE POOL
Use the filter pump to drain the pool, or lower the pool water level, by setting the dial valve
to DRAIN. This position allows the water to be pumped directly to waste without passing
through thetank. Use theDRAIN position foremptying the pool,and also whenusing thevac-
uum cleaner to remove heavy dirt, soil, and sand from the pool.
CLOSING DOWN AND WINTERIZING
Backwash the filter for five minutes before closing down the pool for an extended
period. Consult your pool dealer for advice on winterizing your pool and equipment
if freezing temperatures occur in your locality. Follow his recommendations, because his
knowledge of your equipment makes him the best qualified source of information.
Backwash the filter for at least thirty minutes before closing down the pool for
winterizing. This will clean the filter bed thoroughly (the original sand should last
for severalyears depending on conditions). Wherethe filter systemis unprotected from frost,
drain the tank andpump in the following manner. (Note that it is NOT sufficient to set thedial
valve toWINTERIZE, because the tankand pump will not emptyunless the drainplugs are re-
moved.)
1.Removethedraincaplocatedat thebaseofthefilter tank. Shouldthewaternotdrainreadilyfrom
thetank, dislodge any sandthatmaybe blockingthe drainhole, or blow outtheobstructionby run-
ning the pump for ashortperiod.
CAUTION: DO NOTDAMAGETHEDRAIN NOZZLE.
2. Set the dial valve to WINTERIZE. This will help the draining process by allowing air
toenter the tank.
3.Unscrew thepressure gauge from thedialvalvebyusing awrenchon the squaremetal shank.Do
notapplyforce to the case ofthegauge. Storethegauge indoorswhere itwillnotbemislaid.
4.Removethedrain plug(s) fromthepump. Takethecover offthehairandlint strainerandcheckthat
most ofthewater drains fromthe pump and strainer.
Store the pump and motor indoors, or protect them from the elements and extreme
temperatures. Haveany repairsmadeduringthe off-seasonwhen the best service isavailable- do
notleavethemuntil next season.
Iftheelectricmotor requires serviceorrepairs,takeorsendit tothemotormanufacturer’s
local serv-
ice station, as listed in the information supplied with the motor. Competition pool
accessories inc.. doesnotundertaketheservice or repair ofmotors.
FIGURE 4 - CLAMP INSTALLATION
Clamps are
completely closed
FIGURE 2 - SAND FILL COVER
ASSEMBLY
FIGURE 3 - 7 Position
Dial Valve Installation
Clamp
Screw
O-Ring
Clamp
Bolt
Clamp
3
COMPETITION POOL ACCESSORIES INC.
Beperkte garantie
Competition pool accessories Inc. (hierna “Competition”
genoemd) garandeert dat de “Competition”
zwembadproducten vrij zijn van gebreken in materiaal en
vakmanschap voor een periode van 12 maanden na de
datum van aankoop, met de volgende uitzonderingen:
Gloeilampen –Full Moon Watercolor LED-lampenhebben
een garantieperiode van 12 maanden vanaf de datum van
aankoop; gloeilampen hebben een
garantieperiode van 90 dagen vanaf de datum van
aankoop.
DDiivv..
- Filterelementen, DE roosters, witgoed, filter
manden, filter mand “klep” en “aanzuigleiding”,
manometers,vierkante ringen, o-ringen, pakkingen, en alle
vervangings onderdelen hebben een garantieperiode van
12 maanden vanaf de datum van aankoop.
VOORWAARDEN VOOR UITOEFENING VAN
DE GARANTIE :
Om deze 12 maanden garantieperiode te activeren
moeten de “Competition” producten geregistreerd zijn bij
“Competition” op één van de volgende manieren;
• De Garantie Registratiekaart via email insturen
• Online op www.competition-pool.com
Alle defecten moeten binnen 72 uur aangegeven worden
on verspreidng naar andere apparatuur te voorkomen,
waarbij bij nalating, de huidige garantie niet gehonoreerd
wordt. Deze garantie is niet overdraagbaar en is alleen
verleend aan de originele koper via de detailhandel en
alleen gedurende de tijd dat de oorspronkelijke koper via
de detailhandel het terrein bewoont waar het product
oorspronkelijk was geinstalleerd. “Competition” garantie
verplichting met betrekking tot de apparatuur die zijzelf
niet vervaardigen is gelimiteerd tot de garantie feitelijk
verleend aan “Competition” door zijn leveranciers
(d.w.z. motoren).
Deze garantie geldt alleen voor producten gebruikt in
zwembaden, spa’s, & watercultuur toepassingen en is niet
van toepassing op enig product die onderhevig is geweest
aan nalatigheid, verandering, ongelukken,
verkeerd gebruik, misbruik, onjuiste installatie,
schuurmiddelen, corrosie, onjuiste voedingsspanning,
vandalisme, civile ongeregeldheden, of overmacht (in-
clusief maar niet gelimiteerd tot schade veroorzaakt door
bevriezing, bliksem, en andere schade veroorzaakt door
catastrofale gebeurtenissen). De enige garanties geau-
toriseerd door “Competition” zijn degenen die hierin ver-
vat zijn. “Competition” geeft geen autorisatie aan andere
personen om enige garanties met betrekking tot zijn pro-
ducten te verlenen, noch zal “Competition” aansprake-
lijkheid aannemen voor enig
niet-geautoriseerde garanties gemaakt in verband met de
verkoop van zijn producten. “Competition” zal niet
verantwoordelijk zijn voor enige verklaringen die gemaakt
of gepubliceerd zijn, schriftelijk of mondeling, die misleidend
of inconsistentzijn met de feiten zoals ze gepubliceerd zijn
in de literatuur of specificaties
verschaft door “Competition”.
GARANTIE CLAIM PRODEDURE
Garantieclaims dienen gemaakt te worden door contact
op te nemen met de installateur/verkoper, bouwer,
dealer of winkelier (aankooppunt) of de "Competition"
zwembadproducten distributeur in uw streek.
Alle apparatuur moet geïnspecteerd worden door
een plaatselijke “Competition”- geautoriseerde
vertgenwoordiger of in de fabriek voordat de garantie
geautoriseerd is. Alle rekeningen of uitgaven voor
transport van en naar de fabriek, verwijdering en
herinstallatie van de producten of installatie van een
vervangend product zijn voor de verantwoordelijk van de
koper tenzij uitdrukkelijk anders schriftelijk
geautoriseerd door “Competition”. “Competition” mag
naar eigen oordeel, elk product dat gebrekkig blijkt te zijn
binnen de garantieperiode gratis repareren of vervangen
(F.O.B. fabriek in Mirabel (Québec) Canada) of het kan een
creditering doen voor het bedrag van de factuur van de
defecte apparatuur in plaats van reparatie of vervanging
ervan. “Competition” behoudt het recht om nieuwe of ver-
beterde apparatuur te vervangen op welke omruil on-
derdelen dan ook .
REV-2
 Loading...