Das Bombas de Série CLREN
Instalação, operação
ESTE MANUAL DEVE SER LIDO ANTES DE PROCEDER À INSTALAÇÃO DA BOMBA
E DEVE DEIXÁ-LO COM O UTENTE DO EQUIPAMENTO.
RENDIMENTO DA BOMBA
Modelo Capacidade Máxima : Pressão Máxima : Potência :
da bomba:
(m
3
/h) (m) (W)
C3LREN-S2 12 11 375
C5LREN-S2 13 12 450
C7LREN-5-S2 13 12 450
C7LREN-S2 17 12 600
C1LREN-5-S2 13 12 550
C1LREN-7-S2 17 12 600
C1LREN-S2 19 14 900
C15LREN-7-S2 17 12 600
C15LREN-1-S2 20 14 1000
REQUISITOS IMPORTANTES PARA A INSTALAÇÃO
• Instale a bomba dentro de uma área não inundável.
• Utilize parafusos para fixar a bomba à sua superfície de suporte.
• A instalação deve ser feita para fornecer um fácil acesso à caixa de conexão.
• A instalação elétrica deve ser feita por um eletricista habilitado.
• A bomba CLREN possui cabo para fonte de alimentação de 3m e tomada. Conecte a
tomada a um receptáculo ligado à terra protegido por um interruptor automático do
circuito de fuga a terra com um disjuntor de corrente nominal até 30 mA.
• A tampa da caixa de terminal deve estar apropriadamente fechada e hermética.
NÃO UTILIZAR CABO DE EXTENSÃO.
Advertência: Para prevenir feridas, se o cabo elétrico de alimentação estiver danado,
deve ser trocado por parte do fabricante, do técnico do serviço pós-venda ou qualquer
outra pessoa qualificada. Faça um controle anual do cabo. Fonte de alimentação para
todas as bombas CLREN: 1~, 230V, 50Hz
GERAL
Este produto foi cuidadosamente inspecionado e embalado em nossa fábrica.
Devido a que a empresa transportadora assumiu a plena responsabilidade pela chegada
segura do produto, qualquer reivindicação por dano na carga, seja visível ou oculto,
deve ser feita à empresa transportadora. Esta é uma bomba auto-escorvante, o que
significa que ela pode elevar água através de uma linha de sucção seca dispensando a
utilização de válvulas, e possibilitando que a caixa da bomba e o filtro estejam cheios de
água antes de ligar o motor. Contudo, recomendamos a utilização de uma válvula de
controle do balanceio dentro do cano de sucção, no ou sob o nível de água, se a ele-
vação da sucção for superior a 1,5 m ou se a linha de sucção seca for superior a 3,05 m
d e
extensão. Esta providência faz mais fácil o escorvamento inicial, e manterá o cano de
sucção escorvado em todo momento.
INSTALAÇÃO
ADVERTÊNCIA : Podem ser necessários requisitos especiais de instalação para
instalar a bomba numa piscina ou tanque. Pergunte a suas autoridades locais. A instalação
deve atender os códigos locais.
LOCAL : A bomba deve ser instalada segundo os padrões e instruções vigentes no seu
país ou município, preferentemente numa área seca, sombreada, e bem ventilada. Em
caso de dúvidas, contate o seu vendedor. Instale a bomba no ou sob o nível da coberta.
Se isso não for possível, escolha a mais baixa elevação possível, mas assegure-se de
que a bomba não esteja exposta a nenhuma provável inundação. Isso simplifica o escor-
vamento, e aumenta a pressão desenvolvida pela bomba. Prepare uma superfície dura e
plana que seja suficientemente grande para acomodar a bomba e seu equipamento.
Tenha em mente o seguinte: a Drenagem do compartimento do filtro ou fosso; a Venti-
lação do motor; o Acesso para manutenção e preparação do equipamento para o in-
verno; e a
Proteção do equipamento contra a intempérie.
CONEXÕES DE ENCANAMENTO : As conexões da bomba têm roscas de 1-1/2" NPT
fêmeas. Mantenha o encanamento da forma mais simples possível e mantenha a maior
parte do cano de sucção o mais embaixo possível do nível de água da piscina, já que
isso reduzirá o tempo de escorvamento. Coloque o cano de maneira que suba
continuamente em direção à bomba para prevenir áreas altas que possam formar bolsos
de ar. Para um serviço conveniente do equipamento, instale válvulas de fechamento no
sistema de sucção da bomba e junte as linhas de retorno perto do sistema da bomba.
Recomenda-se essas válvulas se o equipamento for instalado embaixo da coberta.
Mantenha a válvula de fechamento totalmente aberta dentro da linha de sucção durante
a operação. Durante a instalação tome cuidado de manter os canos limpos e
assegure-se de que o sistema de sucção seja absolutamente hermético. Utilizar Somente
fita de Teflon na conexão dos canos à bomba.
CONEXÕES ELÉTRICAS : Controle que a informação na placa de identificação do motor
elétrico corresponda à fonte de alimentação. Solicite os serviços de um eletricista
competente para fazer a instalação elétrica. Instale um switch de fácil acesso para ligar
e desligar a bomba. As bombas CLREN possuem um cabo de energia de 3m ligado à
terra e deve ser conectado a um receptáculo ligado à terra protegido por um interruptor
automático do circuito de fuga a terra com um disjuntor de corrente nominal de até 30 mA.
A cobertura do fio não deve ser mais leve do que um fio flexível com cobertura de
borracha apresentando o símbolo HO5RN-F.
Pressão acústica inferior a 70dB(A).
NÃO UTILIZAR CABO DE EXTENSÃO! PROTEJA O CABO CONTRA O MAU USO, MAS
EVITE ENTERRÁ-LO.
OPERAÇÃO
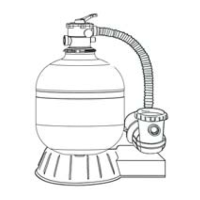
Nota: os números entre parênteses referem o número chave na Figura 1.
POSTA EM MARCHA: Se a bomba for provista como parte de um sistema de filtros
completo, siga o procedimento de posta em marcha descrito nas instruções separadas
para o sistema de filtros completo. Nos outros casos, proceda como a seguir:
1. Fechar as válvulas de fechamento nas linhas de sucção e retorno. Remover a tampa
do filtro (5) de cabelo e fios e encher a bomba completamente com água. Substituir a
tampa.
ADVERTÊNCIA : Não sobre aperte o ANEL-LOKTM (6) do filtro; aperte apenas manualmente.
NUNCA LIGUE A BOMBA SE ELA NÃO TIVER ÁGUA, já que a falta de água pode danar
o selo do eixo. ENCHER A BOMBA COM ÁGUA ANTES DA POSTA EM MARCHA.
2. Abrir as válvulas de fechamento nas linhas de sucção e de retorno. Se a bomba falhar
em produzir um fluxo completo de água dentro dos quatro ou cinco minutos, desligue a
bomba e repita o Passo 1. Se a bomba continuar falhando, verifique os escapes de ar na
tampa do filtro (5), nas conexões da linha de sucção, e nas glândulas do tubo da bomba
antes de repetir o Passo 1.
ADVERTÊNCIA : NÃO OPERE A BOMBA COM A SUCÇÃO FECHADA NEM COM AS
VÁLVULAS DESCARREGADAS.
3. Após operar durante dez minutos, verifique se os acessórios do retorno da piscina
tiverem bolhas de ar. O fluxo contínuo de ar indica escapes na linha de sucção. Localize
e corrija quaisquer escapes imediatamente.
ADVERTÊNCIA : NÃO RE-APERTE O ANEL-LOKTM (6) DO FILTRO DURANTE A OPERAÇÃO.
CONTROLE DO RENDIMENTO: Mantenha a válvula de fechamento dentro da linha de
sucção totalmente aberta durante a operação. Se for necessário controlar o rendimento,
utilize a válvula dentro da linha de retorno.
LIMPEZA DO FILTRO DE CABELO E FIOS : Desligue a bomba. Feche as válvulas nas
linhas de sucção e de retorno. Desaparafuse o ANEL-LOKTM (6) do filtro ao contrário
dos ponteiros do relógio e retire a tampa do filtro (5) de cabelo e fios, levante o cesto do
filtro (3) e retire-o. Limpe e re coloque o cesto. Cuide-se de colocar o cesto apropriada-
mente. Limpe o Anel O-ring (4) e os assentos do Anel O-ring na tampa e no filtro. Opere
novamente a bomba.
DRENAGEM : Retire as duas tampas de dreno (2). Verifique que as válvulas dentro das lin-
has de sucção e de retorno estejam abertas para permitir a drenagem completo da
bomba. Podem necessitar-se outras condições para o drenagem
das linhas do filtro, do aquecedor e do cano.
Durante os períodos em que a bomba não estiver em uso, e
sempre durante a manutenção, desligue o interruptor e puxe a tomada do receptáculo.
DIAGNÓSTICO
PARA MANUTENÇÃO E DIAGNÓSTICO DA BOMBA, CONTATE SEU REVENDEDOR LOCAL.
O MOTOR NÃO LIGA: interruptor desligado ou disjuntor na posição DESLIGADO; Fusíveis
fundidos ou sobrecarga térmica aberta; Eixo do motor travado; Enrolamentos do motor
queimados; interruptor dentro do motor defeituoso; instalação elétrica defeituosa ou
desligada.
O MOTOR NÃO ATINGE A VELOCIDADE MÁXIMA : Voltagem baixa; Enrolamentos do
motor ligados a voltagem errada.
13
Vide a lista dos nossos distribuidores europeus:
http://www.competition-pool.com/distribution
ADVERTÊNCIA!
Channels low; Backwashing cycle too short; Backwash adapter in wrong location; Chan-
nels in sand.
FILTER LEAKS: Tank cracked; Drain plug not tight; Valve/tank O-Ring damaged.
DIAL VALVE LEAKS: Handle not properly engaged; Valve/tank O-Ring damaged; Valve cover
O-Ring damaged; Pressure gauge needs sealant.
ABNORMAL LOSS OF POOL WATER: Leak inside dial valve; Leakage from pool or piping.
HIGH PRESSURE IN FILTER: Dirty filter; Backwash adapter installed in return; Calcified sand
bed; Return lines too small.
LOW PRESSURE IN FILTER: Dial valve incorrectly set; Pump running too slow (plugged); Air
leakage into pump suction.
NOTE: If the recommendations in this manual do not solve your particular problem(s), please
contact your local dealer for service.
WATER CHEMISTRY
A proper and consistent use of chemicals is necessary to maintain clean, sanitary water, pre-
vent a spread of germ infection and control the growth of algae which can spoil the appear-
ance and enjoyment of your pool or spa. Chlorine is the most commonly used chemical to
provide clean, sanitary water. Either dry or liquid chlorine can be used which
should be added
daily as it is dissipated by dirt and germs as well as by the sun and the wind.
It is also important that the correct level of acidity or alkalinity of the pool water be
maintained. This is the pH of your pool with pH 7.0 being neutral. Readings above pH 7.0 are
alkaline and readings below are acid. A desirable range is 7.2 to 7.4. Consult your local
pool/spa dealer for complete information on the proper application and use of chemicals.
FILTER MAINTENANCE
Filter tank and contents should not require attention other than backwashing,
provided water is kept in continuous chemical balance without heavy dosages of
corrosive chemicals.
SERVICE AND REPAIR PARTS
Refer all service to your local dealer as his knowledge of your equipment makes him
the best qualified source of information. Order all repair parts through your dealer.
Give the following information when ordering repair parts: Unit nameplate date and descrip-
tion of part.
ELECTRICAL CONNECTION
Check that the information on the name plate of the electric motor corresponds to the power
supply. Employ a competent electrician to install the wiring. Install an easily accessible on/off
switch to turn the pump on and off. CLREN pumps are complete with
a 3m grounded power cord and must be connected to a grounded receptacle protected by
an earth-leakage circuit breaker with a rated trip current not exceeding 30mA.
The electrical plug must be easily accessible after installation of the pump.
For pump operation and servicing, see the pump manual.
IMPORTANT: This product has been carefully inspected and packed at our factory. As the
carrier has assumed full responsibility for its safe arrival, any claim for damage to
the shipment, either visible or concealed, must be made on the carrier. Check that the equip-
ment is correct for the particular installation.
The pump is supplied with a 3m power supply cord and plug. Connect the plug to
a grounded receptacle protected by an earth-leakage circuit breaker with a rated trip current
not exceeding 30mA. DO NOT USE AN EXTENSION CORD.
Caution: If the cord is damaged or appears to be damaged, replace it immediately with
the same type of cord which is available from your local dealer.
The new cord must be installed by a qualified electrician. Inspect the cord annually.
Power supply: 1~, 230V, 50Hz
6
COMPETITION POOL ACCESSORIES INC.
Limited Warranty
Competition pool accessories Inc. (“Competition”)
warrants “Competition” pool products to be free of defects in
material and workmanship for a period of 12 months from
the date of purchase with the following exceptions:
Light Bulbs
– Full Moon Watercolor LED light bulbs
are warranted for 12 months from the date of purchase; in-
candescent bulbs are warranted for 90 days from the date of
purchase.
Misc.
- Filter elements, DE grids, white-goods, strainer
baskets, strainer basket “flap” and “priming tube”,
pressure gauges, square rings, o-rings, gaskets, and all re-
placement parts are warranted for 12 months from the date
of purchase.
CONDITIONS IN ORDER TO EXERCISE
THE WARRANTY:
In order to activate this 12 month warranty, “Competition”
products must be registered with “Competition” by either of
the following methods:
• Mail-in the Warranty Registration Card
• Online at www.competition-pool.com
All defects must be denounced within 72 hours in order to
avoid the spreading to other equipment, failing which, the
present warranty will not be honoured. This warranty is non
transferable and extends only to the original retail buyer and
only during the time in which the original retail buyer occu-
pies the site where the product was originally installed.
“Competition” warranty obligation with regard to equipment
which it does not itself manufacture is limited to the warranty
actually extended to “Competition” by its
suppliers (i.e. motors).
This warranty applies to products used in swimming pools,
spas, & aquaculture applications only and does not apply to
any product which has been subjected to negligence,
alteration, accident, abuse, misuse, improper installation,
abrasives, corrosion, improper voltage supply, vandalism,
civil disturbances, or acts of God (including but not limited to
damage caused by freezing, lightning strikes, and other dam-
age caused by catastrophic events). The only
warranties authorized by “Competition” are those set forth
herein. “Competition” does not authorize other persons to
extend any warranties with respect to its products, nor will
“Competition” assume liability for any unauthorized
warranties made in connection with the sale of its products.
“Competition” will not be responsible for any statements that
are made or published, written or oral, which are
misleading or inconsistent with the facts as published in the
literature or specifications furnished by “Competition”.
WARRANTY CLAIM PROCEDURE
Warranty claims shall be made by contacting the in-
staller/seller, builder, dealer, or retailer (point of purchase) or
the “Competition” pool products distributor in your area. All
equipment must be inspected by a local “Competition” au-
thorized representative or at the factory before warranty is
authorized. All charges or expenses for freight to and from
the factory, removal and reinstallation of the products, or in-
stallation of a replacement product are the
responsibility of the purchaser unless otherwise expressly
authorized in writing by “Competition”. “Competition”, at
its discretion, may repair or replace free of charge
(F.O.B. factory in Mirabel, Québec, Canada) any product that
proves defective within the warranty period, or it may issue
credit in the amount of the invoice of the defective
equipment in lieu of its repair or replacement.“Competition”
reserves its right to substitute new or improved equipment
on any replacements.
REV-2
 Loading...