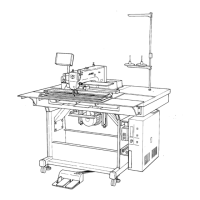
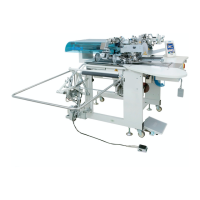
– 34 –
3. Adjustment of concentricity between welting patch scale and needle
center
(1) After the fixing screw has been loosened, let the entire binder
deflect in the direction of the arrow to secure the concentricity of the
needle center. After concentricity adjustments, tighten the fixing
screw assuredly.
(Caution) This adjustment is also needed when the parallelism is
adjusted between the welting patch scale and the
clamp feet.
4. Adjustment of binder levelness
Similarly as for adjustments of fall position and concentricity, adjust
and confirm the horizontality (also horizontality of the welting patch
scale and the sewing table ).
(1) Similarly as for the adjustment of the fall position, manually lower
the binder .
(2) Assume the conditions such that the distance becomes 1mm between
the lower face of the welting patch scale and the upper face of
the sewing table at the bottom end, and that horizontality can be
secured.
(However, the difference between front and rear ends of the welting
patch scale shall be 0.3mm or less.)
(3) For horizontality adjustment, loosen the fixing screw of the binder
mounting base and deflect the entire binding in the direction of
the arrow, around the center of the binder pivot shaft , in order to
secure the horizontality.
After the adjustment of horizontality, tighten the fixing screw
securely.
(4) For the adjustment of clearance (1mm) between the lower face of
the welting patch scale and the upper face of the sewing table ,
try to turn the cylinder sahft as illustrated.
Loosen the lock nut and turn the cylinder shaft in the direction
of tightening the shaft onto the cylinder joint to let the welting patch
scale rise or in the direction of loosening the shaft to let the scale
fall.
When a clearance of 1mm has been secured, tighten the lock nut
assuredly.
5. Adjustment of materials guide
The material guide allows a welting patch to become stable at
the edge of the needle during sewing.
When the stitch size is changed, readjustments are always needed.
(1) Loosen the fixing screw of the material guide arm and move
the arm to the side of the needle.
The clearance between the side face of the needle shank section
and that of the material guide shall be 0.1 to 0.6mm.
(2) At that time, the material guide spring shall be effective such that
the material guide arm is lightly pressed and there is no
unreasonable resistance at the time of material passing.
The pressing pressure of the material guide spring can be adjusted
by the screw .
(3) The clearance between the material guide and the welting patch
scale shall be kept around 0.5 to 1.0mm (welt cloth thickness).
It can be adjusted by means of the screw after loosening the lock
nut .
After adjustments, tighten the lock nut securely.
Adjustment Procedures Results of Improper Adjustment
 Loading...