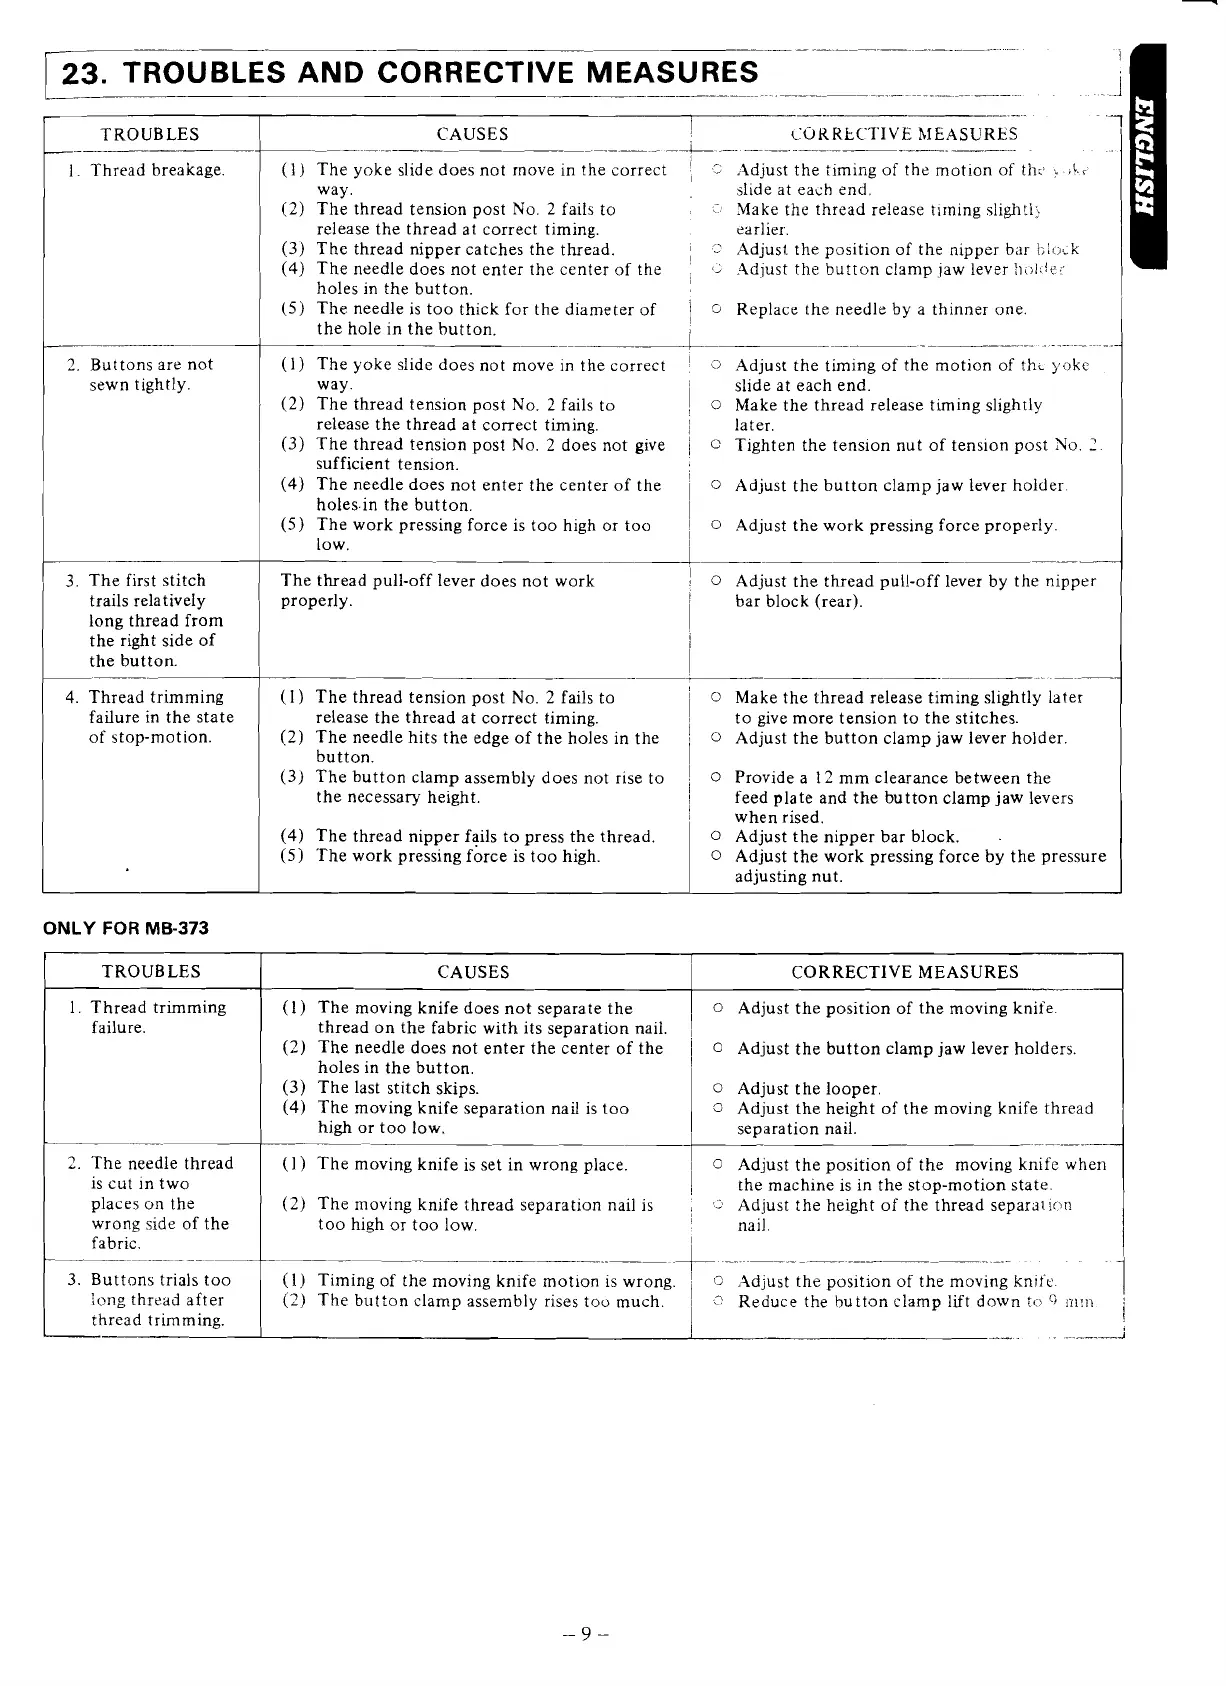
TROUBLES
1
1
Thread breakage
2.
Buttons are not
sewn tightly.
CAUSES
I
COKKtCTIVE hIEASURES
--&
~~
(1) The yoke slide does not rnove in the correct
:
'2
Adjust the timing of the motion of
tilt;
:
,\.c
way. slide at each end.
(2) The thread tension post No. 2 fails to
L-,
Make the thread release timing slightl:
release the thread at correct timing. earlier.
(3)
The thread nipper catches the thread.
I
2
Adjust the position of the nipper b;lr
i:ll.;;k
(2
Adjust the button clamp jaw lever
:~,>i:!i;t.
(4) The needle does not enter the center of the
!
'1
holes in the button.
(5)
The needle is too thick for the diameter of
j
'3
Replace the needle by a thinner one.
the hole in the button.
I
i
(1) The yoke slide does not move in the correct
3
Adjust the timing of the motion of th~
yoke
way. slide at each end.
(2)
The thread tension post No.
2
fails to
!
0
Make the thread release timing slightly
release the thread at correct timing.
I
later.
(3) The thread tension post No. 2 does not give
/
Tighten the tension nut of tension post No.
7.
sufficient tension.
i
(4)
The needle does not enter the center of the
0
Adjust the button clamp jaw lever holder
holesin the button.
(5) The work pressing force is too high or too
0
Adjust the work pressing force properly.
low.
I
3.
The first stitch The thread pull-off lever does not work
trails relatively properly.
long thread from
the right side of
-
4. Thread trimming
failure in the state
of stop-motion.
ONLY
FOR
MB-373
(1) The thread tension post No. 2 fails to
release the thread at correct timing.
(2) The needle hits the edge of the holes in the
button.
(3)
The button clamp assembly does not rise to
the necessary height.
(4) The thread nipper fails to press the thread.
(5) The work pressing force is too high.
0
Adjust the thread pull-off lever by the nipper
bar block (rear).
~~-~p~.--~
-
--
I
0
Make the thread release timing slightly later
to give more tension to the stitches.
0
Adjust the button clamp jaw lever holder.
0
Provide a
12
mm clearance between the
feed plate and the button clamp jaw levers
when rised.
0
Adjust the nipper bar block.
.
0
Adjust the work pressing force by the pressure
adjusting nut.
[
TROUBLES
1
1. Thread trimming
failure.
2.
The needle thread
is cut
In two
places on the
wrong side of the
fabric.
-
-
-
--
CAUSES
(1) The moving knife does not separate the
thread on the fabric with its separation nail.
(2) The needle does not enter the center of the
holes in the button.
(3)
The last stitch skips.
(4) The moving knife separation nail is too
high or too low.
-
-
CORRECTIVE MEASURES
0
Adjust the position of the moving knife.
0
Adjust the button clamp jaw lever holders.
0
Adjust the looper.
Adjust the height of the moving knife thread
separation nail.
(I)
The moving knife is set in wrong place.
1
0
Adjust the position of the moving knife when
1
the machine is in the stop-motion state.
(2) The moving knife thread separation nail is
,.,
Adjust the height of the thread separa1~wn
too high or too low.
I
nail.
3. Buttons trials too
Icng
thread after
thread trimming.
L
(1)
Timing of the moving knife motion is wrong.
1
(3
Adjust the position of the moving knife.
I
(2)
The button clamp assembly rises too much.
/
-?
Reduce the button clamp lift down
tr:>
%ill:i?
1
...
-.
. .
---J
!

 Loading...