Do you have a question about the JVC Everio R and is the answer not in the manual?
| Optical Zoom | 40x |
|---|---|
| Digital Zoom | 200x |
| Image Sensor | 1/5.8-inch CMOS |
| Touchscreen | No |
| Still Image Format | JPEG |
| Battery Type | Lithium-Ion |
| Memory Card Slot | Yes |
| Recording Media | SD/SDHC |
| Interface | USB |
Lists and describes all accessories included with the camcorder, with illustrations.
Instructions for turning the unit on and off by opening/closing the LCD monitor.
Detailed steps and precautions for charging the camcorder's internal battery.
Procedure to reset the unit using the reset button in case of malfunction.
Details the unit's waterproof, dust-proof, drop-proof, and freeze-proof capabilities.
Important precautions for using the camcorder underwater or in cold environments.
Instructions for cleaning after use and general safety cautions.
Guidance on grip adjustment, attaching the lens cap, and core filter.
Instructions for inserting, removing, and types of usable SD cards.
Explanation of how to use the touch screen and lock it for underwater use.
Steps to calibrate the touch screen for accurate input recognition.
Identifies buttons and indicators on video recording and playback screens.
Identifies buttons and indicators on still image and index screens.
Illustrates the menu structure for different operating modes.
Guide to setting the date, time, and time zone for accurate recording.
Steps to change the language displayed on the camcorder's screen.
Proper grip technique and instructions for mounting on a tripod.
Information on using the unit abroad and setting local time.
How to set daylight saving time and information on optional accessories.
Guide to using Intelligent Auto for automatic recording settings.
Explanation of icons and indicators shown during video recording.
Details on Intelligent Auto scene modes and video operation buttons.
How to use Silent Mode and useful settings for recording.
How to capture still images while recording a video.
Guide to capturing still images using the Intelligent Auto mode.
Explanation of icons and indicators shown during still image recording.
How to adjust the angle of view using optical and digital zoom.
How to store and recall specific zoom positions.
Guide to using manual settings when Auto mode is insufficient.
Steps to manually adjust focus for sharp images.
How to adjust the monitor's brightness level.
Corrects images appearing too dark due to backlight.
Adjusts color tone to match the light source for accurate colors.
How to take close-up shots using the tele macro function.
Procedures for setting white balance and locking screen for underwater shooting.
How to add and record various visual effects to images.
Records images with a grainy, black and white photo feel.
Captures appetizing food images with enhanced warm colors.
Records soft, gentle images ideal for capturing babies.
Adjusts focus and brightness based on tapped subject position.
How to use the image stabilizer to reduce camera shake.
Records scenes that change slowly by capturing frames at intervals.
Options for setting intervals and parameters for time-lapse recording.
Displays a still image in a sub screen while recording video.
How to use the self-timer for group shots or to prevent camera shake.
Steps to use the self-timer for capturing still images.
Automatically plays back scenes after recording for repeated checking.
How to record videos with date and time displayed on footage.
How to record videos with an integrated stopwatch counter.
How to check remaining battery power and recording time.
Tables for approximate recording times and battery duration.
Overview of different video playback types available.
Steps for playing back recorded videos in standard mode.
Identifies and explains controls for video playback screens.
How to control the audio volume during video playback.
How to view recording details like date, time, and quality.
How to display and reset a time counter during playback.
Plays back a digest of recorded videos for quick content review.
How to play back videos with damaged management information.
Steps for selecting and playing back still images from an index.
Identifies and explains controls for still image playback.
How to play still images in slideshow and connect to TV.
Steps for connecting to a TV via HDMI for HD playback.
Linked operations via HDMI and connecting using the AV connector.
How to delete unwanted files from the recording media.
How to protect files from accidental deletion.
How to protect or unprotect multiple selected files.
How to capture still images from scenes in recorded videos.
How to combine videos recorded on separate media into one.
How to select and save a specific part of a video as a new file.
How to dub videos to a disc by connecting to a Blu-ray recorder.
How to copy videos and images from built-in memory to an SD card.
How to copy files to a computer using the provided software.
Checks PC requirements for using the bundled software.
Guide to installing the bundled software onto a computer.
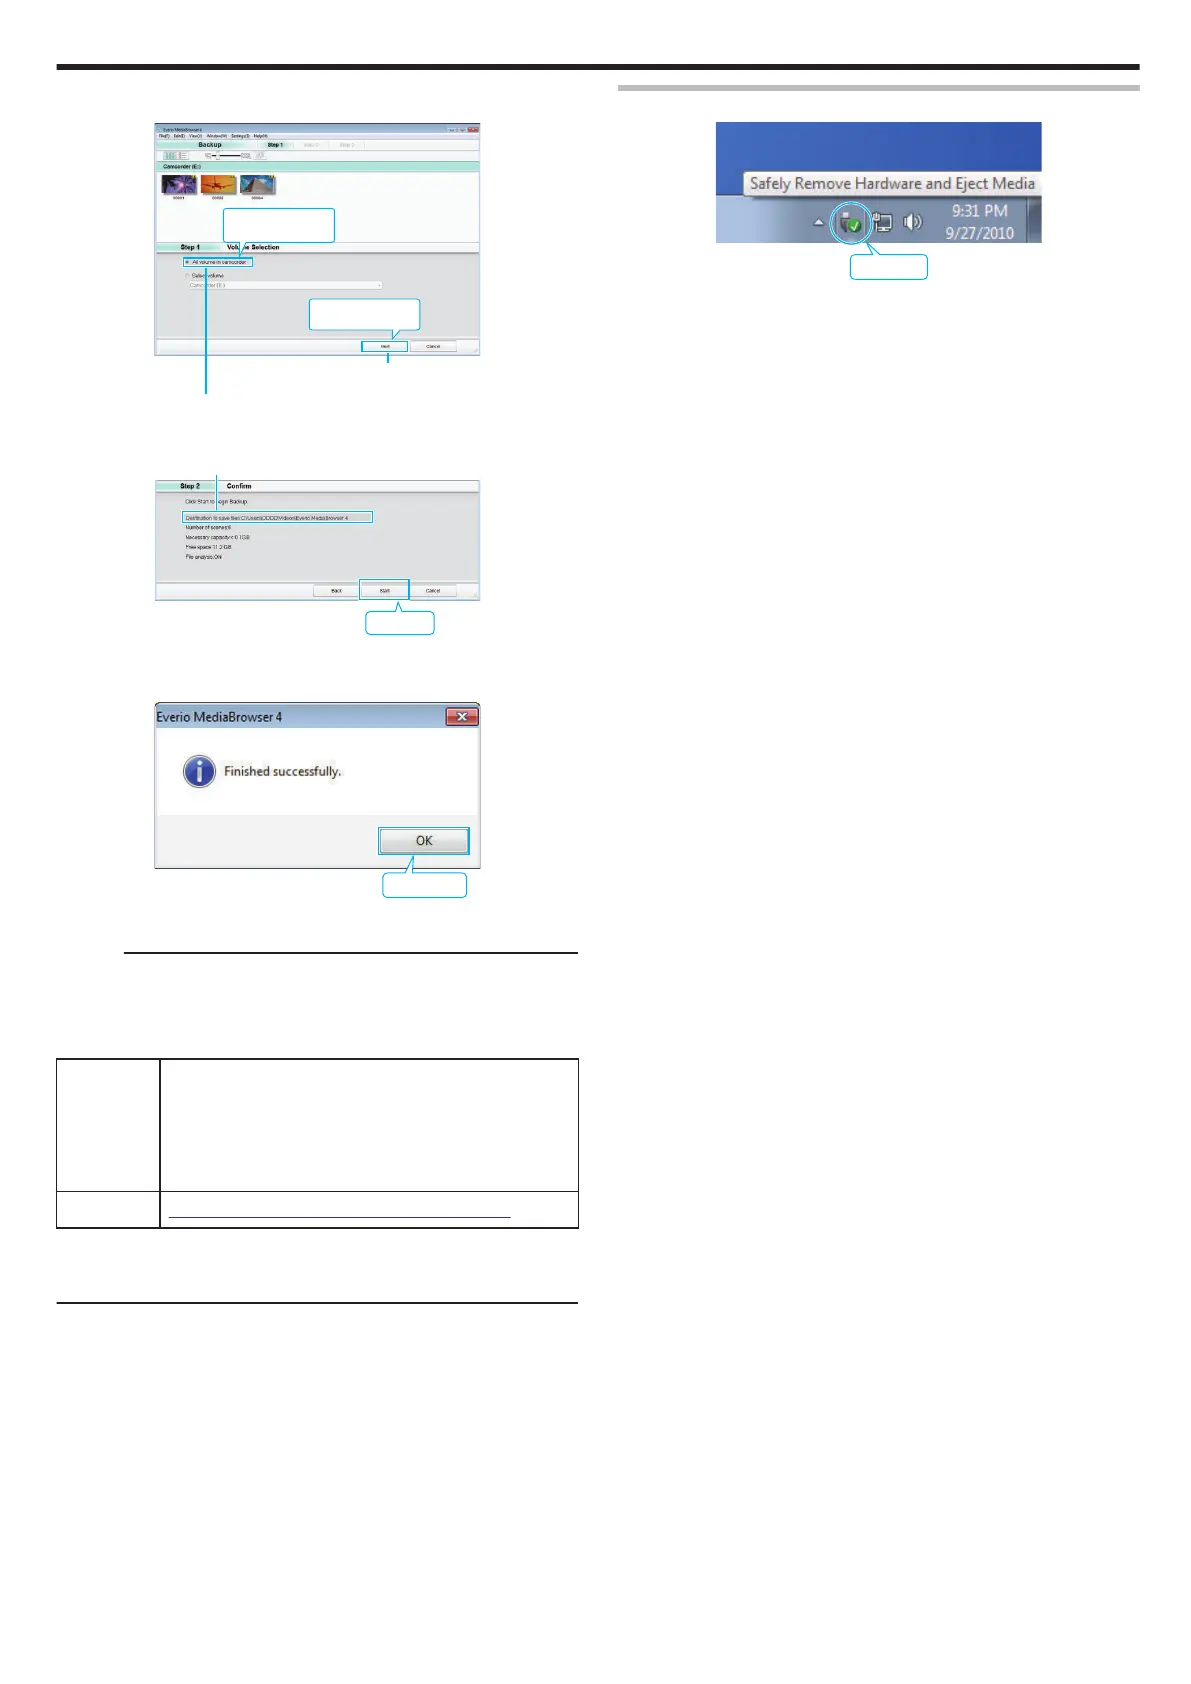
How to back up all recorded files from the unit to a computer.
Safe procedure for disconnecting the unit from the computer.
How to organize backed-up files using labels and user lists.
How to copy recorded videos to discs using the provided software.
How to copy files to a computer without installing additional software.
Shows the structure of folders and files created on the unit.
How to copy files to a Mac for editing with iMovie/iPhoto.
How to access and navigate through the unit's menus.
Adjusting focus, brightness, backlight, white balance, and tele macro.
Settings for wind cut, self-timer, time-lapse, and recording effects.
Seamless recording, video quality, zoom, and zoom microphone settings.
Settings for microphone level, K2 Technology, and screen lock.
Enables recording to continue with the LCD monitor closed.
Focus, brightness, backlight, white balance, tele macro, and self-timer settings.
Recording effects, shutter modes, image size, and screen lock for still images.
Settings for display date/time, time counter, and slow-motion speed.
Functions for protecting files, copying, trimming, and seamless recording control.
Settings for slideshow playback, including transition effects.
Functions for protecting files and copying images.
Settings for Mobile User Guide, Date/Time, Display Style, and Language.
Settings for monitor brightness, auto power off, demo mode, and media selection.
Settings for image media, formatting, factory preset, and firmware update.
Settings for TV display, video output aspect ratio, and HDMI control.
Options for connecting to a computer via USB for playback or backup.
Identifies external parts on the camera's sides and bottom.
Identifies external parts on the top, rear, and inside the terminal cover.
Details the LCD monitor and its functions, including self-portraits.
Explains common indicators during recording and video recording.
Explains indicators shown during still image recording and video playback.
Explains indicators shown during still image playback.
How to reset the unit and troubleshoot battery charging issues.
Troubleshooting power-on failures and recording interruptions.
Troubleshooting SD card errors and playback interruptions.
Troubleshooting file deletion, copying, and HDMI connection issues.
Troubleshooting computer connection, screen visibility, and image quality.
Addresses issues like unresponsive touch screen and grainy images.
Explains various error messages and their corresponding solutions.
Procedure to follow when the camera displays a high temperature warning.
Instructions for cleaning the camcorder body, lens, and LCD monitor.
Detailed technical specifications for the camera, lens, and recording media.
Technical specifications for the AC adapter.