EasyManua.ls Logo

JVC GR-FX11 User Manual

JVC GR-FX11
60 pages
To Next Page IconTo Next Page
To Previous Page IconTo Previous Page
Page #30 background image
30 EN
Exposure Control
This feature automatically adjusts the iris for the best
available picture quality, but you can override it and make
the adjustment manually. Manual exposure adjustment is
recommended in the following situations:
When shooting using reverse lighting or when the
background is too bright.
When shooting on a reflective natural background such
as at the beach or when skiing.
When the background is overly dark or the subject light.
1
Set the Power Switch to “PRO.”.
2
Press the Select Wheel to display the Menu Screen.
3
Rotate the Select Wheel to move the highlight bar to
“EXPOSURE” and press it. The EXPOSURE Menu
appears.
4
Rotate the Select Wheel to move the highlight bar to
“MANU”, then press it. The Menu Screen disappears
and “00” (exposure control level counter) appears.
5
To brighten the image, rotate the Select Wheel
upward. The exposure control level counter increases
(maximum +06).
To darken the image, rotate the Select Wheel
downward. The exposure control level counter
decreases (maximum –06).
6
Press the Select Wheel. The setting is complete. The
Menu Screen reappears with the highlight bar on
“RETURN”.
7
Press the Select Wheel. The Menu Screen disappears
and the exposure control level counter reappers to
indicate the exposure is adjusted.
NOTES:
To return to the factory setting, select “AUTO” in step 4.
To re-adjust exposure, repeat the procedure from step 2.
00
06 06
+
06
Manual Exposure
Screen
To brighten the image
To darken the image
Select Wheel
Power Switch
Exposure control
level counter
RECORDING
Advanced Features (cont.)
Question and Answer IconNeed help?

Do you have a question about the JVC GR-FX11 and is the answer not in the manual?

JVC GR-FX11 Specifications

General IconGeneral
Optical Zoom16x
FocusAuto/Manual
Image Sensor1/4 inch CCD
Effective Pixels680, 000
ViewfinderElectronic
LCD Screen2.5 inches

Summary

SAFETY PRECAUTIONS

Battery Safety and Handling

Precautions for lithium batteries and general battery safety.

General Operating Cautions

Cautions regarding ventilation, moisture, heat, and proper use.

Environmental Disposal Guidelines

Guidelines for proper disposal of batteries and compliance with directives.

MAJOR FEATURES

Key Camcorder Features Overview

Overview of primary features like Auto Light, AE, S-VHS ET, TBC, Stabilizer, Zoom.

Automatic Demonstration Notes

Information on when and how automatic demonstration occurs and how to cancel it.

PROVIDED ACCESSORIES

Accessory List and Core Filter Attachment

Lists included accessories and provides instructions for attaching the core filter.

GETTING STARTED

Power and Battery Management

Covers power sources, charging, and battery use.

Initial Configuration Settings

Setting date/time, titles, and tape length for operation.

Pre-Recording Setup

Loading cassettes, setting format, and video output for recording.

Camcorder Adjustments and Mounting

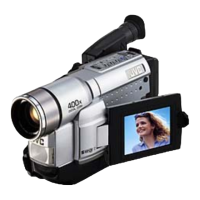
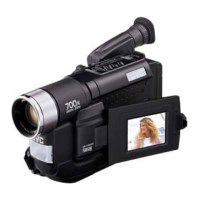
Guide to grip, viewfinder, strap adjustment, and tripod mounting.

RECORDING BASIC OPERATIONS

Basic Recording Procedures

Steps for shooting using the viewfinder or LCD monitor.

Power Switch Modes

Explanation of AUTO, PRO., OFF, and PLAY modes.

Display Indicators During Shooting

Explanation of what the various indicators on the LCD and viewfinder mean.

RECORDING BASIC FEATURES

Zooming Functionality

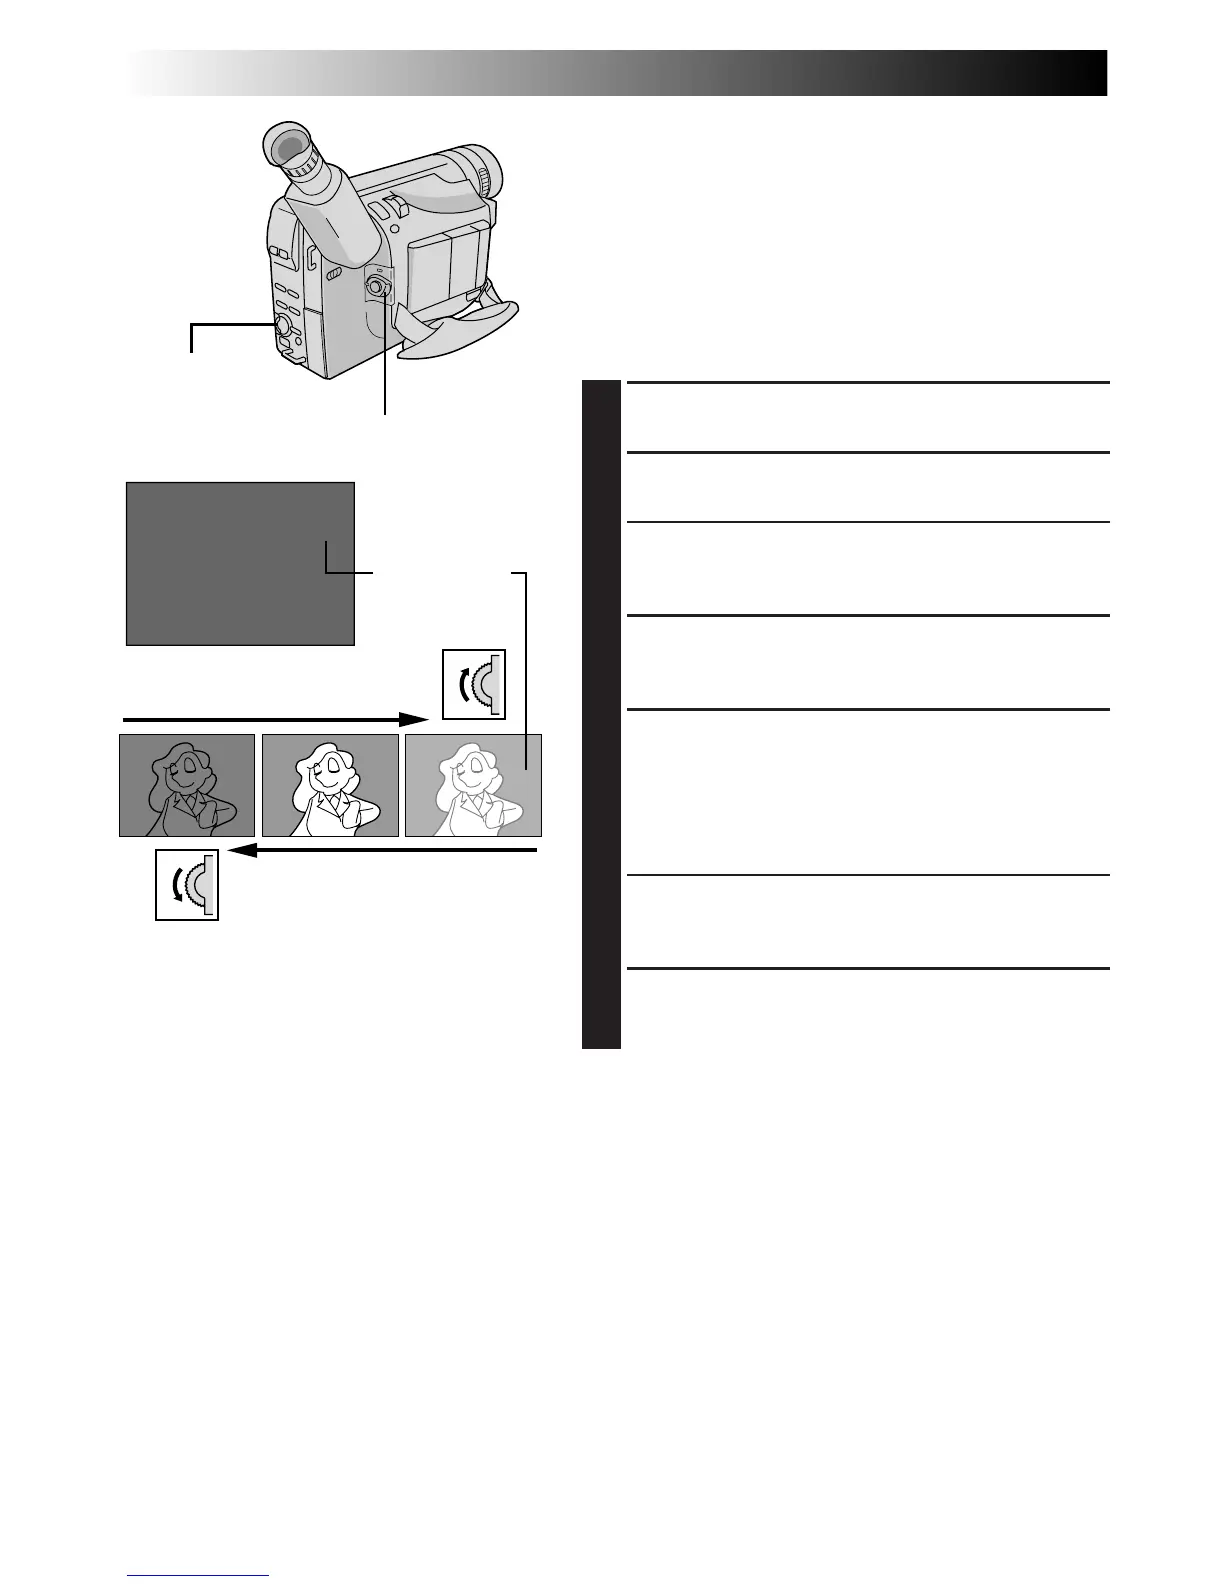
How to use the zoom lever and digital zoom features.

Picture Stabilizer

How to activate the stabilizer to reduce shake.

RECORDING BASIC FEATURES (CONT.)

Using the Video Light

Instructions for using the camcorder's video light for dim scenes.

RECORDING ADVANCED FEATURES

Quick Review and Retake

Checking the end of recordings and re-recording segments.

5-Second Recording Function

How to record short 5-second clips for scene transitions.

Taking Snapshots

Using the camcorder to capture still images in succession.

FADE AND WIPE EFFECTS

Fade and Wipe Effects

Applying transition effects like fades and wipes to recordings.

PROGRAM AE WITH SPECIAL EFFECTS

Special Effect Modes

Using modes like Sepia, Sports, Twilight, and Nega/Posi for creative recording.

USING MENUS FOR DETAILED ADJUSTMENT

Menu Navigation and Access

How to use the on-screen menu system for camcorder settings.

Menu Screen Options Overview

Explains settings accessible via Select Wheel and MENU button.

Configuring Recording and Output Settings

Detailed menu options for S-VHS, tape, time, language, and video output.

DATE/TIME AND TITLE INSERTION

Inserting Date and Time onto Video

How to display and record date/time information on the video image.

Adding Instant Titles to Footage

Superimposing preset titles onto video recordings for titles.

ANIMATION AND TIME-LAPSE RECORDING

Creating Animation Effects

Technique to create the illusion of movement by shooting sequential pictures.

Recording Time-Lapse Sequences

Capturing subtle changes over time by recording at set intervals.

EXPOSURE CONTROL

Manual Exposure Adjustment

How to manually adjust exposure for optimal picture quality in various lighting conditions.

FOCUSING

Auto Focus Operation

How the continuous auto focus system works and its limitations.

Manual Focus Adjustment

Procedure for manually locking focus when auto focus is not ideal.

WHITE BALANCE ADJUSTMENT

Automatic and Manual White Balance

Adjusting colour reproduction for different lighting conditions.

PLAYBACK BASICS

Basic Playback Controls

How to play, pause, rewind, and fast-forward tapes.

Monitor and Volume Adjustment

Adjusting LCD brightness and speaker volume during playback.

Still Playback and Shuttle Search

Methods for reviewing footage at specific points or fast searching.

PLAYBACK FEATURES

Tracking Adjustment

Eliminating noise bars by adjusting tracking automatically or manually.

Time Base Corrector (TBC)

Using TBC to stabilize video signals and improve picture quality.

Counter Memory Function

How to mark and locate specific tape segments.

Playback Special Effects

Applying creative effects to playback images.

PLAYBACK USING CASSETTE ADAPTER

Cassette Adapter Operation

How to use the optional adapter to play VHS-C tapes on a VHS VCR.

PLAYBACK CONNECTIONS AND DUBBING

Connecting to TVs and VCRs

Guides for SCART, S-Video, and RCA connections.

Basic Tape Dubbing Procedure

Steps for transferring video from camcorder to VCR.

USING THE REMOTE CONTROL UNIT

Remote Control Overview

Identifies buttons on the RM-V715U and RM-V700U remote controls and their functions.

Battery Installation for Remote Control

Instructions for installing batteries in the remote controls.

REMOTE CONTROL FUNCTIONS

Animation and Time-Lapse Setup

Using the remote to set recording time for animation and time-lapse.

Playback Zoom Control

Using the remote to zoom in on recorded footage during playback.

EDITING WITH REMOTE CONTROL

Insert Editing Procedure

Recording new scenes onto existing footage using the remote.

Audio Dubbing Procedure

Recording new soundtracks over existing audio using the remote.

VCR CONTROL AND RANDOM ASSEMBLE EDITING

Setting Remote/VCR Code

How to set up the remote control to operate a VCR.

Random Assemble Editing Process

Step-by-step guide for selecting scenes and performing automatic editing.

MAKE CONNECTIONS FOR EDITING

Camcorder to VCR Connection Types

Guides for connecting to different types of VCRs and using cable adapters.

TROUBLESHOOTING

Troubleshooting Power, Recording and Tape Issues

Solutions for power, recording, tape transport, and playback problems.

Troubleshooting Other Issues and Errors

Solutions for display issues, errors, focus, and lens cover warnings.

INDEX AND INDICATORS

Controls and Connectors Index

Reference list of camcorder controls and connection ports with page numbers.

Indicator Lights and Their Meanings

Explains the meaning of power lamps, recording indicators, and other status lights.

INDICATIONS DURING RECORDING

Recording Indicator Explanations

Explains indicators like tape remaining time, recording format, and zoom level.

INDICATIONS DURING PLAYBACK AND WARNINGS

Playback Indicator Explanations

Explains indicators like cassette status, TBC, and playback effects.

Understanding Warning Indicators

Explains warnings for battery, cassette, condensation, and error codes.

CAUTIONS

Video Light Safety

Safety warnings regarding the hot video light and its usage.

Battery and Battery Pack Precautions

General rules for battery use, types, and precautions for battery packs.

Cassette Handling and Storage

Guidelines for using and storing video cassettes properly.

Main Unit Safety and Usage Precautions

Cautions for the camcorder unit regarding operation, environment, and protection.

LCD Monitor Care and Maintenance

Precautions for the LCD monitor and camcorder maintenance procedures.

SPECIFICATIONS

Camcorder Technical Specifications

Details on format, power, dimensions, weight, pickup, and lens.

Component and Accessory Specifications

Specs for viewfinder, connectors, AC adapter, and optional accessories.

Related product manuals