4.2
Section 4
Air Cleaner and Air Intake System
Service Paper Element
Check the paper element for dirty, loose or damaged
parts every 25 hoursȱȱDzȱȱĞȱȱ
extremely dusty or dirty conditions. Yearly or every
100 hours of operation replace the paper element.
Follow these instructions to service:
1. Loosen the air cleaner knob and remove the
cover. Remove the paper air cleaner element and
the precleaner (if equipped). See Figure 4-1.
2. Do not wash the paper element or use
pressurized air, as this will damage the element.
Replace a dirty, bent, or damaged element with a
genuine Kohler element.
3. When servicing the air cleaner, check the air
cleaner base. Make sure it is secured and not
damaged. Also, check the air cleaner cover for
ȱȱȱęǯȱȱȱȱȱ
cleaner components.
4. If any loose dirt or debris fell into the air cleaner
when the element was removed, carefully remove
it and wipe the base clean.
5. Check the condition of the rubber seal on the
paper element. If the condition is questionable in
any way, replace the element.
6. Reinstall the paper element and the optional
ǰȱȱǯȱĴȱȱǯ
Disassembly
The following procedure outlines complete
disassembly of the air cleaner assembly. Since removal
ȱȱȱȱȱȱěȱȱȱ
and governor adjustment, Step 4 should only be
performed if required. For further information see the
Dissassembly and Reassembly sections of this manual.
1. Loosen the air cleaner cover retaining knob and
remove the air cleaner cover.
2. Remove the foam precleaner (if equipped), and
the paper air cleaner with the formed rubber seal.
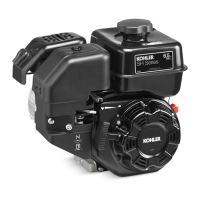
3. Disconnect the breather hose from the crankcase.
See Figure 4-2.
Inspect Air Cleaner Components
Whenever the air cleaner cover is removed, or the
paper element or precleaner are serviced, inspect the
following areas:
Outer Air Cleaner Cover - Make sure the air cleaner
cover is in good condition, not cracked, damaged,
ȱȱȱȱǰȱȱȱěȱȱ
sealing ability of the air cleaner element.
Air Cleaner Base - Make sure the base is properly
secured and not cracked or damaged. It is extremely
important that the fasteners securing this component
are tight at all times.
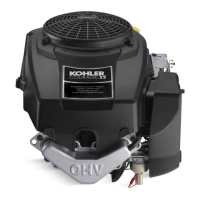
Primer Bulb Hose - Make sure the hose is not cracked
ȱȱǰȱȱĴȱȱȱȱȱ
cleaner base and the carburetor. See Figure 4-3.
ȱ Śǯȱ ȱȱȱ¡ȱĚȱȱȱȱ
mounting studs which secure the air cleaner base,
carburetor, and gaskets. Remove the third hex
ȱĴȱȱȱȱȱǯȱ
5. Remove the air cleaner base by swinging it out
ȱȱĞȱȱȱȱȱȱǻȱ
equipped) from the carburetor. See Figure 4-3.
Figure 4-2. Breather Hose.
Figure 4-3. Primer Bulb Hose.
 Loading...