ENGLISH
16
WARNING
MAINTENANCE AND ADJUSTING WORK MARKED WITH AN ASTERISK (*) REQUIRES EXPERT SKILLS AND
TECHNICAL KNOW-HOW. FOR YOUR OWN SAFETY, ALWAYS HAVE SUCH WORK PERFORMED BY A SPECIALIZED
KTM DEALER WHERE YOUR MOTORCYCLE WILL BE OPTIMALLY SERVICED BY APPROPRIATELY QUALIFIED
SKILLED STAFF.
!
CAUTION
!
–W
HEN CLEANING THE MOTORCYCLE, DO NOT USE A HIGH PRESSURE CLEANING UNIT IF POSSIBLE, OTHERWISE WATER WILL PENETRATE THE BEARINGS, CAR-
BURETOR
, ELECTRIC CONNECTORS ETC
.
–WHEN TRANSPORTING YOUR
KTM, ENSURE THAT IT IS HELD UPRIGHT WITH RESTRAINING STRAPS OR OTHER MECHANICAL FASTENING DEVICES AND THAT
THE FUEL TAP IS IN THE
OFF POSITION - IF THE MOTORCYCLE SHOULD FALL OVER, NO FUEL CAN LEAK FROM THE CARBURETOR OR FUEL TANK
–O
NLY USE SPECIAL SCREWS WITH AN APPROPRIATE THREAD LENGTH SUPPLIED BY
KTM TO FIX THE SPOILERS ON THE TANK. USING OTHER SCREWS OR
LONGER SCREWS CAN CAUSE LEAKS IN THE TANK THROUGH WHICH FUEL CAN FLOW OUT
.
–D
O NOT USE TOOTHED WASHERS OR SPRING RINGS WITH THE ENGINE FASTENING SCREWS, AS THESE WORK INTO THE FRAME PARTS AND KEEP WORKING
LOOSE
. INSTEAD, USE SELF-LOCKING NUTS.
–LET YOUR MOTORCYCLE COOL DOWN BEFORE BEGINNING ANY MAINTENANCE WORK IN ORDER TO AVOID GETTING BURNED.
–R
EMOVE OILS, FATTY MATTERS, FILTERS, FUELS, WASHING DETERGENTS ETC. ORDERLY.
–UNDER NO CIRCUMSTANCES MAY USED OIL BE DISPOSED OF IN THE SEWAGE SYSTEM OR IN THE OPEN COUNTRYSIZE. 1 LITER USED OIL CONTAMINATES
1.000.000 LITERS WATER.
MAINTENANCE WORK ON CHASSIS AND ENGINE
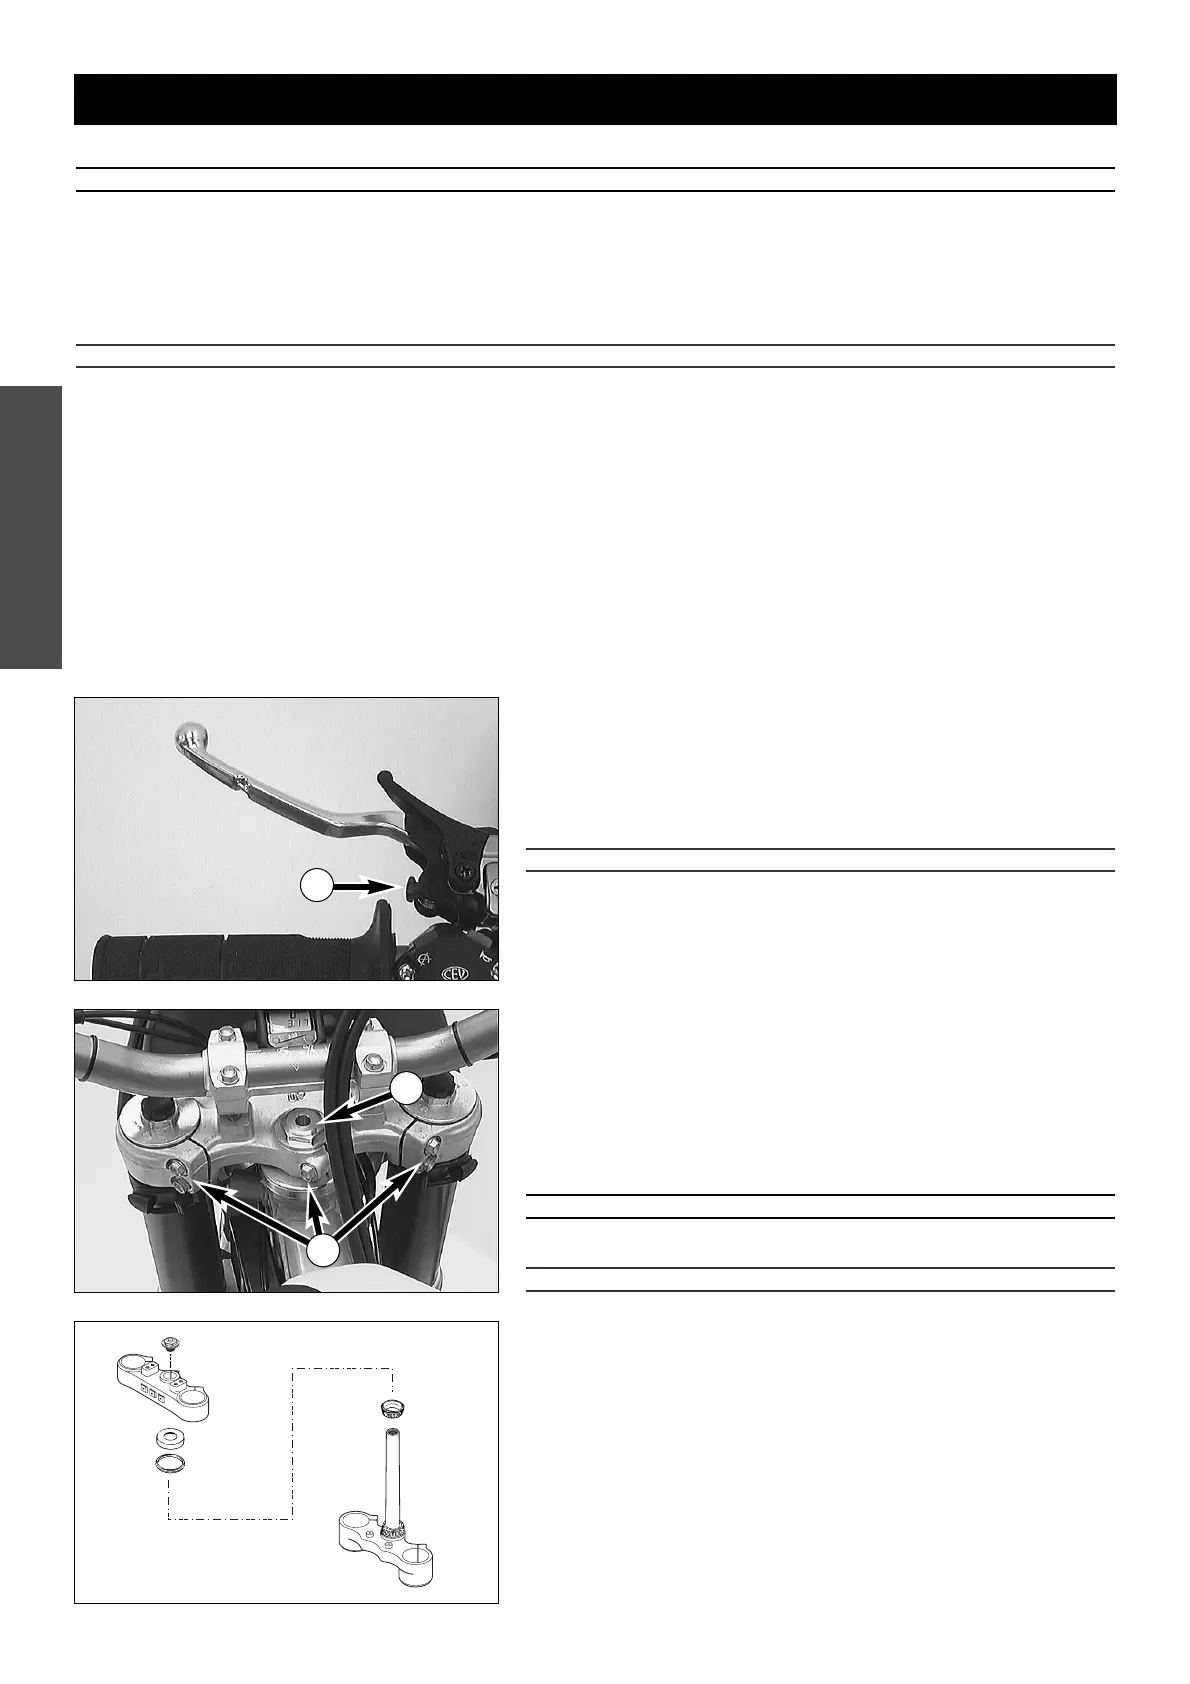
Changing the original position of the clutch lever
The adjusting screw 1 can be used for individual adjustment of the original
position of the clutch lever, thus allowing adjustment to an optimal position
for every hand size.
Turning the adjusting screw clockwise reduces the distance between the
clutch lever and the handlebar. Turning the adjusting screw counterclock-
wise increases the distance between the clutch lever and the handlebar.
!
CAUTION
!
A
DJUSTMENT OF THE CLUTCH LEVER POSITION IS ONLY POSSIBLE WITHIN CERTAIN LIMITS.
O
NLY TURN THE ADJUSTING SCREW MANUALLY AND NEVER APPLY EXCESSIVE FORCE
.
Checking and adjusting the steering head bearing *
Check steering head bearing for play periodically. For check put motorcycle
on stand so that the front wheel is off the ground. Now try to move the
fork forward and backward. For readjusting, loosen the five pinch bolts
2
of the top triple clamp and turn steering stem bolt clockwise 3 until there is
no more play. Don’t tighten the steering stem bolt all the way, otherwise
the bearings will be damaged. With a plastic hammer, lightly rap on the
triple clamp to release tension. Retighten the five pinch bolts to 20 Nm
(15 ft.lb).
WARNING
I
F THE STEERING HEAD BEARING IS NOT ADJUSTED TO BE FREE OF PLAY, THE MOTORCY-
CLE WILL EXHIBIT UNSTEADY DRIVING CHARACTERISTICS AND CAN GET OUT OF CONTROL.
!
CAUTION
!
IF YOU DRIVE WITH PLAY IN THE STEERING HEAD BEARING FOR LONGER PERIODS, THE
BEARINGS AND SUBSEQUENTLY THE BEARING SEATS IN THE FRAME WILL BE DESTROYED
.
The steering head bearings should be regreased at least once a year
(i.e. Shell Advance Grease).
2
3
1
 Loading...