SETUP 2
3
2.1 Unpacking and setting up the vehicle
Condition
Packaging V2
– Unpack and set up the V2 vehicle. ( p. 4)
– Remove V2 headlight mask. ( p. 4)
Condition
Packaging V12
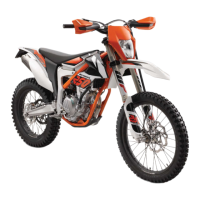
– Unpack and set up the V12 vehicle. ( p. 5)
– Install V12 fork legs. ( p. 5)
– Install V12 shock absorber. ( p. 6)
– Install C12 combination instrument. ( p. 6)
– Stick on the reflector. ( p. 7)
– Install handlebars. ( p. 7)
– Install the handlebar cushion. ( p. 8)
– Install left side controls. ( p. 8)
– Install right side controls. ( p. 10)
– Install left and right rear mirrors. ( p. 11)
– Install left and right hand guards. ( p. 11)
– Install front fender. ( p. 12)
– Install the front wheel. ( p. 12)
– Install the front and rear turn signals. ( p. 13)
– Install the license plate lamp. ( p. 14)
– Install the reflector. ( p. 14)
– Route the front turn signal cable. ( p. 14)
– Route the rear turn signal cable. ( p. 15)
– Install the license plate holder extension. ( p. 18)
– Remove the motorcycle from the lift stand. ( p. 19)
– Install the engine guard. ( p. 19)
– Install the footrests. ( p. 19)
– Recharge the battery. ( p. 20)
– Install the headlight mask with the headlight. ( p. 22)
– Check the headlight setting. ( p. 23)
– Adjust the combination instrument. ( p. 23)
– Adjust kilometers or miles. ( p. 24)
– Adjust the clock. ( p. 25)
– Refuel. ( p. 25)
– Unpack and mount the KTM PowerParts included in the delivery (optional).
Info
Read the accompanying KTM PowerParts fitting instructions.
– Remove remaining protective film.
– Attach the sticker included in the delivery (optional).
– Prepare the vehicle according to the specifications in the KTM Dealer.net for handover to the customer.
Info
Transport mode must be deactivated to be able to start the motorcycle.
 Loading...