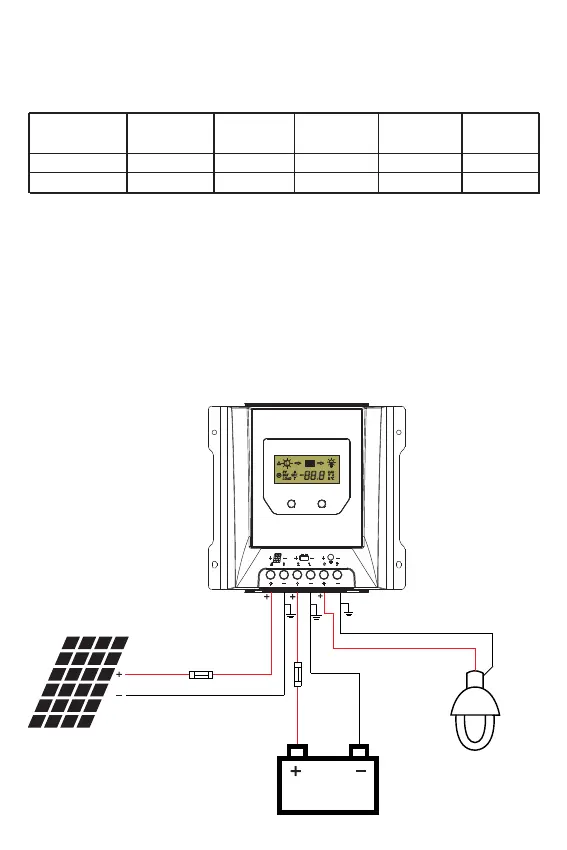
We strongly recommend connecting a fuse directly to the battery to protect any short circuit at the
battery wiring. Solar PV modules create current whenever light strikes them. The current created varies
with the light intensity, but even in the case of low levels of light, full voltage is given by the modules. So,
protect the solar modules from incident light during installation. Never touch uninsulated cable ends, use
only insulated tools, and make sure that the wire diameter is in accordance with the expected currents of
solar charge controller. Connections must always be made in the sequence described below.
5.4 Connection
Model
Rated charging
current
Rated
discharging
current
Solar wire
diameter
(mm²/AWG)
Battery wire
diameter
(mm²/AWG)
Load wire
diameter
(mm²/AWG)
MT3010-E 30A 30A 6/9 6/9 6/9
MT4010-E 40A 30A 10/8 10/8 6/9
5.3 Wiring Specifications
Wiring and installation methods must comply with national and local electrical specifications.
The wiring specifications of the solar, battery and loads must be selected according to rated currents, and
see the following table for wiring specifications:
!
controller or between the controller and the battery, larger wires can be used to reduce the
voltage drop and improve performance.
The wire size is only for reference. If there is a long distance between the PV array and the
⑤
⑥
MEN U OK
①
②
③
④
8
 Loading...