-
71
-
1) Connect the connection wire securely to the terminal block. If the wire is not affixed completely, contact will be
poor, and it is dangerous as the terminal block may heat up and catch fire.
2) Take care not to confuse the terminal numbers for indoor and outdoor connections.
3) Affix the connection wire using the wiring clamp.
c) Attach the control lid.
4) Hanging the unit
Please arrange four sets of a hanging bolt (M10 or M8), a nut matching the bolt, a flat washer and a spring washer on the
installation site.
A . When hanging from the ceiling
a) When installing on a 2
’
x 2
’
grid ceiling, if necessary, please
detach the T bar temporarily before you install it. When
installing on a conventional ceiling, cut an installation opening
(660mm x 660mm) in the ceiling. When installing on a conventional
ceiling, cut an opening (Min 450 x 450) for inspection purposes.
b) Determine the positions of hanging bolts (530 x 530).
c) Use four hanging bolts, each fastened in such a manner that it can withstand pull force of 50kgf.
d) Make hanging bolts to the length that leaves approximately 45 mm of them above the ceiling. In hoisting the unit
main body in, temporarily fasten the four lower nuts of the hanging bolts approx. 93 mm from the ceiling and the
four upper nuts at positions sufficiently far from the lower nuts so that they may not hamper installation work when
the unit is hoisted in or the height is adjusted.
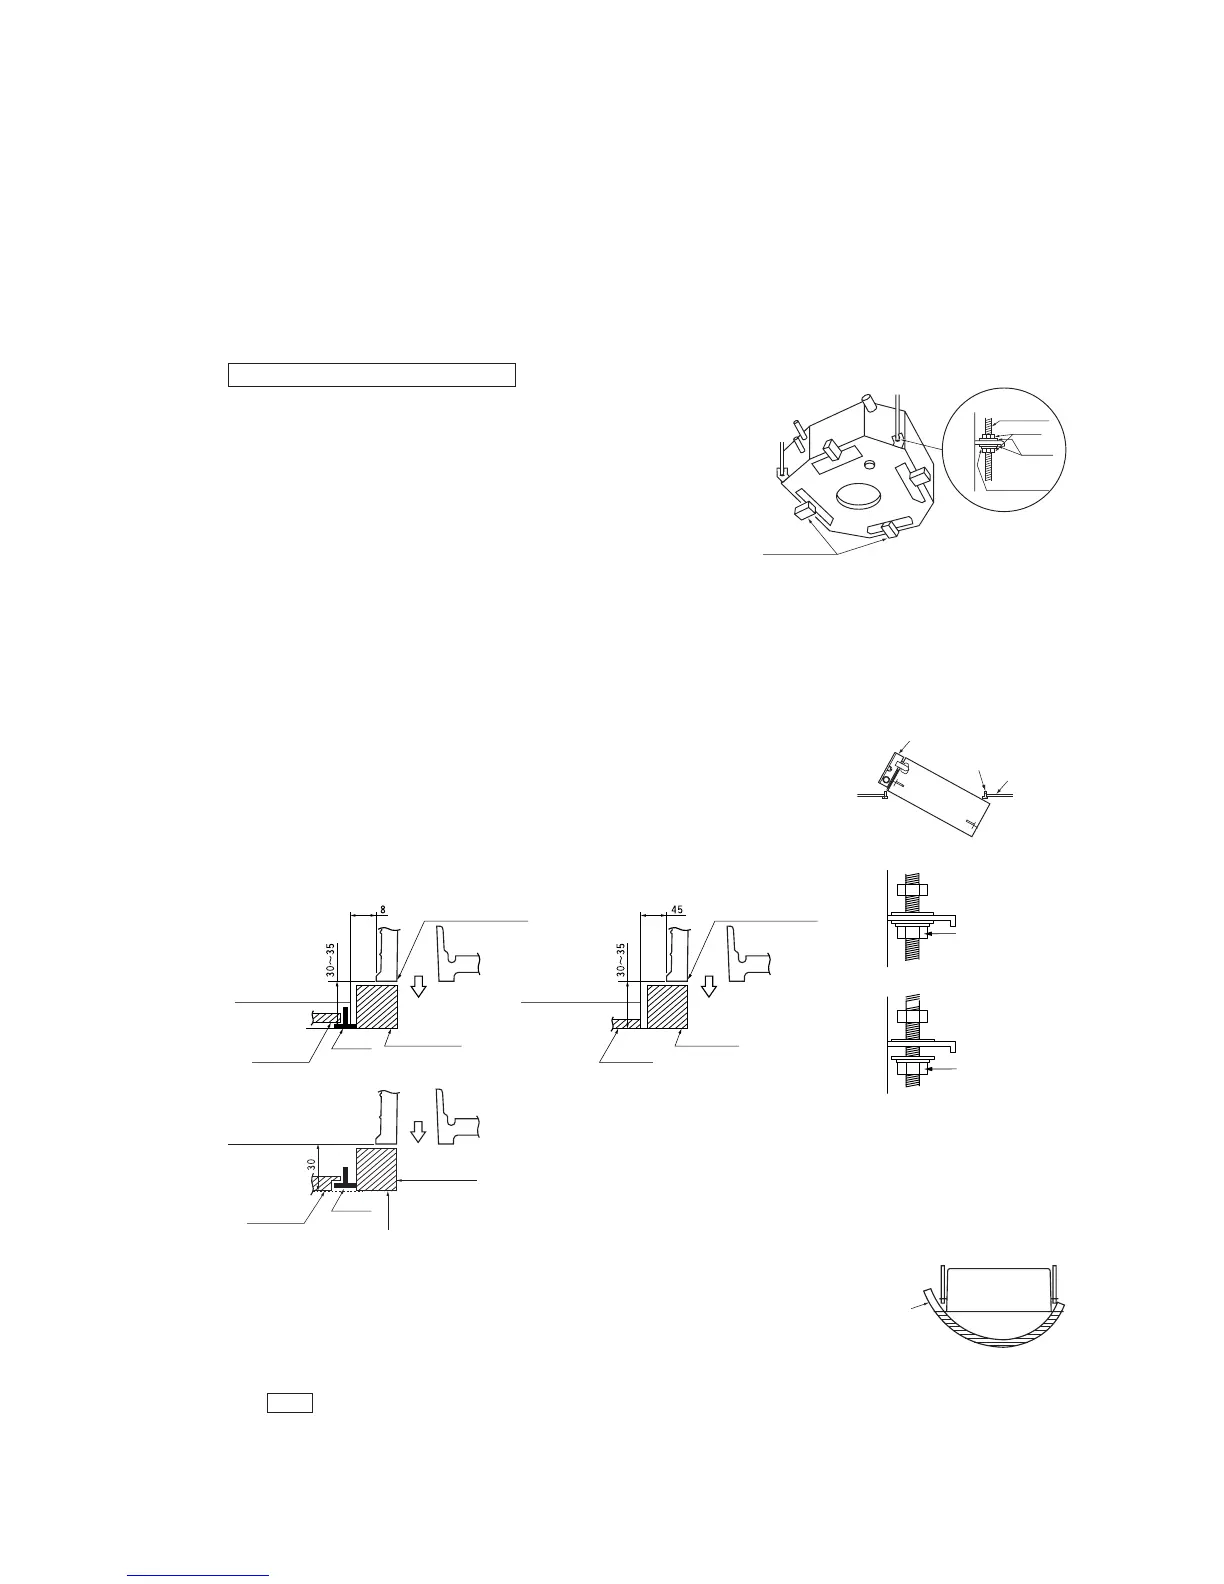
e) Put the unit on an angle.
f) After hoisting in the unit , attach level gauges supplied as accessories and
determine the unit position (height). To adjust height, use the four lower nuts
with the four upper nuts left loose. Please make sure that the unit's four hanging
fixtures touch the four lower nuts and washers evenly without any play.
g) Please make sure that the unit main body is installed levelly. Level must be checked with
the level gauge or a clear hose filled with water. (A tolerable height difference at an
end of the unit is within 3 mm)
h) After you have adjusted the height and level of the unit, fasten the four upper nuts to fix the unit.
Control box
T bar
Ceiling
panel
Spring washer
Drainage
Refrigerant piping
Level gauge
Main
unit
Hanging bolt
Nut
Washer
Indoor unit
hose
Use level gauges
as reference.
adjust the bottom
to the face of the
ceiling.
Use level gauges
as reference.
adjust the bottom
to the face of the
ceiling.
Ceiling panel
Ceiling
material
T-bar
Level gauge
(insulation)
Level gauge
(insulation)
Diffuser Diffuser
Attach it by
aligning it with this
side of a diffuser.
Attach it by
aligning it with this
side of a diffuser.
[For conventional ceiling]
[For 2
'
x 2
'
grid ceiling]
Notes • Do not adjust the height with the upper nuts. It may cause deformation due to excessive force working on the
unit main body, which can result in such problems that you cannot attach the panel or noises are generated
from the interfering fan.
When the ceiling panel comes below the T bar, align the botom
of the level gauges to the lower face of the ceiling panel.
Use level gauges as reference.
adjust the bottom to the face
of the indoor unit.
Ceiling panel
T-bar
Level gauge
(insulation)
Diffuser
Play is left between the
fixture and the lower
nut and washer
Correct
Main
unit
Touch the lower nut
and washer
without any play
Incorrect
Main
unit
 Loading...