EasyManua.ls Logo

Pioneer vsx-1123 User Manual

Pioneer vsx-1123
44 pages
To Next Page IconTo Next Page
To Previous Page IconTo Previous Page
Page #9 background imageLoading...
Page #9 background image
3
A
FRONT HEIGHT / WIDE /
SURROUND BACK / ZONE 2
SURROUNDCENTERFRONT
RLRLRLRL
(Single
)
B
SUB
WOOFER
1
2
PRE OUT
SPEAKERS
A
FRONT HEIGHT / WIDE /
SURROUND BACK / ZONE 2
SURROUNDCENTERFRONT
RLRLRLRL
(
Single
)
B
SUB
WOOFER
1
2
PRE OUT
SPEAKERS
LINE LEVEL
INPUT
Raccordement
Raccordement des enceintes
Le récepteur fonctionne avec deux enceintes stéréo seulement (enceintes avant sur le schéma)
mais il est conseillé d’utiliser au moins cinq enceintes, et avec une configuration complète le
son surround sera bien meilleur.
Pour obtenir le son surround le plus agréable, installez vos enceintes comme illustré ci-dessous.
Système surround à 7.1 canaux :
Après avoir installé les enceintes, raccordez-les de la façon ci-dessous.
L
– Avant Gauche
C
– Centre
R
– Avant Droite
SL
– Surround Gauche
SR
– Surround Droite
SBL
– Surround arrière Gauche
SBR
– Surround arrière Droite
SW
– Caisson de grave
Remarque
Il existe aussi d’autres façons de connecter
les enceintes (avant haute, avant large,
etc.). Pour le détail, reportez-vous à la page
17 du mode d’emploi.
Raccordement des câbles d’en-
ceintes
Veillez à bien raccorder l’enceinte de droite
à la borne droite (
R
) et l’enceinte de gauche
à la borne de gauche (
L
). Assurez-vous aussi
que les bornes positives et négatives (
+/–
)
sur le récepteur correspondent à celles des
enceintes.
1
Torsadez les ls ensemble.
2
Dévissez la borne et insérez la partie
dénudée des ls.
3
Serrez la borne.
12 3
10 mm
ATTENTION
Avant de réaliser ou de modifier des
liaisons, éteignez les appareils et
débranchez le cordon d’alimentation de
la prise électrique.
Ces bornes d’enceintes sont soumises à
une tension
DANGEREUSE
. Pour éviter
tout risque de décharge électrique lors
du branchement ou débranchement des
câbles d’enceintes, débranchez le cordon
d’alimentation avant de toucher les
parties non isolées.
SL
L
R
SR
SBL
SBR
SW
C
Caisson de
grave
(
SW
)
Avant Droite
(
R
)
Surround Droite
(
SR
)
Surround Gauche
(
SL
)
Avant
Gauche
(
L
)
Centre
(
C
)
Surround arrière Droite
(
SBR
)
Surround arrière Gauche
(
SBL
)
Remarque
Si vous raccordez une seule enceinte surround arrière, raccordez-la aux bornes
SURROUND
BACK L (Single)
.
Cet appareil accepte les enceintes ayant une impédance nominale de 6
W
à 16
W
.
Important
Cette illustration montre le VSX-1123. Les raccordements du VSX-923 sont identiques, sauf
mention contraire.

Table of Contents

Question and Answer IconNeed help?

Do you have a question about the Pioneer vsx-1123 and is the answer not in the manual?

Pioneer vsx-1123 Specifications

General IconGeneral
Channels7.2
HDMI Inputs8
HDMI Outputs2
4K Pass-ThroughYes
3D Pass-ThroughYes
Dolby TrueHDYes
DTS-HD Master AudioYes
Network ConnectivityEthernet
AirPlayYes
DLNA CertifiedYes
Internet RadioYes
Auto Speaker CalibrationYes (MCACC)
Total Harmonic Distortion0.08%
Wi-FiNo
Power Output per Channel80W (8 ohms, 20Hz-20kHz, 0.08% THD, 2 channels driven)
Zone OutputZone 2
USB InputFront
Frequency Response5 Hz-100 kHz
Input Sensitivity200mV
Signal-to-Noise Ratio100 dB (line)
BluetoothYes

Summary

Connection and Initial Setup Methods

Setup via Quick Start Guide

Connect and set up the receiver by following the instructions in this Quick Start Guide.

Setup via AVNavigator (Network Required)

Connect and set up the receiver using the 'Wiring Navi' feature in AVNavigator, which requires a network connection.

Setup via AVNavigator (No Network)

Connect and set up the receiver using the 'Wiring Navi' feature in AVNavigator without a network connection.

Using AVNavigator

AVNavigator for Mac

Instructions for downloading and installing AVNavigator on a Mac computer for setup.

AVNavigator for iPad

Instructions for downloading and installing AVNavigator on an iPad for setup.

AVNavigator for Windows

Instructions for loading the CD-ROM and installing AVNavigator on a Windows computer.

STEP 1 Connecting up

Connecting the Speakers

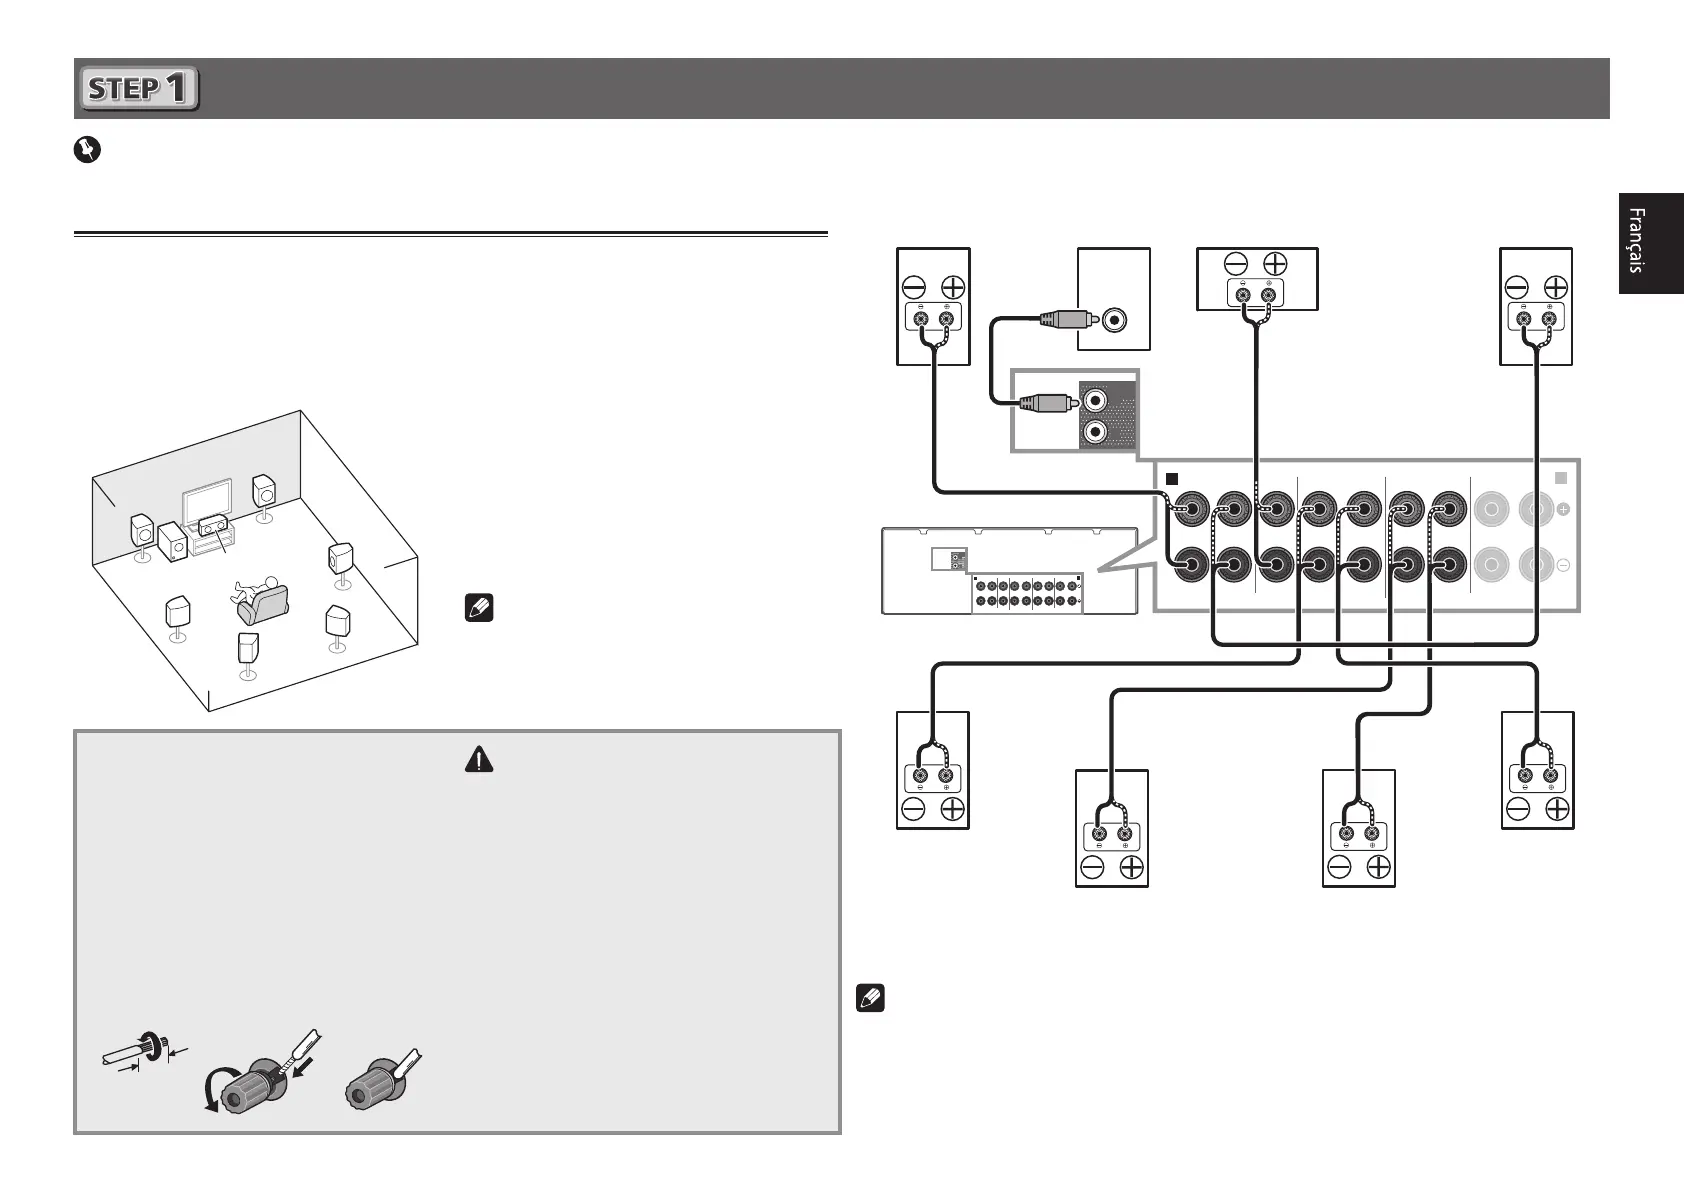
Install and connect the front, surround, and subwoofer speakers for a 7.1 channel surround sound system.

Connecting Speaker Cables

Properly connect speaker cables to the receiver terminals, ensuring correct polarity (+/-).

Connecting Audio/Video Components

Connect a TV and playback components like Blu-ray players using HDMI or other connections.

Connecting Antennas

Connect the AM loop antenna and FM wire antenna to the receiver for radio reception.

Connecting to the Network

Connect the receiver to your home network using a LAN cable for internet features.

STEP 2 Initial Setup

Before You Start

Prepare by inserting batteries into the remote, switching on the receiver and TV, and connecting the TV input.

Automatic Setup for Surround Sound (MCACC)

Use the setup microphone for automatic acoustic calibration to optimize surround sound settings.

STEP 3 Basic playback

Multichannel Playback

Switch on the playback component, select the input, and choose playback modes for multichannel audio.

Listening to the Radio

Tune into FM/AM radio stations, adjust reception with MPX, and save favorite stations.

Listening to Station Presets

Recall and listen to previously stored radio station presets using the preset buttons.

Further Functions

Playing an iPod

Connect your iPod/iPhone/iPad and navigate through music files to start playback.

Listening to Internet Radio Stations

Connect to the internet and select Internet radio stations for playback.

To Enjoy the Many Functions

Install AVNavigator and load the CD-ROM for interactive manuals and operation guides.

Related product manuals