26
Start-Up
given outdoor and indoor conditions, remove charge.
5.8.4 Final Charging by Liquid Subcooling
1. After preliminary charging by weight or pressures, find the design subcooling value. The correct subcooling
value is found at the intersection of the installed system and the outdoor ambient temperature on the Charging
Chart located inside the access panel cover.
SC° from Charging Chart = _____°F [°C].
IMPORTANT: Indoor conditions as measured at the indoor coil are required to be within 2ºF (1.1ºC) of comfort
conditions as preferred by the homeowner and must have operated for at least 15 minutes prior to final charge
adjustment. Unit charging is recommended under the following outdoor conditions ONLY:
Cooling Mode: 55°F [12.8°C] outdoor dry bulb and above
Heating Mode: Between 40°F [4.4°C] and 60°F [15.6°C] outdoor dry bulb
NOTICE: Systems should not be charged below 40°F [4.4°C] outdoor temperature.
NOTICE: If the indoor temperature is above or below the recommended range, run the system to bring the
temperature down or run the electric heat/furnace to bring the temperature up.
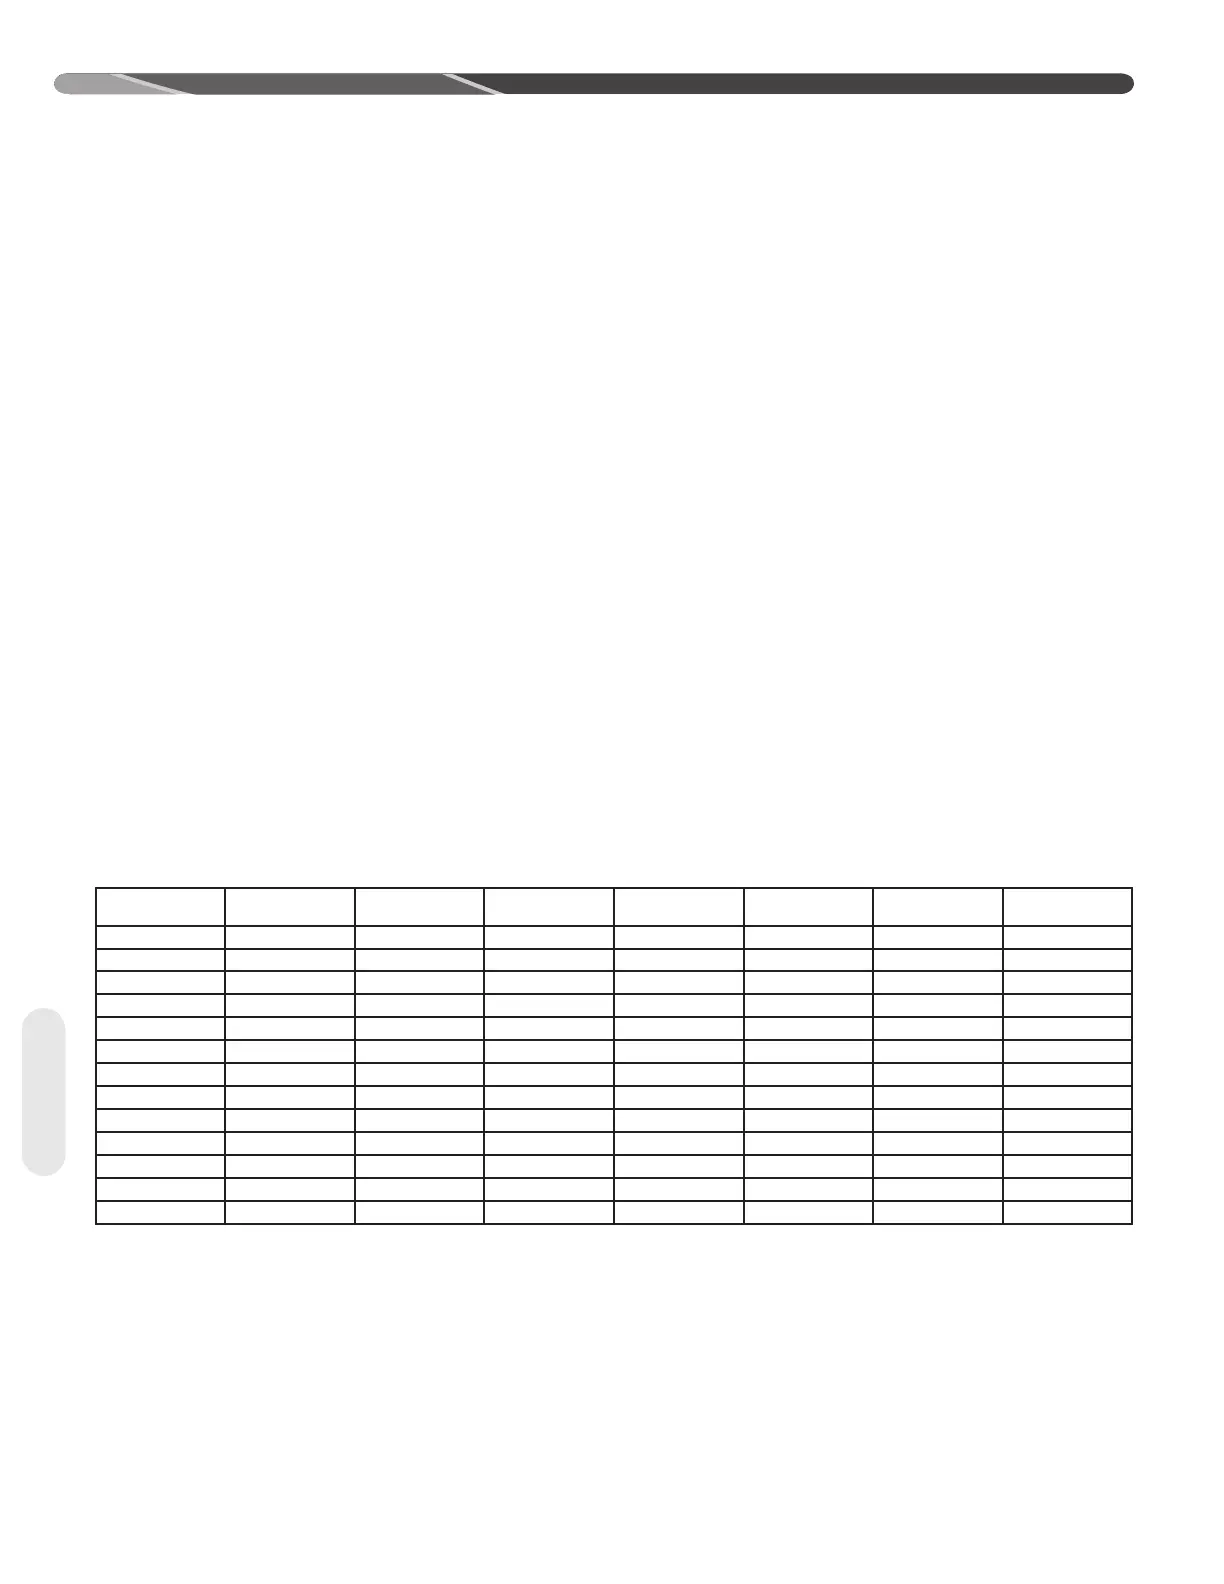
2. Note the measured Liquid Pressure, Liq Press =
______psig [kPa], as measured from the liquid (small) service valve. Use the Temperature Pressure Chart
below to note the corresponding saturation temperature for R-410A at the measured liquid pressure.
Liquid Saturation Temperature, SAT°= _____°F [°C].
3. Note the liquid line temperature, Liq° = _____°F [°C], as measured from a temperature probe located within 6"
[15.2 cm] outside of the unit on the copper liquid line (small line). It is recommended to use a calibrated clamp-
on temperature probe or an insulated surface thermocouple.
4.
Subtract the liquid line temperature from the saturation temperature to calculate subcooling. SAT°_____°F
[°C]
-
Liq°_____°F
[°C]
= SC°_____°F
[°C]
5.
Adjust charge to obtain the specified subcooling value. If the measured subcooling level is below the listed
requirement for the given outdoor temperature, add charge. If the measured subcooling level is above the listed
requirement for the given outdoor temperature, remove charge.
SATURATION
TEMP ºF [ºC]
R-410A
PSIG [kPa]
SATURATION
TEMP ºF [ºC]
R-410A
PSIG [kPa]
SATURATION
TEMP ºF [ºC]
R-410A
PSIG [kPa]
SATURATION
TEMP ºF [ºC]
R-410A
PSIG [kPa]
-150 [-101] – -30 [-34] 17.9 [123.4] 35 [2] 107.5 [741.2] 100 [38] 317.4 [2188.4]
-140 [-96] – -25 [-32] 22.0 [151.7] 40 [4] 118.5 [817.0] 105 [41] 340.6 [2348.4]
-130 [-90] – -20 [-29] 26.4 [182.0] 45 [7] 130. 2 [897.7] 110 [43] 365.1 [2517.3]
-120 [-84] – -15 [-26] 31.3 [215.8] 50 [10] 142.7 [983.9] 115 [46] 390.9 [2695.2]
-110 [-79] – -10 [-23] 36.5 [251.7] 55 [13] 156.0 [1075.6] 120 [49] 418.0 [2882.0]
-100 [-73] – -5 [-21] 42.2 [291.0] 60 [16] 170.1 [1172.8] 125 [52] 446.5 [3078.5]
-90 [-68] – 0 [-18] 48.4 [333.7] 65 [18] 185.1 [1276.2] 130 [54] 476.5 [3285.4]
-80 [-62] – 5 [-15] 55.1 [380.0] 70 [21] 201.0 [1385.8] 135 [57] 508.0 [3502.5]
-70 [-57] – 10 [-12] 62.4 [430.2] 75 [24] 217.8 [1501.7] 140 [60] 541.2 [3731.4]
-60 [-51] 0.4 [2.8] 15 [-9] 70.2 [484.0] 80 [27] 235.6 [1624.4] 145 [63] 576.0 [3971.4]
-50 [-46] 5.1 [35.2] 20 [-7] 78.5 [541.2] 85 [29] 254.5 [1754.7] 150 [66] 612.8 [4225.1]
-40 [-40] 10.9 [75.2] 25 [-4] 87. 5 [603.3] 90 [32] 274.3 [1891.2]
-35 [-37] 14.2 [97.9] 30 [-1] 97.2 [670.2] 95 [35] 295.3 [2036.0]
5.8.5 R-410A Temperature Pressure Chart
Table 10: R-410A Temperature Pressure Chart
5.9 Completing Installation
1. Disconnect the hoses from the pressure ports. Replace the pressure port caps and tighten adequately to seal
caps. DO NOT overtighten.
2. Replace the service valve top caps finger-tight and then tighten with a wrench to adequately seal caps. DO
NOT overtighten.
3. Replace control box cover and service panel and install screws to secure panels.
4. Restore power to unit at disconnect if required.
5. Exit Charging Mode and configure EcoNet™ Control Center or thermostat per the thermostat installation
instructions and set to desired mode and temperature.
 Loading...