EasyManua.ls Logo

Roland JUNO-Di User Manual

Roland JUNO-Di
136 pages
To Next Page IconTo Next Page
To Previous Page IconTo Previous Page
Page #20 background imageLoading...
Page #20 background image
20
Getting Ready
941
Once the connections have been completed, turn on power to
your various devices in the order specified. By turning on
devices in the wrong order, you risk causing malfunction and/
or damage to speakers and other devices.
1.
Before turning on the JUNO-Di’s power, consider these
two questions:
Is the AC adaptor and any other equipment connected correctly?
Have the volume controls of the JUNO-Di and all connected audio
devices been turned to their lowest settings?
2.
Turn on the [POWER] switch located on the rear panel of
the JUNO-Di.
fig.power-onoff.eps
Always make sure to have the volume level turned down
before switching on power. Even with the volume all the way
down, you may still hear some sound when the power is
switched on, but this is normal, and does not indicate a
malfunction.
To ensure proper operation of the pitch bend lever, make sure
not to touch the lever when turning the JUNO-Di’s power on.
fig.Bender2-e.eps
3.
Turn on the power for any connected audio devices.
4.
While playing the keyboard and listening to the sound,
slowly increase the volume of the JUNO-Di and the
volume of the connected equipment until you obtain the
desired volume.
fig.volume1.eps
1.
Before turning off the power, consider these two
questions:
Have the volume controls of the JUNO-Di and all connected audio
devices been turned to their lowest settings?
Have you saved your JUNO-Di sounds or other data you’ve created?
2.
Turn off the power for all connected audio devices.
3.
Turn off the [POWER] switch of the JUNO-Di.
fig.power-onoff.eps
1.
Use the [VOLUME] knob to adjust the volume.
Turning the knob toward the left will decrease the volume, and
turning it toward the right will increase the volume.
Also adjust the connected device to an appropriate volume.
fig.volume2.eps
The characters in the display may be difficult to read immediately after
the power is turned on, or after you have been using the JUNO-Di for an
extended time, or due to the conditions in which it’s being used. If this
occurs, turn the rear panel [LCD CONTRAST] knob to make the display
legible.
fig.LCDcontrast.eps
Turning On/Off the Power
On
Lower position
Turning Off the Power
Adjusting the Volume Level
([VOLUME] Knob)
Adjusting the Display Contrast
([LCD CONTRAST] Knob)
Off
Upper position
JUNO-Di_e.book 20 ページ 2009年6月22日 月曜日 午前9時23分

Table of Contents

Other manuals for Roland JUNO-Di

Question and Answer IconNeed help?

Do you have a question about the Roland JUNO-Di and is the answer not in the manual?

Roland JUNO-Di Specifications

General IconGeneral
Keyboard61 keys (with velocity)
Polyphony128 voices
Parts16 parts
User Patches256
User Rhythm Sets8
User Performances64
User Favorites100
Chorus3 types
Reverb5 types
File FormatSMF, WAV, AIFF
Current Draw600 mA
Wave Memory64 MB (16-bit linear)
Preset Rhythm Sets20 or greater
Preset Performances64 performances
Multi-Effects79 types
Mic Input Reverb8 types
ArpeggiatorYes
DisplayGraphic LCD (128 x 64 dots)
ConnectivityUSB, MIDI
Power SupplyAC Adaptor
Dimensions1, 008 (W) x 300 (D) x 104 (H) mm
Weight5.2 kg
ConnectorsUSB, MIDI, mic input (1/4" jack), audio output (L/Mono, R), headphones (1/4" stereo jack), Hold Pedal

Summary

USING THE UNIT SAFELY

About WARNING and CAUTION Notices

Clarifies the meaning of warning and caution labels.

About the Symbols

Explains the meaning of various warning symbols.

IMPORTANT NOTES

Power Supply: Use of Batteries

Discusses power sources and battery usage guidelines.

Additional Precautions

General safety and handling advice.

Main Features

Panel Descriptions

Front Panel

Describes the controls and connectors on the front of the unit.

Rear Panel

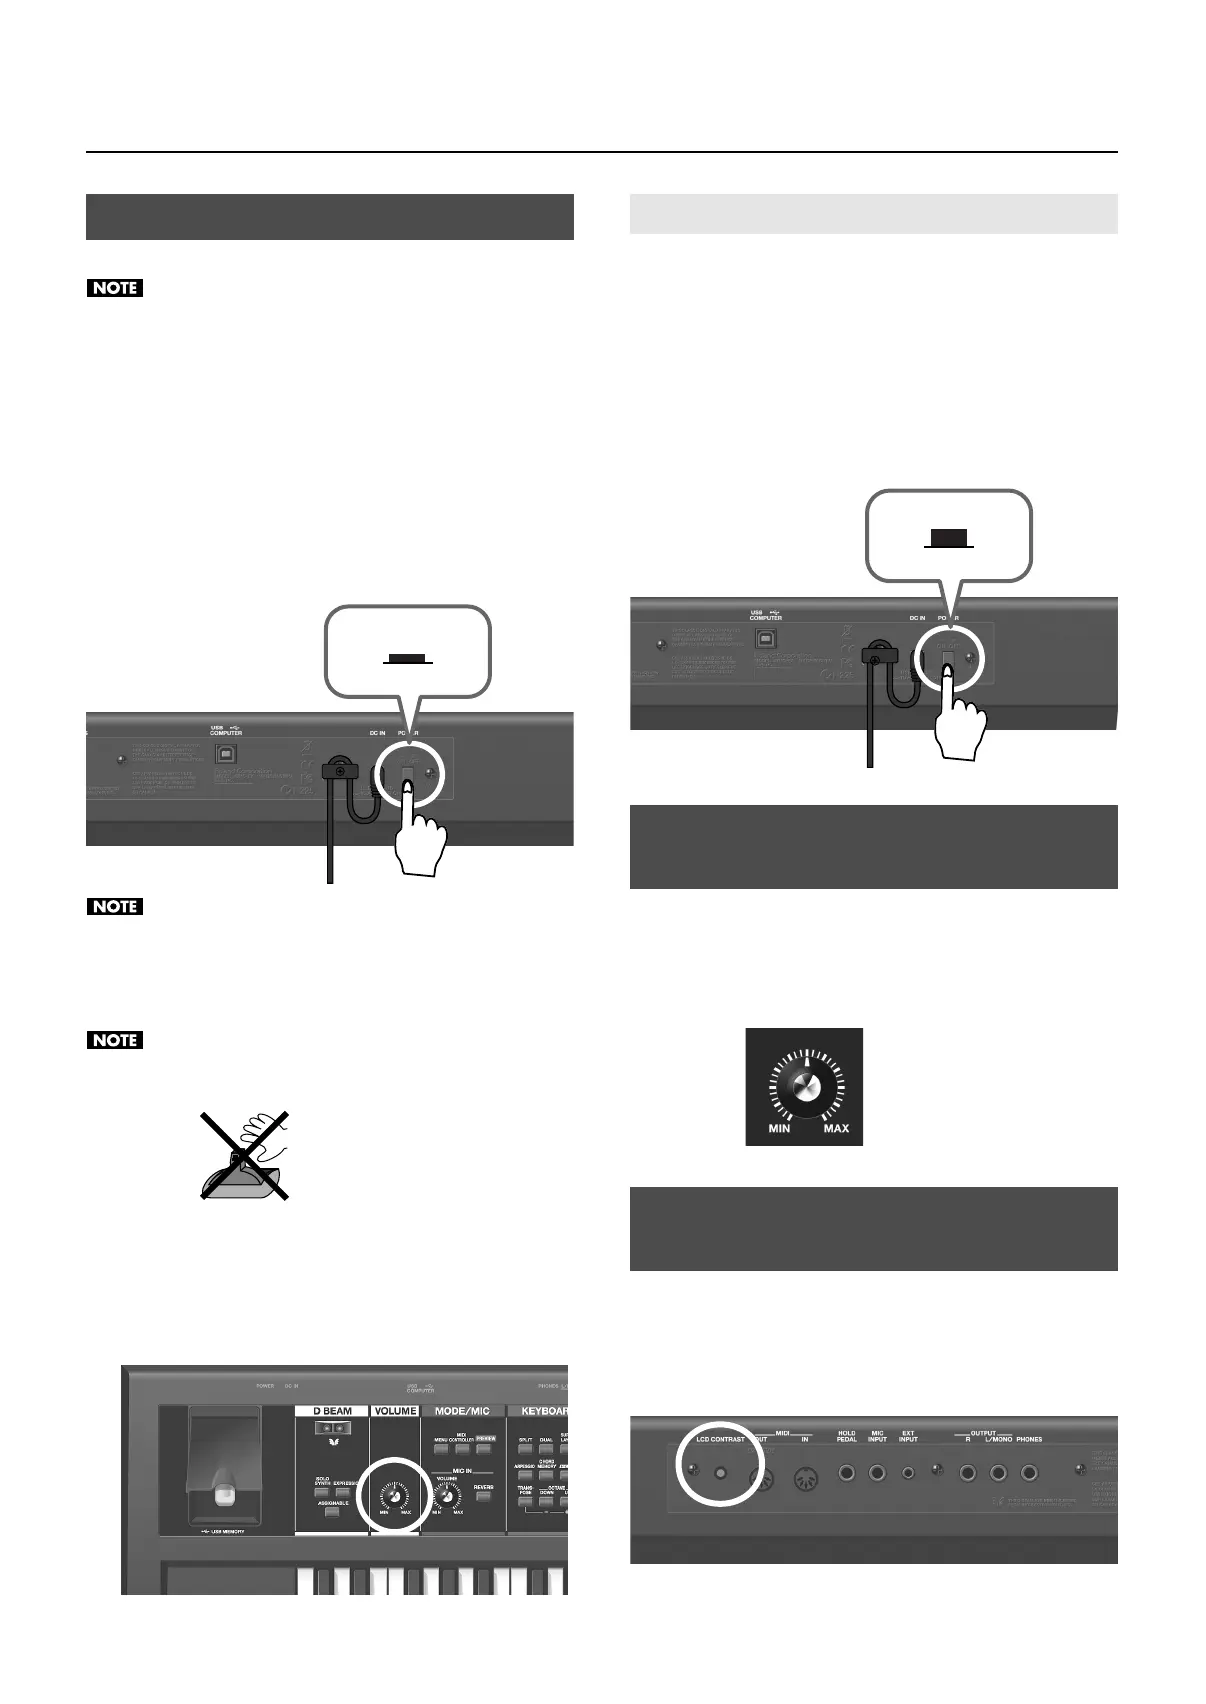
Details the ports and controls located on the rear of the unit.

Getting Ready

Connecting the AC Adaptor

Instructions for connecting the power adapter.

Installing Batteries (Sold Separately)

Guide for installing batteries.

Connecting the External Equipment

How to connect speakers, headphones, and other audio equipment.

Turning On/Off the Power

Steps for powering the unit on and off.

Playing Ballads

Playing Jazz Electric Piano

Playing Rock Organ

Playing Pops

Playing R&B

Playing Bossa Nova

Playing Techno Sounds

Playing Drums

Playing Synthesizer Sounds

Singing Along While You Play

Playing Live

Registering Frequently Used Tones

How to save and register favorite tones.

Invoking Registered Tones

How to recall registered favorites.

Playing Back Songs with the Song Player

Using the Song Player function to play audio files.

Playing Back a Song—[SONG LIST] Button

Selecting and playing songs from USB memory.

Saving Your Settings—[WRITE] Button

Overview

How the JUNO-Di is Organized

Describes the main sections of the JUNO-Di.

Basic Operation of the JUNO-Di

The [SHIFT] Button’s Function

How the SHIFT button provides shortcuts.

Detailed Tone Settings

Saving Your Settings

How to save modified settings.

Detailed Settings for Performance Functions

Song Player Settings

Other Settings

Backing Up or Initializing Data (UTILITY)

Utility functions for data management.

Returning to the Factory Settings (FACTORY RESET)

How to reset the unit to factory defaults.

Connecting an External MIDI Device

Installing the USB Driver in Your Computer

How to install the USB driver.

Troubleshooting

Problems Concerning the Entire JUNO-Di

General issues affecting the whole unit.

Issues Related to Sound

Problems related to sound output or quality.

Issues Related to MIDI and External Devices

Troubleshooting MIDI and external connections.

Issues Related to Effects

Troubleshooting effect application problems.

Issues Related to Saving Data

Troubleshooting data saving issues.

Issues Related to Songs

Troubleshooting song playback issues.

Issues Related to USB Memory

Troubleshooting USB memory detection and backup.

Error Messages

Effects List

Shortcut List

Warning

Federal Communications Commission Radio Frequency Interference Statement

Related product manuals