- 8 -
Getting to Know Your
Ice-cream Maker
Congratulations on the purchase of your new
Ice-Cream Maker.
Before first using your new Ice-Cream Maker, it is
most important that you read and follow the
instructions in this use and care booklet, even
if you feel you are familiar with this type of
appliance.
Your attention is drawn particularly to the section
dealing with IMPORTANT SAFEGUARDS. Find
a safe and convenient place to keep this booklet
handy for future reference.
This appliance has been designed to operate
from a standard domestic power outlet. It is not
intended for industrial or commercial use.
Before First Use
Carefully unpack the Ice-Cream Maker and
remove all packaging materials.
Wash the freezer canister, cover and paddle in
warm soapy water and dry thoroughly. These
parts are not dishwasher safe.
Use a damp cloth to clean the exterior of the
motor unit. Do not immerse the motor unit in
water.
How to Use Your Ice-cream
Maker
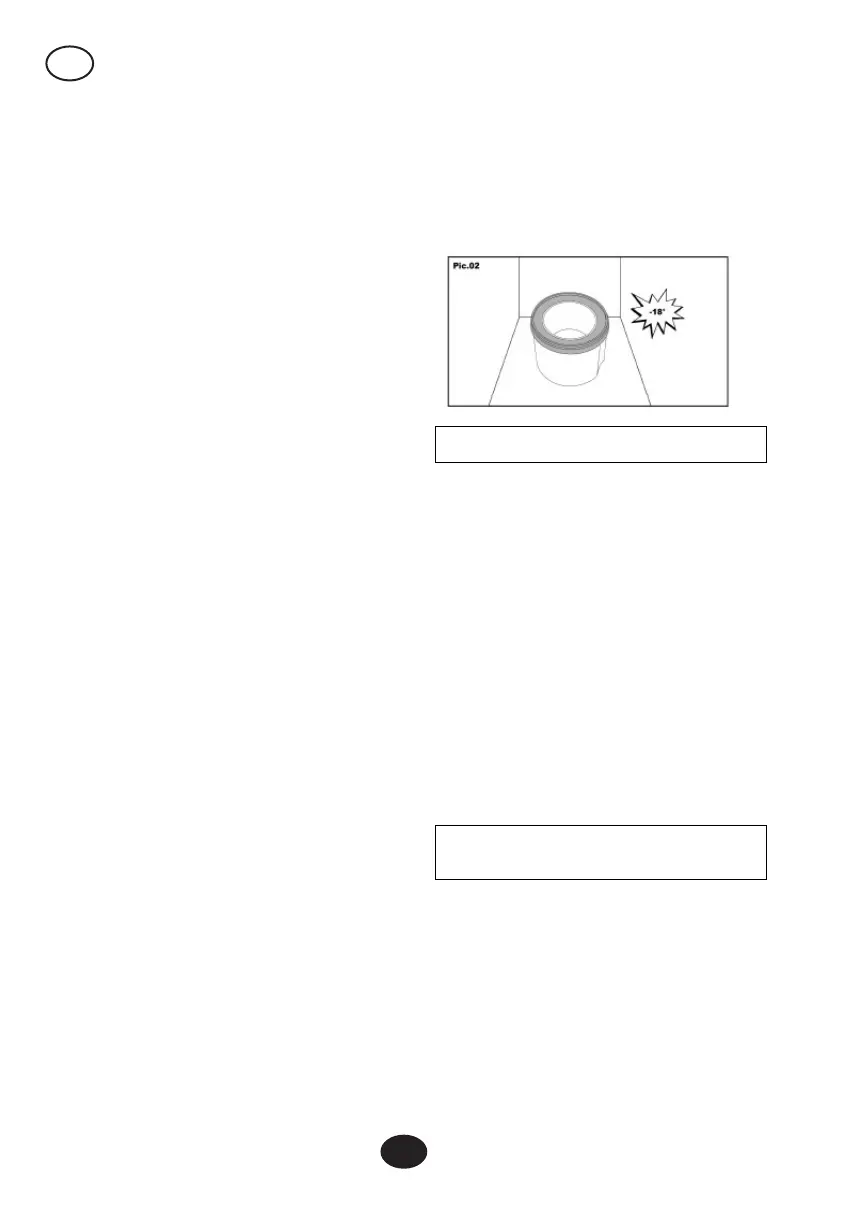
Step 1 – freezing the freezer container
(PiC.01)
Note: It is essential that the freezer canister is
frozen properly.
To freeze the freezer canister, wrap it in a plastic
bag and store it in the back section of your
freezer, where the temperature is the coldest.
The plastic bag will prevent freezer burn from
occurring.
Shake the freezer canister to check the progress
of the freezing process. If you can hear liquid,
replace the freezer canister back into the freezer.
When you can no longer hear the liquid when you
shake the freezer canister, the freezing process is
complete. The table below indicates the amount
of time required to freeze the freezer canister.
freezer approx.
temperature freezing time
-30°C/-22°F 8-9 Hours
-25°C/-13°F 12-13 Hours
Note: The canister must be used immediately
after being withdrawn from the freezer. Do
not allow it to thaw.
Step 2 – preparing the ice-cream mixture
Refer to the recipes in the back of this booklet to
prepare ice-cream mixture.
For best results, prepare the ice-cream mixture
one day before making ice-cream. This adds
volume and allows time for the mixture to cool
sufficiently.
Step 3 – Assembly of Ice Cream
Maker
1. Turn the motor unit upside down (1) and insert
the transparent cover lid (2).
2. Insert the paddle holder in the transparent
cover lid (3).
3. Attach the paddle (4).
4. Take out the freezer container from the icebox.
5. Place the motor unit and the paddle on top of
the freezer bowl.
6. Slide in the locking teeth make sure the triangle
on cover lid match lock symbol on
top ring.
Step 4 - The Ice Cream Making
Process
1. Turn the ON/OFF switch to the position “I”.
2. Immediately pour the Ice Cream mixture
through the feeder holes into the cooling
container.
3. Leave the machine ON for approximately 20-
40 minutes. Maximum operation time is 40
Note: Turning the appliance off during the
operation may cause the mixture to freeze
and restrict the movement of the paddle.
4. DO NOT use sharp objects or utensils inside
the freezer container, sharp objects will
scratch and damage the inside of the freezer
container, A rubber scraper or wooden spoon
may be used when the appliance is turned off.
5. Keep in mind that fresh home-made ice-cream
will not be same consistency than that of hard,
store-bought ice-cream. Rather, the consistency
will be frozen, yet soft. For hard ice-cream, using
a rubber spatula or wooden spoon remove ice
cream from the cooling container into a sealed
container. Place container back into the freezer
for several hours, or until ice-cream becomes
hard. You may leave the ice-cream in the cooling
container, to harden in the freezer for a period of
time (more than 30 minutes). Then it will be
perfect to serve.
Note: The maximum volume of mixture
that can be prepared in the container is
400-600ml. As the mixture expands during the
freezing process, the maximum volume of ice
cream that can be made during the ice cream
making process is approximately 1000ml.
 Loading...