www.scheppach.com
22
|
GB
7. Technical data
Filter
Connection 220-240V / 50Hz
UVC lamp power rating 11 W
Filter tank volume 9.5 l
UVC lamp holder G23
Inlet/outlet thread 1”
Pump
Connection 220-240V / 50Hz
Power 43 W
Max. delivery ow 2500 l/h
Max. delivery height 2 m
Max. submersion depth 2 m
Protection category IPX8
Min./max water temperature 4°C / 35°C
Length of mains connection
cable
10 m
Weight 5.5 kg
Technical changes reserved!
8. Unpacking
• Open the packaging and carefully remove the de-
vice.
• Remove the packaging material, as well as the pack-
aging and transport safety devices (if present).
• Check whether the scope of delivery is complete.
• Check the device and accessory parts for transport
damage. In the event of complaints the carrier must
be informed immediately.
Later claims will not be recognised.
• If possible, keep the packaging until the expiry of the
warranty period.
• Familiarise yourself with the product by means of the
operating instructions before using for the rst time.
• With accessories as well as wearing parts and re-
placement parts use only original parts. Replace-
ment parts can be obtained from your dealer.
• When ordering please provide our article number as
well as type and year of manufacture for your equip-
ment.
m WARNING!
The device and the packaging material are not
children‘s toys! Do not let children play with plas-
tic bags, lms or small parts! There is a danger of
choking or suocating!
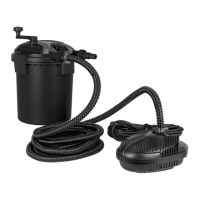
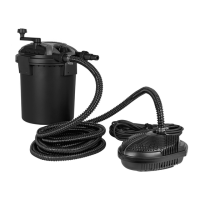
9. Layout
Warning!
Always pull out the mains plug before carrying out ad-
justments on the device.
1. Connect the twist-clean crank (j). (Fig.2)
2. Fit the desired lter connection (h or i) using the
seal (g) and the union nut (f). (Fig. 2)
3. Screw the pump connection (d) onto the pump (a).
(Fig. 3)
4. Cut the hose (b) according to your needs. (Fig. 4)
5. Attach one end of the hose to the pump connection
(d) using the hose clamp (e). (Fig. 5)
6. On the lter inlet side (7), attach the other end of
the hose to the lter connection attached previous-
ly (h or i) using the hose clamp (e). (Fig.6)
7. If you wish, attach the remaining hose to the lter
connection (h or u) on the lter outlet side (6) using
the hose clamp (e). (Fig. 7)
8. Position the pressure lter (c) above the pump po-
sition. The hose of the lter outlet must not pro-
trude into the water. (Fig. 8)
9. Insert the pump (a) into the water. The pump must
be positioned below the pressure lter. (Fig. 8)
10. Start up
m Attention!
Always make sure the device is fully assembled
before commissioning!
m Attention!
The pump must be switched on before the lter,
otherwise the device is at risk of damage.
Switching on the device
1. Connect the mains plug of the pump. The device
starts up immediately.
2. Set the rotary switch (5) to “Run”.
3. Connect the mains plug of the pressure lter.
 Loading...