www.scheppach.com / service@scheppach.com / +(49)-08223-4002-99 / +(49)-08223-4002-58
GB
|
31
The tilt protection (10) prevents the plunge saw from
tilting during miter cuts and adjustment work.
The rebound protection (M2 / not included) ensures a
safe guiding during plunging into the workpiece (not
included).
By means of the rail joiner (22), 2 guide rails can be
connected and allow long, precise cuts.
The guide clearance of the assembly on the guide rail
can be regulated with the two adjustment screws (9).
it will need to be adjusted to slide with minimal side
movement on the guide rail. Adjustable cams (9) are
1. Place saw on guide rail.
2.
clockwise until tight.
3. Then clockwise slightly to allow clearance.
4. While holding dials in position lock in place by
with machine)
5. Pull saw back and forth along rail ensuring it
6. Future adjustment may be needed depending on
use of saw.
Splinter Protection
The guide rail comes with a splinter guard, which
1. Secure rail with the screw clamps (not included) to
a piece of scrap lumber.
2. Adjust the guide clearance on the rail with the two
adjustment screws (9).
3. Set the plunge saw to ca. 6mm cut depth
4. Set up the saw at the back end of the rail.
5. Switch on the machine, press down to the set cut
length in one pass without stopping. The edge of
the splinter guard now corresponds exactly to the
cutting edge of the saw blade
Cutting with guide rails (Fig. A, B, E, M)
1. Place the machine in the guide rails.
2. Turn on the machine by pressing the ON/OFF
switch (8).
3.
4. Press the saw downwards to reach the sawing
depth.
Note:
thus splitter protection is guaranteed up to the saw
blade.
5. Push the saw uniformly forwards.
6.
top when the saw cutting is complete.
• Grip the saw tightly with both hands ensuring that
one hand is placed on the main handle and the
other on the front handle.
• When using a guide rail, it must be fastened with
screw clamps.
• Make sure the power cable is not placed in the saw
ing direction.
Sawing along the scribe mark
The cutting indicator (Fig. G Pos. G1) displays the
cutting line for 0° and 45° cuts (without guide rail).
Cutting sections
1. Place the machine with the front part of the saw
table on the workpiece.
2. Switch the machine on using the ON/OFF switch
(8).
3.
4. Push the saw downwards to reach the sawing
depth.
5. Push the saw forward evenly.
6.
Sawing cut outs (plunge cuts) (Fig. L - O)
m ATTENTION! In order to avoid kickbacks, the
following instructions must be observed without fail
when plunge cutting:
• Always place the machine with the rear edge of the
• When working with the guide rail, place the ma
chine against the kickback stop (M2 / not included)
clamped to the guide rail.
Procedure
1. Place the saw onto the work piece.
2. Place the cutting indicator with the rear arrow (L1)
Note: The markings (L1/L2/L3) indicate the abso
lute front and the absolute rear cutting points of
the saw blade (dia. 160 mm) when using the saw
at maximum cutting depth with the guide rail.
3. Switch the machine on and push the saw down
wards until you reach the set cutting depth.
4. Move the saw forwards until the cutting indication
(L3) has reached the marked point.
5.
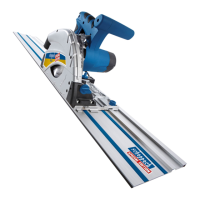
Guide rails (Fig. E + M)
The guide rails (21) enable clean, precise cuts and
protect the surfaces from damage.
Note: When sawing with the guide rail, the cut depth
is 4.5 mm less than the scale value on the machine.
For safety, the guide rail can be secured with screw
clamps (M1) (not included).
 Loading...