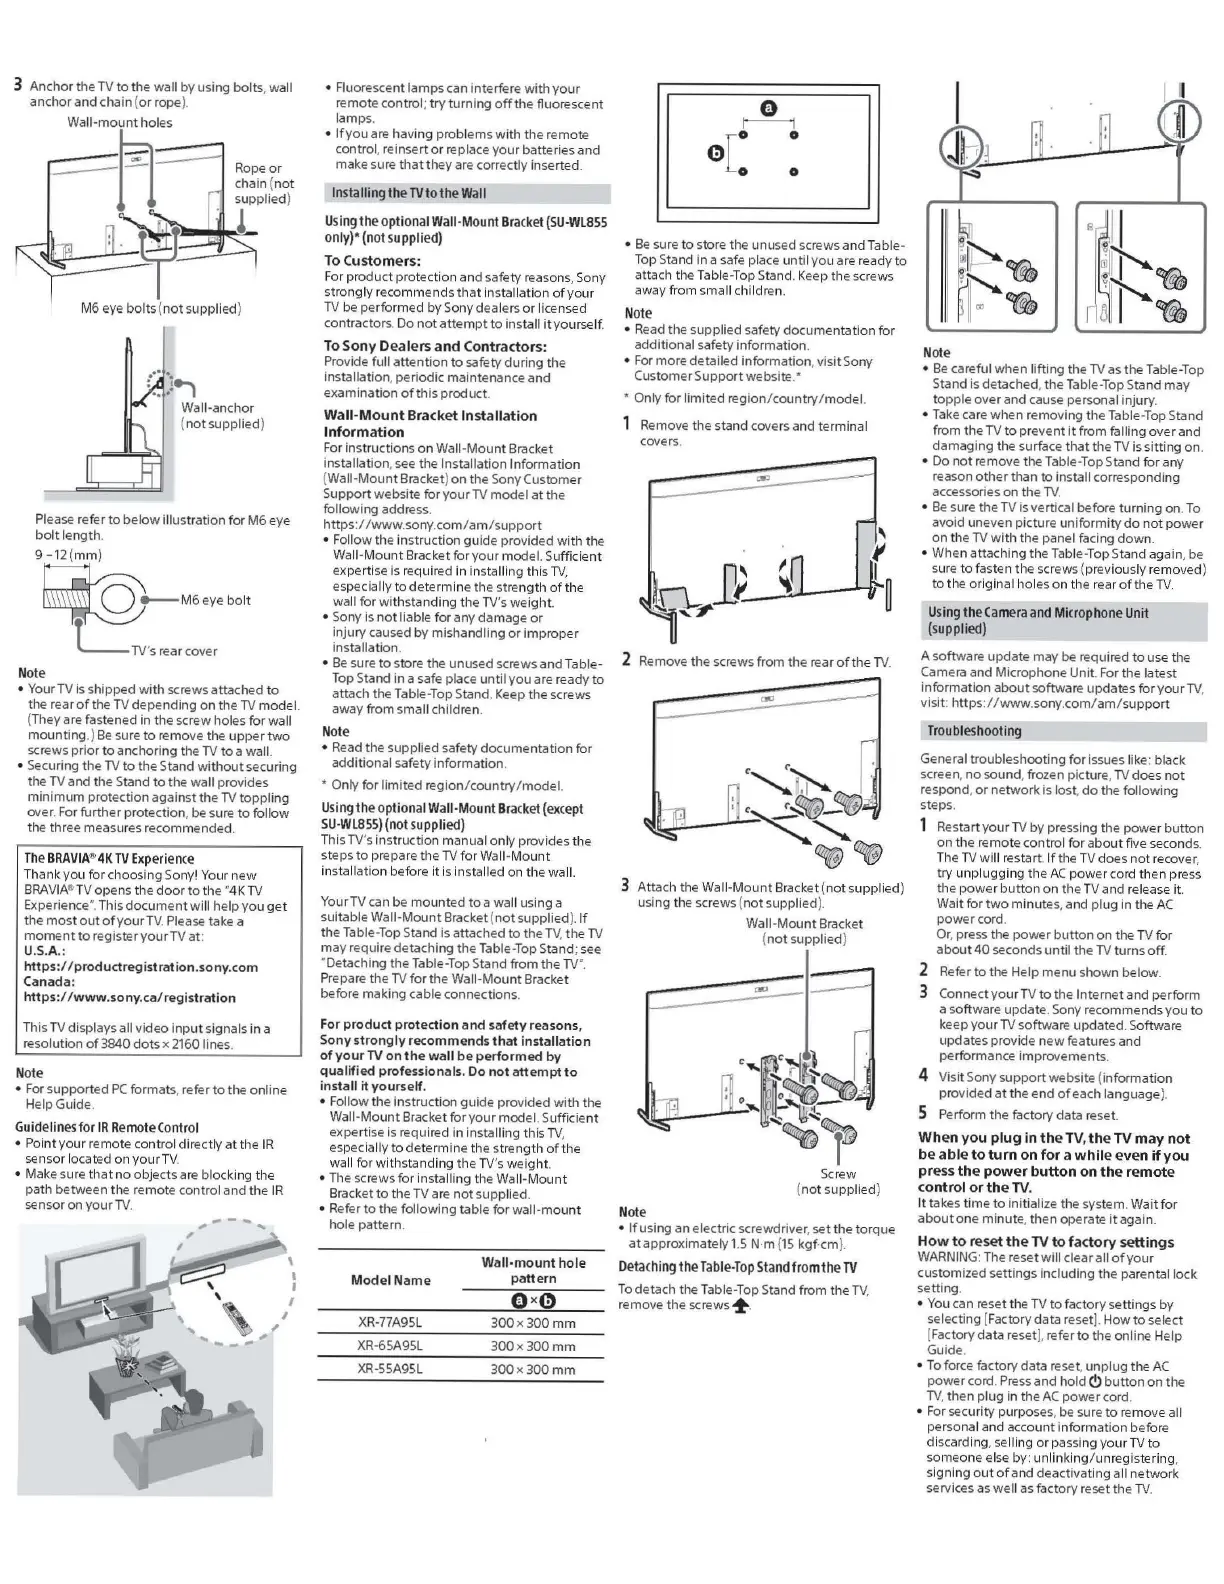
3 Anchor
the
TV
to
the
wa
ll
by
using
bolts
, wall
anchor and chain (
or
rope).
Wa
ll
-mount
holes
-
-~
,
----
·,
M6 eye bolts (
notsupplied
)
Wall-anchor
(
not
su
pp
lied)
Pl
ease
ref
er
to
belo
w illus
tr
ation
for
M6
eye
bo
lt
le
ngth
.
9-12
(
mm
)
~M6eyebo
lt
CTV
's rear cover
N
ote
• Your TV
is
shi
pped
wi
th
sc
r
ews
attached
to
the rear
of
the TV depending
on
th
e
TV
model.
(
Th
ey are fastened in
th
e screw holes
for
wall
mounti
ng.)
Be
sure
to
re
mo
ve the
upp
er
two
sc
re
ws
prior
to anchoring the
TV
to
a wall.
• Securing the
TV
to
the Stand w
ith
ou
t securing
the TV and the Stand
to
the
wall provides
minimum
protec
tion
against
th
e
TV
to
pp
ling
over
. For further
prot
ection, be s
ur
e to
follow
the
thr
ee measures recommended.
Th
e
BRAVIA
"
4K
TV
Experi
e
nc
e
Thank
yo
u
for
choosing Sony' Your
new
BRAVIA
®T
Vope
ns the
door
to the "4KTV
Expe
ri
ence
·.
This
docum
e
nt
wi
ll
help
you
get
the
mo
sto
utofyourT
V.
Please take a
moment
to
register
yo
ur
TV
at
:
U.S
.A
.:
https
:/
/pr
oductr
egis
t
ration.
so
ny.com
Canada:
htt
ps://
www
.s
ony.ca/registration
This TV displays all video
input
signals in a
resolution
of
3840
dots
x 2160 lines.
N
ote
• F
or
s
up
ported
PC
formats, refer
to
the online
Help Guide.
Guid
e
lin
es
for
IR
R
emote
Control
• Point
yo
urr
e
mot
e co
ntrol
dir
ec
tl
y
at
th
e IR
se
nsor located on
your
TV.
• Make sure
th
at
no
ob
jects are blocking
th
e
pa
th
between
th
e re
mot
e control and
th
e
IR
sensor
on
your
TV
.
I
I
' ,
..
,
---
•
Flu
orescent
lamps
can interfere with y
our
remote control; try
turning
o
ff
the fluorescent
l
amps
.
•
If
you
are having problems
with
the remote
control, reinse
rt
or
replace
yo
ur
batteries
and
ma
ke
s
ur
e
that
they
are correctly inserted.
Installing
the
TV
to
the
Wall
Using
the
optiona
l
Wall-Mount
Bra
cket
(SU-Wl855
only)*
(not
supp
lied)
To
Customers:
F
or
product protection and
sa
fety reasons, Sony
s
tr
ong
ly reco
mmend
s
that
installation
of
yo
ur
TV
be performed by Sony dealers
or
licensed
contractors. Do
not
att
e
mpt
to
install
it
yourself.
To Sony Dealers and Contractors:
Provide full
attention
to
sa
fety
during
the
installati
on
, periodic maintenance
and
ex
am
ination
of
this product.
Wall-
Mount
Bracket Installation
Information
Fo
r ins
truct
ions
on
Wa
ll
-Mount
Brack
et
installa
tion
, see
th
e Installa
tion
Information
(Wall-Mount Bracket)
on
the Sony Customer
Support website
for
your
TV
model
at
the
follo
wing
address.
http
s://www.so
ny.
com
/
am
/s
upport
• Follow
th
e
in
struc
tio
n
gui
de provided
with
the
Wall-
Mount
Bracketforyour
mod
e
l.
Suffici
en
t
expertise is required
in in
stalling this
TV
,
especially
to
determine
th
e s
tr
ength
of
the
wall
for
wit
hstanding
the
TV
's weight.
• Sony is
not
liable
for
any damage
or
i
nju
ry caused by
mi
shandling
or
i
mpr
oper
inst
allation.
• Be s
ur
e to
sto
re t
he
unu
sed
sc
r
ews
and
Table-
Top Stand in a sa
fe
place
until
you
are ready to
attach
th
e Table-Top Stand. Keep
the
sc
re
ws
away from small children.
N
ote
• Read
th
e
supp
lied safety
documentation
for
additional safety information.
* Only for limited region/ country
/m
odel.
Using
the optional
Wall
-
Mount
Bra
cket (
except
SU-Wl855)
(not
supplied)
This TV's
in
struction ma
nu
al only provides
th
e
steps to pre
pa
re
th
e
TV
for
Wa
ll-Mou
nt
in
sta
ll
a
tion
before
it
is install
ed
on
th
e wall.
Your
TV
ca
n be
mount
ed
toa
wall using a
s
uit
able Wall-M
ount
Bracket (
not
supplied).
If
the
Tab
le-Top Stand is attached
to
th
e TV, the
TV
may
r
eq
uire detaching
th
e Tabl
e-
Top
Stand; see
"Detaching the Table-Top St
and
from
th
e
TV
".
Prepare the
TV
for
the
Wa
ll
-
Mount
Bracket
befo
re making cable connection
s.
For
product protection
and
safety
reasons,
Sony
strongly
recommends
that installation
of your
TV
on
the w
all
be performed
by
qualified
professionals
.
Do
not
attempt to
install
it
yours
elf.
•
Fo
ll
ow
th
e instruction guide prov
id
ed w
ith
the
Wall-
Mo
unt
Brack
et
for
yo
ur model. Suffici
ent
expert
i
se
is re
quir
ed
in
installing
thi
s
TV
,
especially to determine
th
e s
tr
engt
h
of
the
wall
for
withs
tan
ding
th
e
TV
's weight.
• The
sc
r
ews
for
installing
th
e
Wa
ll
-Mo
unt
Bracket
to
the TV
ar
e
not
supplied.
• Refer
to
th
e
fo
llo
wing
table for wall
-mou
nt
ho
le pattern.
Mod
el Name
XR-77A95L
XR-65A95L
XR-55A95L
Wall-mount hole
pattern
300x300
mm
300x300mm
300x300mm
•
Be
sure
to
store the unused screws
and
Table-
T
op
Stand
in
a
sa
fe place u
ntil
yo
u are ready
to
attach t
he
Table-Top Stand. Keep the
sc
rews
away fr
om
s
mall
child
re
n.
Note
• Read the supplied safety
documentation
for
additional safety information.
•
Fo
r
more
detailed
info
rmation, vis
it
Sony
Custom
er
Support
website.•
* Only
for
limited
region
/co
untry
/m
odel.
Remove
th
e stand covers and terminal
covers.
""
2
Re
move the
sc
re
ws
from
the rear
of
the
TV.
""
3 Attach
th
e Wall-
Mount
Bracket (
not
supplied)
using the screws (
not
supplied).
Wa
ll
-Mount
Bracket
(
not
supplied)
-
-~
- -- - _-::-:_
:-
_- ]
L
.:1.:~~
n
·~
·~
- .
~
ILJl.;l...--
- ·~
~l
N
ote
Screw
(
not
supplied)
• If using
an
elec
tr
ic screwdriver,
se
t
th
e torque
at
app
roximately
1.5
N-m {15 kgf-cm
).
De
ta
c
hing
the
Tabl
e-Top
Stand
from the
TV
To
detach the Table-Top Stand from the TV,
remove the
screws
¼ .
Not
e
•
Be
careful
when
l
ifting
the
TV
as the Table-Top
Stand is detached, the Table-Top Stand may
t
opp
le
over
and cause personal inj
ury
.
•
Take
care when removing the Table-Top Stand
from the
TV
to
prevent
it
from falling
over
and
damag
ing the surface
that
the TV is
sitt
ing
on
.
• Do
not
re
mo
ve the
Tab
le
-T
op
Stand
for
an
y
reason
othe
r than
to
install corresponding
accessories on
the
TV
.
•
Be
sure the TV is vertical before turning
on
.
To
avoid uneven picture uni
formity
do
not
power
on
t
he
TV
with
the panel faci
ng
down.
• When attaching the Table-Top Stand again, be
sure
to
fasten t
he
screws (previously re
mov
ed)
to
t
he
or
iginal
ho
les
on
th
e
re
ar
of
th
e
TV
.
Us
ing
th
e
Camera
and
Microphone
Unit
(supplied)
A software
upd
at
e may be required
to
use t
he
Camera and Microphone Unit. For
the
latest
inform
ation
about
software updates
for
your
TV
,
visit:
https
://
www
.sony.
com
/
am
/
support
Troubl
es
h
ooting
General
tr
ou
ble
shoot
ing
for
issues li
ke
: black
screen,
no
sound, frozen picture,
TV
do
es
not
respond,
or
network
is lost,
do
the following
steps.
1 Restart
your
TV
by
pressing
the
power
butto
n
on
the r
emote
control
for
about five seconds.
The
TV
will restart. If
th
e TV
do
es
not
reco
ver
,
try
unp
lugging the
AC
power cord then press
th
e
power
button
on
th
e TV and release it.
Wait
for
two
minutes, and plug
in
the
AC
power
cord.
Or, press the
power
button
on
the TV
for
about40
seconds
un
til
th
e
TV
turns
off
.
2 Refer to the H
elp
menu
shown below.
3 Connect
your
TV
to
the Internet and p
erfo
rm
a software update. Sony recommends
you
to
keep yo
ur
TV software
updat
ed
. Software
updates provide n
ew
fea
tu
res and
performance
imp
rovements.
4 Visit Sony
support
website (
informat
i
on
provided
at
t
he
end
of
each language
).
5 Perform
th
e factory data reset.
When you plug in
the
TV
,
th
e
TV
may
not
be
able
to
turn
on
for
a
while
even if you
pr
ess
th
e p
owe
r button on
the
remote
control
or
th
e
TV.
It
takes
time
to
initialize
th
e system. Wait
for
about
one
minute
, th
en
operate
it
again.
How
to
reset
th
e TV to factory settings
WARNING
:
The
reset
will
clear all
of
your
customized
se
tting
s including
th
e parental lock
setting.
• You can reset
th
e TV
to
factory
sett
ings by
selecting [Factory
data
reset
).
How
to
select
[Factory
data
reset]. r
efer
to
the online
He
lp
Guide.
•
To
force fac
tory
data reset,
unp
lug
t
he
AC
power
cord. Press
and
hold
C)
button
on
th
e
TV
, then
plug
in
th
e
AC
power
cord.
•
For
secur
ity
purposes,
be
su
re
to
remove all
personal and accou
nt
information before
discarding,
se
lling
or
passi
ng
yo
ur
TV
to
someone else by: unli
nk
i
ng
/
unr
egistering,
signing
out
of
and deactivating all
network
services as well as fact
ory
reset
th
e
TV
.
 Loading...