EasyManua.ls Logo

TCL 43P6US User Manual

TCL 43P6US
24 pages
To Next Page IconTo Next Page
To Previous Page IconTo Previous Page
Page #10 background imageLoading...
Page #10 background image
10
Initial Setup
Initial setup involves selecting all the settings
required to be able to search for and store all the
analogue and digital channels you can receive.
Make sure that the television is switched on and
follow all the steps in turn specied hereafter.
Note: If the channel search retrieved only the
analogue channels it could be caused by poor
broadcasting and therefore is not covered by
manufacturer warranty. Manufacturers cannot be
held responsible for lack of or poor broadcasting
in some areas.
The rst time you switch the set on, the Initial Setup
wizard opens, which guides you through the initial
setup process.
1. Press / to select your language, then press
OK to conrm and then press OK again to enter
the next step.
2. Press /to select your location, then press OK
to conrm and then press OK again to enter the
next step.
3. Press / to select your country, then press OK
to conrm and then press OK again to enter the
next step.
Chapter 2 Getting Started
4. Read the terms and conditions carefully and
highlight Agree and press OK to enter the next
step.
5. Network setup process:
- Press / to select your network connection
type (Wired or Wireless), then press OK to
conrm and then press OK again to enter the
next step.
- Follow the guides on the screen and press the
corresponding buttons on the remote control to
proceed.
Note: You can also skip this step by selecting Skip.
Question and Answer IconNeed help?

Do you have a question about the TCL 43P6US and is the answer not in the manual?

TCL 43P6US Specifications

General IconGeneral
Screen Size43 inches
Resolution3840 x 2160 (4K UHD)
Display TechnologyLED
Smart TVYes
Operating SystemAndroid TV
HDMI Ports3
USB Ports2
Wi-FiYes
EthernetYes
Refresh Rate60 Hz
BluetoothYes
HDR SupportHDR10
Sound Output20W

Summary

Chapter 1: Introduction

Precautions

Read all instructions before operating the set. Keep these instructions for future use.

Safety Warnings

Never place a television set in an unstable location, which may cause serious injury or death.

Power & Plug Safety

Unplug the set if not used for a long period or if power cord/plug is damaged.

Wall Mounting Safety

Operation requires two people. Ensure the wall supports the TV weight and follow mount instructions.

Chapter 1: Introduction (Continuation)

Remote Control Functions

Describes how to use the remote control to navigate menus and configure settings.

Chapter 2: Getting Started

Switching On the TV

Follow instructions to switch on TV and remote. Connect power cable first to TV, then socket.

Chapter 2: Getting Started (Continuation)

Network Connection Overview

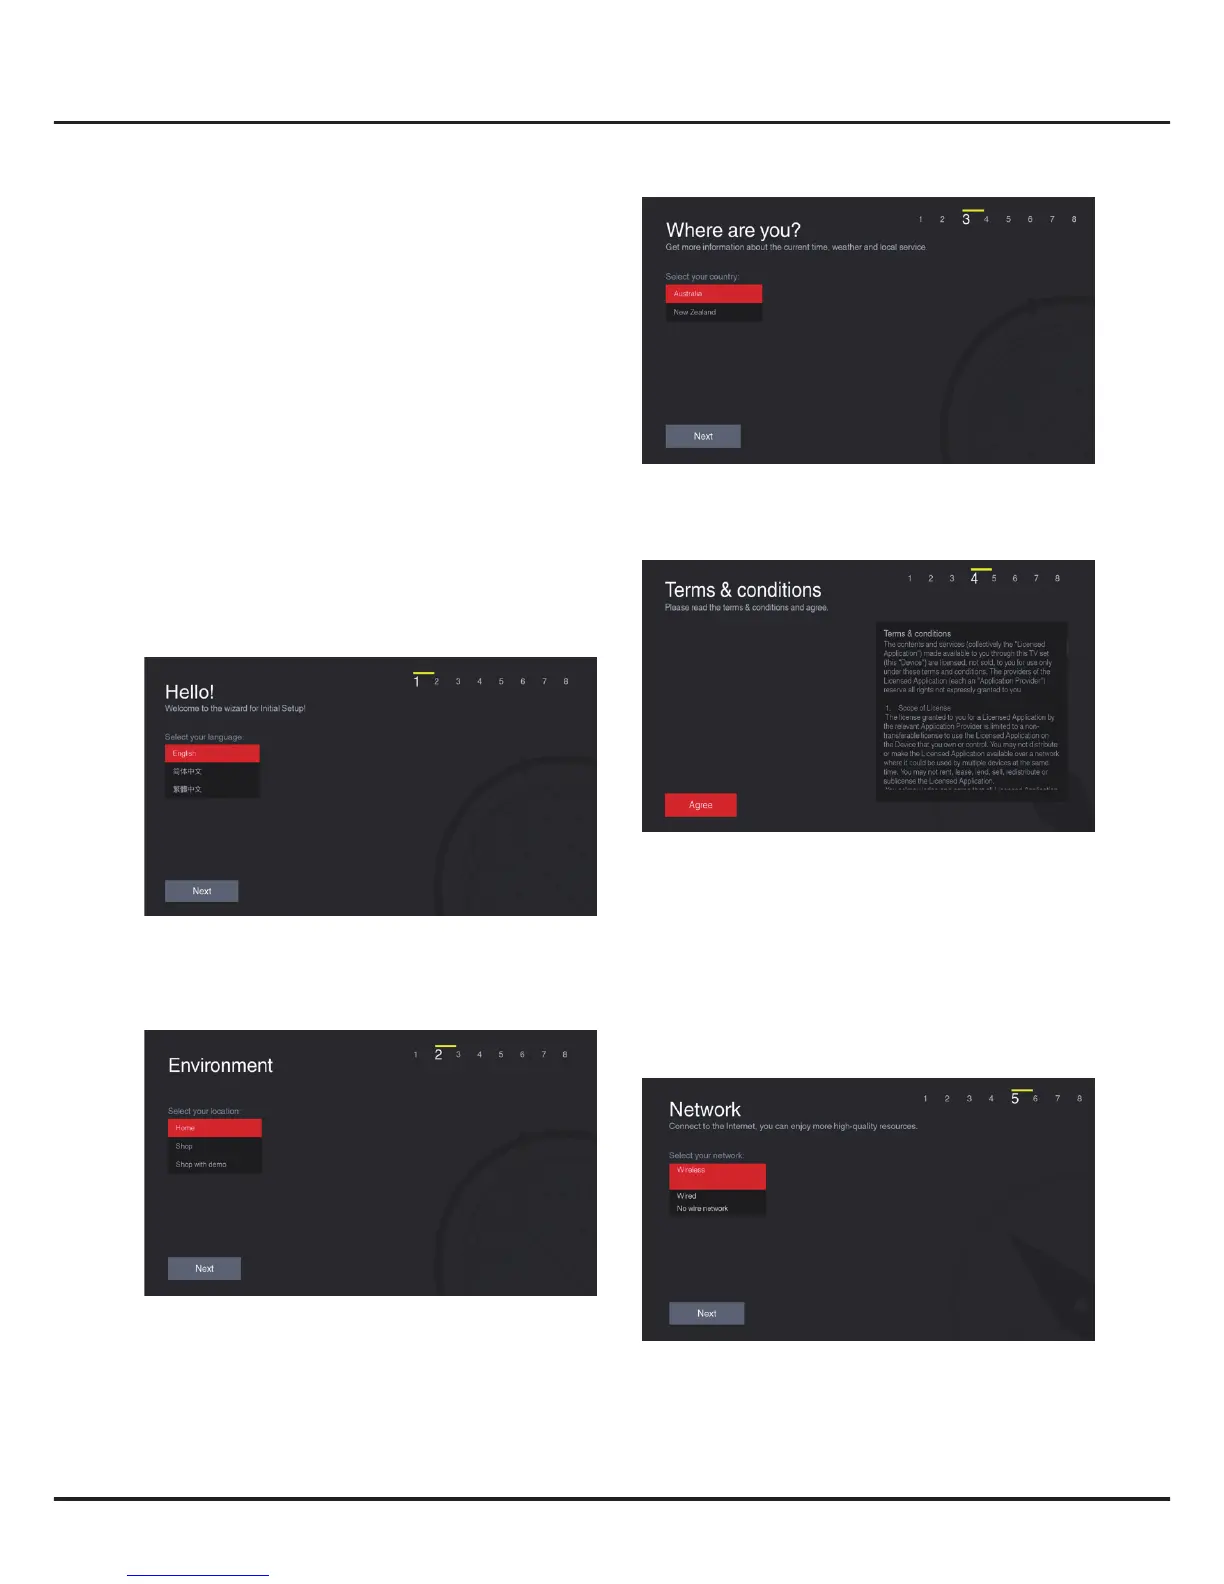
TV requires internet for functions. Connect via wired (LAN) or wireless (Wi-Fi) methods.

Network Settings Configuration

Set up wired or wireless connection to access the Internet. Options include Scan, Manual, or Auto.

Wired Network Setup

Connect TV to router/modem via Ethernet cable. Ensure proper hardware and connection.

Chapter 2: Getting Started (Continuation)

Initial Setup Wizard

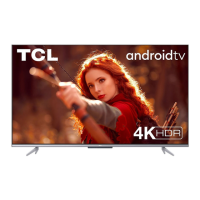
Guides through initial setup: language, location, country, terms, and network connection.

Naming Your TV

Assign a name to your TV for easier identification and connection with other devices.

Language Selection

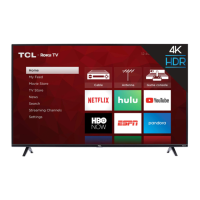
Choose your preferred language for the TV interface during initial setup.

Channel Installation Process

Install analogue and digital channels. Options for tuner mode and channel type available.

Location and Environment

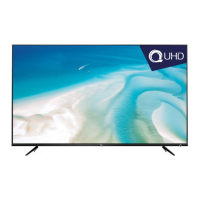
Select your location (Home/Shop) and set up the environment settings.

Setup Completion

Confirmation message upon completing initial setup. Allows modification of settings.

Terms and Conditions

Review and agree to the terms and conditions to proceed with setup.

Network Setup

Configure wired or wireless network connection as part of the initial setup.

Chapter 3: Basic Operation

Automatic Channel Scan

Search and store available analogue and digital channels automatically.

Chapter 5: Using More of Your TV (Continuation)

PVR Program Playback

Watch recorded programs by navigating to TV > Media > PVR and selecting the record file.

Software Update Procedures

Update TV software via USB, channel, or network for new features and performance improvements.

Chapter 5: Using More of Your TV (Continuation)

Personal Video Recorder (PVR)

Record favourite TV programs using a connected USB drive.

Chapter 6: Other Information

Troubleshooting Network Issues

Solutions for failing to link to the network, including checking connections and contacting ISP.

Software Update Precautions

Important notes for SW updating: avoid power cuts, refrain from remote operations, and be patient.

Chapter 6: Troubleshooting (Continuation)

Picture and Sound Issues

Resolve problems like no picture, no sound, no color, or blank screens in VGA mode.

Related product manuals