EasyManua.ls Logo

Tektronix 760A User Manual

Tektronix 760A
172 pages
To Next Page IconTo Next Page
To Previous Page IconTo Previous Page
Page #92 background image
Theory of Operation
6–4
760A / 760D / 760N
Comparator
Filter &
Rectifier
Decoder /
Driver
LED Bar
DAC
ROM Lookup
Table
CounterClock
DAC Ramp
Input
Signal
+
Figure 6–2: Simplified Level Indicator block diagram
The LED segments of a 100–segment bar are scanned from top to bottom about
300 times per second by a down–counter and decoder. The counter simulta-
neously addresses a ROM lookup table which contains the amplitudes repre-
sented by each segment of the bar. A DAC converts this succession of
amplitudes to an analog voltage ramp which is compared with the rectified and
filtered input signal. When the ramp voltage becomes less than the input signal,
the LED bar driver is enabled, lighting the LED segments. Hence, all segments
representing amplitudes less than the signal level are lit.
The ROM lookup table determines the shape and range of the scale. In addition
to the normal scale range, the ROM also contains the magnified scale range
actuated by the EXPAND SCALE button. Other scales for calibration and
troubleshooting are selected by a special service switch, S340. Refer to SECTION
4, MAINTENANCE, for information on the settings and uses of S340.
The signal from the Input Amplifier is full–wave rectified in precision rectifier
U445A & B, isolated by U445C & D, filtered with PPM time constants and
buffered by U453. The attack time constant is such that a 10 ms sine wave burst
will indicate 1 dB below true peak value. The fall time is 1.8 seconds for a
20 dB indicator drop. R347, R546 and R758 provide calibration adjustments for
the LEFT, RIGHT and AUX indicators, respectively.
Comparator. U635B compares the rectified signal with the DAC ramp and
provides the bar enabling signal. This signal is passed through logic contained
in a PAL, U438, which is part of the Peak Hold circuit description that follows.
GRAPH DRIVERS <2>
Dynamic Response
Control (Left)
Signal Peak Processor
(Left)

Table of Contents

Question and Answer IconNeed help?

Do you have a question about the Tektronix 760A and is the answer not in the manual?

Tektronix 760A Specifications

General IconGeneral
BrandTektronix
Model760A
CategoryMonitor
LanguageEnglish

Summary

Introduction and Specifications

Section 1 Introduction and Specifications

Overview of the instrument, its features, and technical specifications.

Introduction

General description of the 760A Stereo Audio Monitor and its purpose.

Features

Highlights the key features of the Stereo Audio Monitor.

CRT Display

Details the CRT display's function for monitoring stereo separation and phase.

Bar Graph

Describes the 100-segment LED bar graph for signal level indication.

Operating Instructions

Section 2 Operating Instructions

Guide to operating the 760A Stereo Audio Monitor.

Introduction

Familiarizes the user with the instrument's controls, connectors, and displays.

Front-Panel Controls

Describes the functions of all front-panel controls.

Rear-Panel Connectors

Details the audio input connectors on the rear panel.

CRT Display

Explains the CRT display's visual feedback for amplitude and phasing.

Display Orientation

Describes the 'Sound Stage' and alternate XY graticule orientations.

Installation

Section 3 Installation

Provides instructions for installing the instrument.

Unpacking

Instructions for unpacking the instrument and saving packaging.

Electrical Installation

Covers power source and mains voltage requirements.

Power Source

Specifies the instrument's intended power source.

Maintenance

Section 4 Maintenance

Covers preventive maintenance, troubleshooting, and corrective actions.

Introduction

Discusses preventive maintenance, troubleshooting, and corrective maintenance.

Preventive Maintenance

Details cleaning, visual inspection, and performance checks.

Cleaning

Instructions for cleaning the exterior and interior of the instrument.

CORRECTIVE MAINTENANCE

Information for repair procedures.

How To Use This Manual

Explains how to use foldout pages and diagrams for troubleshooting.

TROUBLESHOOTING INFORMATION

Provides information for isolating problems, especially with the DAC.

DAC Servicing

Describes ROM information for troubleshooting DAC issues.

Power Supply Troubleshooting Procedure

Guides for troubleshooting power supply issues.

Low Volts Supply

Procedure for checking and troubleshooting the low voltage supply.

MECHANICAL DISASSEMBLY AND ASSEMBLY

Instructions for disassembling and reassembling mechanical parts.

Bezel Removal

Step-by-step guide for removing the instrument's bezel.

Performance Check and Calibration

Section 5 Performance Check and Calibration Procedures

Procedures to verify and restore instrument specifications.

Introduction

Describes the two procedures: Performance Check and Adjustment.

Required Test Equipment

Lists minimum test equipment needed for procedures.

Performance Check Procedure

Guide to verifying warranted specifications of the 760A.

1. Initial Alignment

Step-by-step process for initial instrument alignment.

Calibration Procedure

Detailed steps for calibrating the instrument.

1. Preliminary Set Up

Initial setup steps before calibration adjustments.

Theory of Operation

Section 6 Theory of Operation

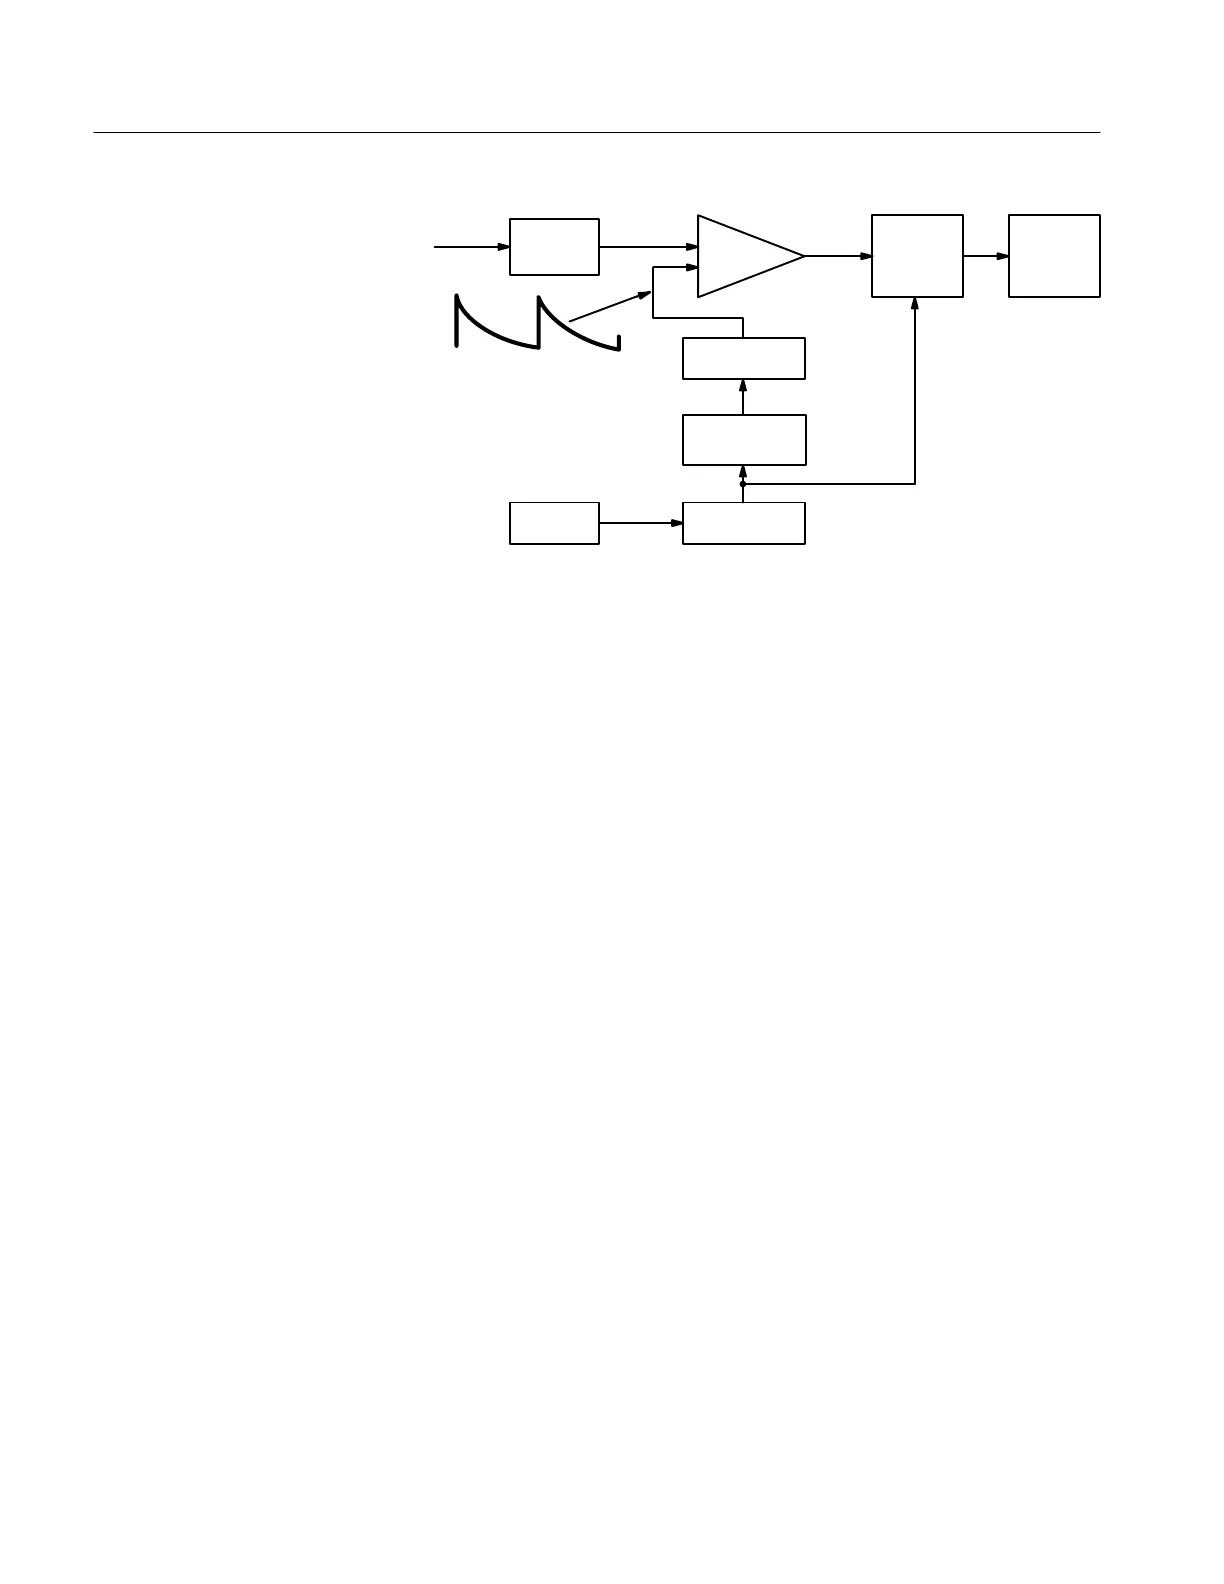
Explains the operational theory and relationships between functional blocks.

INTRODUCTION

Provides a thorough understanding of the 760A/760D/760N operational theory.

BLOCK DIAGRAM

Shows relationships between major functional blocks of circuitry.

DETAILED CIRCUIT DESCRIPTIONS

Describes circuitry in detail, relating blocks to schematic diagrams.

INPUT AMPLIFIERS <1>

Explains the function of the input amplifiers.

Options

Section 7 Options

Documents available instrument options.

Introduction

Describes instrument options available for the 760-Series.

CRT Options

Details the available CRT phosphor options.

Replaceable Electrical Parts

Section 8 Replaceable Electrical Parts

Contains a list of electrical components for replacement.

Parts Ordering Information

Information on how to order replacement parts from Tektronix.

Using the Replaceable Electrical Parts List

Explains the structure and features of the electrical parts list.

Diagrams and Circuit Board Illustrations

Section 9 Diagrams/Circuit Board Illustrations

Contains illustrations of diagrams and circuit boards.

Symbols

Explains graphic symbols and logic symbology used in diagrams.

Component Values

Defines units for capacitors and resistors shown on diagrams.

Replaceable Mechanical Parts

Section 10 Replaceable Mechanical Parts

Lists replaceable mechanical components for the instrument.

Parts Ordering Information

Information on how to order replacement mechanical parts.

Using the Replaceable Mechanical Parts List

Explains the structure of the mechanical parts list.

Preface

Features

Overview of the manual's structure and content.

Operators Part

Includes sections relevant to instrument operators.

Service Part

Includes sections relevant to service technicians.

Section 1, Introduction and Specification

General description and specifications of the instrument.

Section 2, Operating Instructions

Familiarizes users with instrument operation and controls.

Section 3, Installation

Covers electrical and mechanical installation procedures.

Section 4, Maintenance

Provides information on maintenance and troubleshooting.

Section 5 Performance Check and Calibration Procedures

Details performance checks and calibration steps.

Section 6, Theory of Operation

Section 7, Options

Documents available instrument options.

Section 8, Replaceable Electrical Parts List

Lists electrical components available for replacement.

Section 9, Diagrams

Contains servicing illustrations, diagrams, and waveforms.

Section 10, Replaceable Mechanical Parts List

Lists replaceable mechanical parts and ordering information.

Contacting Tektronix

General Safety Summary

To Avoid Fire or Personal Injury

Precautions to prevent fire or personal injury during use.

Symbols and Terms

Defines warning symbols and terms used in the manual.

Service Safety Summary

Do Not Service Alone

Safety warning against performing service alone.

Disconnect Power

Instruction to disconnect power before servicing.

Use Caution When Servicing the CRT

Safety precautions for servicing the CRT.

X-Radiation

Information regarding X-radiation safety.

Specifications

Related product manuals