8 Operation
8.1 Installing/Replacing batteries
1. Open the battery compartment cover (10).
2. Connect a 9 V monobloc battery to the matching terminal inside the battery compartment.
3. Close the battery compartment.
Replace the battery when the battery icon appears on the top right side of the dis-
play.
8.2 Button functions
Press the release button (9)
– once to turn the product on.
– once during measurement, to freeze the readings last shown on the display. The indica-
tion “HOLD” appears on the display (5). To continue with the measurement, press the
release button again.
– for approx. 2 seconds to turn the product off.
Press the laser button (3)
– once to activate the dual-target laser (2),
– twice to deactivate the target laser (2).
Press the button MODE (7) to toggle between the various display units in the top half of
the display:
– Dew point temperature (“DP” indicator)
– Ambient temperature (“AT” indicator)
– Ambient humidity (“%RH” indicator)
Press the button ºC/ºF (6)
– to toggle the temperature display unit between Celsius and Fahrenheit.
– for approx. 2 seconds to turn the beep on/off. The display (5) will show the symbol
(beep on) or (beep off).
8.3 Notes on the measuring procedure
8.3.1 Operating principle
IR thermometers measure the surface temperature of an object. The sensor on the device
records the heat radiation emitted, reected and transmitted from the object, and converts
this information into a temperature value.
The emission level is a value used to describe the energy radiation characteristics of a
material. The higher the value, the more capable the material is of emitting radiation. Many
organic materials and surfaces have an emission level of approx. 0.95. Metallic surfaces
or shiny materials have a lower emission level and therefore return inaccurate measured
values.
The ambient sensor measures the ambient temperature and humidity. From this, the dew
point is calculated. The infrared sensor measures the surface temperature and then com-
pares it with the calculated dew point temperature. The closer the value of the surface
temperature is to the dew point temperature value, the higher the risk of mould formation
on the measured surface.
8.3.2 Measurement distance / measurement surface area ratio (D/S)
To achieve accurate measurements, the target must be larger than the thermometer’s
measuring area. The measured temperature is the average temperature of the area meas-
ured.
The smaller the target, the smaller the measurement distance between thermometer and
target object has to be.
The distance to target / size of IR focal spot ratio is 20:1. With a distance of 20 cm to the
target, the size of the IR focal spot is thus 1 cm.
8.4 Making measurements
1. Turn the product on and activate the target laser (2), if required.
The measuring surface is in the middle between the two laser points. The closer
you are to the surface, the more accurately you can aim on the desired measuring
surface.
The maximum distance from the measuring surface should not be greater than 2 m.
2. Now start scanning the surface slowly. Point the IR sensor (1) as vertically to the measuring
surface as possible.
3. In the lower display (5) area, the surface temperature of the measuring surface will be
shown. In the upper display area, the ambient sensor (8) reading will be shown.
4. The right-hand side of the display shows the bargraph display. The higher the bar indicator
is, the greater the risk of mould formation.
5. The 3-colour warning LED (4) is located above the display. When the LED lights up
– green, there is no risk of mould formation.
– yellow, there is an increased risk of mould formation.
– red, there is an acute risk of mould formation, or the measuring surface has already
been affected by mould.
6. If the yellow LED lights up, in addition a beep tone will sound. If the red LED lights up, in
addition a continuous beep tone will sound.
The device will turn off automatically approx. 15 minutes after having been turned
on with the release button (9).
If the HOLD function (press release button during measurement) is activated, the
device turns off automatically after approx. 20 seconds.
9 Cleaning and care
Important:
– Do not use aggressive cleaning agents, rubbing alcohol or other chemical solutions.
They damage the housing and can cause the product to malfunction.
– Do not immerse the product in water.
The device requires no servicing on your part apart from occasional cleaning.
Clean the product with a dry, bre-free cloth.
10 Disposal
10.1 Product
Electronic devices are recyclable waste and must not be disposed of in the house-
hold waste. At the end of its service life, dispose of the product in accordance with
applicable regulatory guidelines.
10.2 (Rechargeable) batteries
Remove any inserted (rechargeable) batteries and dispose of them separately from the prod-
uct. You as the end user are required by law (Battery Ordinance) to return all used (recharge-
able) batteries. Disposing of them in the household waste is prohibited.
Contaminated (rechargeable) batteries are labeled with this symbol to indicate that
disposal in the domestic waste is forbidden. The designations for the heavy metals
involved are: Cd = Cadmium, Hg = Mercury, Pb = Lead (name on (rechargeable)
batteries, e.g. below the trash icon on the left).
Used (rechargeable) batteries can be returned to collection points in your municipality, our
stores or wherever (rechargeable) batteries are sold. You thus fulll your statutory obligations
and contribute to the protection of the environment.
Before disposal, the exposed contacts of batteries must be fully covered with a piece of ad-
hesive tape to prevent short-circuits. Even if batteries are depleted, the remaining energy can
become dangerous in the event of a short-circuit (bursting, severe heating, re, explosion).
11 Technical data
Input voltage ................................. 9 V block battery
Optics ........................................... 20:1
Emission level ............................... 0.95 (xed)
IR wavelength ............................... 8 - 14 μm
Laser class ................................... 2
Laser wavelength ......................... 630 - 670 nm
Max. laser output power ............... <1 mW
Operating temperature ................. 0 to +50 °C / +32 to +122 ºF
Operating humidity ....................... <80 % RH
Storage temperature ..................... -20 to +60 ºC / -4 to +140 ºF
Storage humidity ........................... 10 – 90 % RH (non-condensing)
Dimensions ................................... 82 x 168 x 58 mm (W x H x D)
Weight .......................................... 163 g
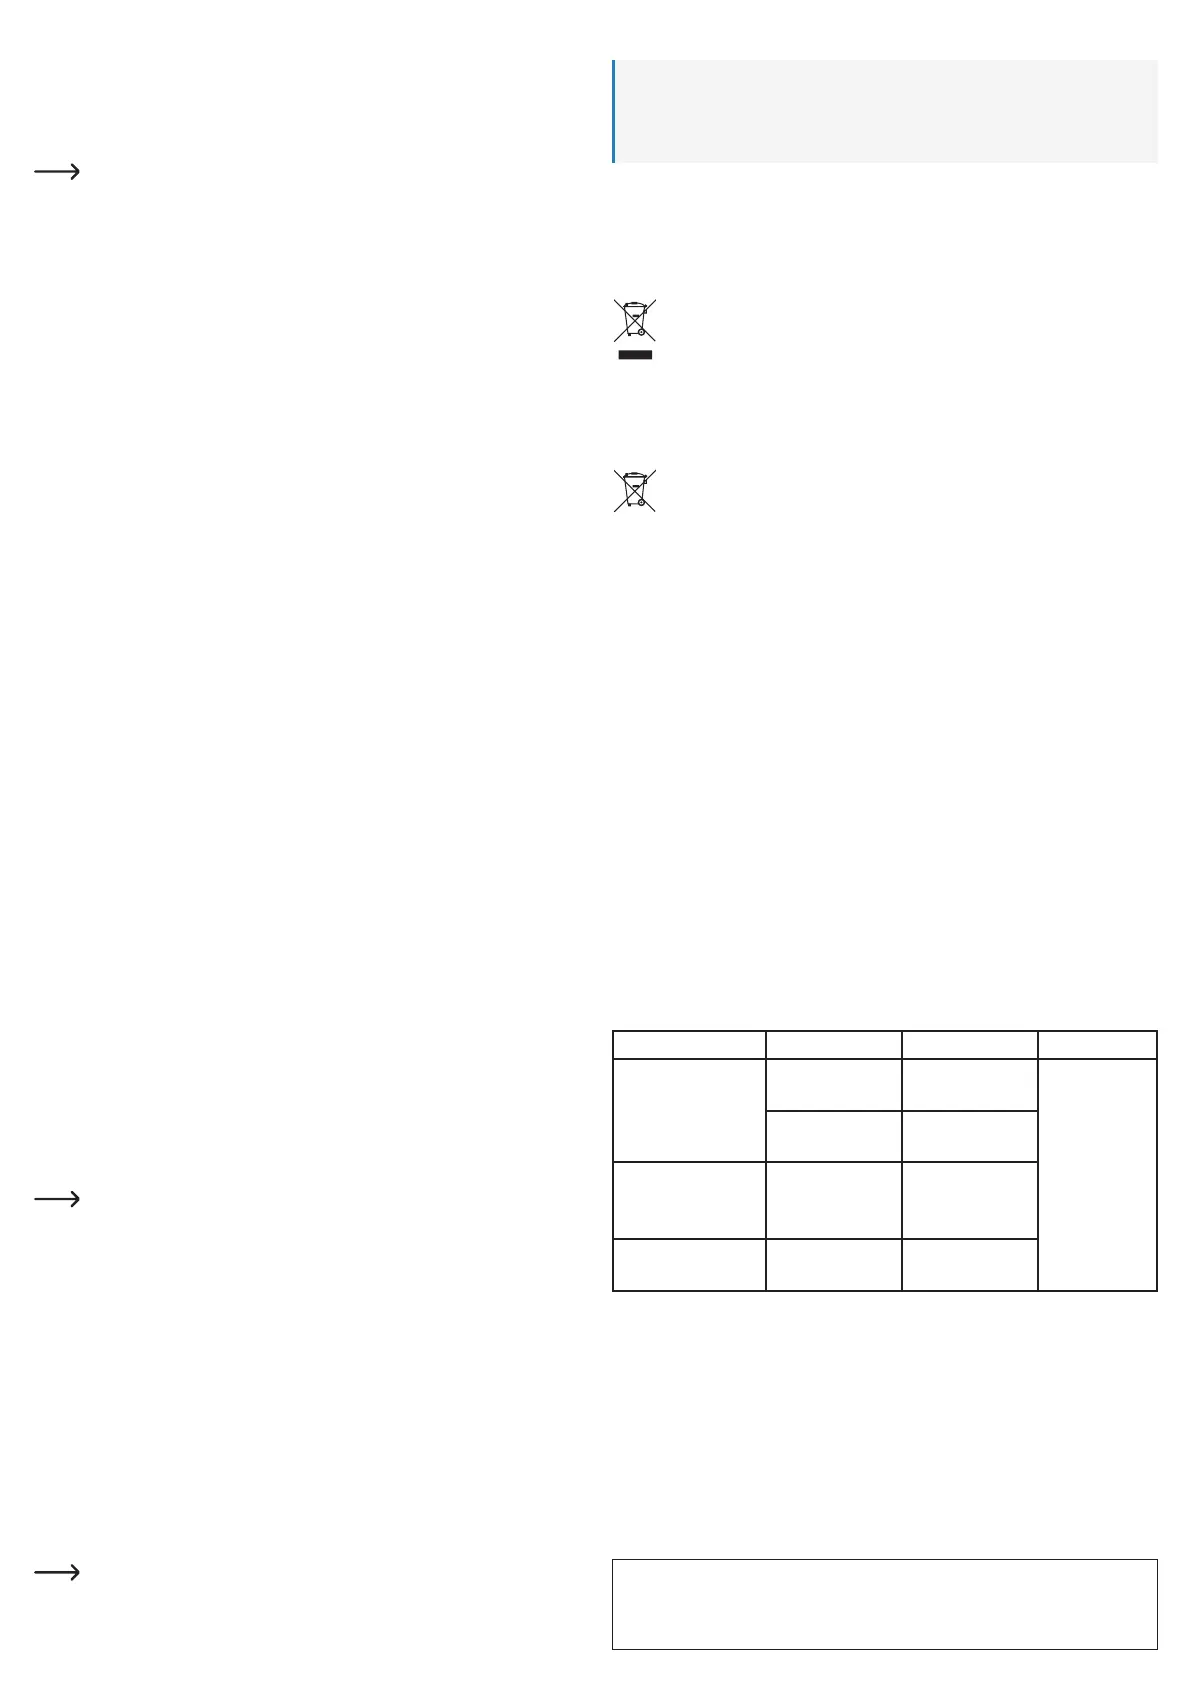
Measuring range Accuracy Resolution
Temperature
-50 to +20 ºC
-58 to +68 ºF
±5 ºC
±9 ºF
0.1
+20 to +380 ºC
+68 to +716 ºF
±1.5 % +2 ºC
±1.5 % +5 ºF
Humidity
0 - 20 % RH
20 - 80 % RH
80 - 100 % RH
4.5 %
3.5 %
4.5 %
Dew point temperature
-30 to +100 ºC
-22 to +212 ºF
---
This is a publication by Conrad Electronic SE, Klaus-Conrad-Str. 1, D-92240 Hirschau (www.conrad.com). All rights in-
cluding translation reserved. Reproduction by any method, e.g. photocopy, microlming, or the capture in electronic data
processing systems require the prior written approval by the editor. Reprinting, also in part, is prohibited. This publication
represents the technical status at the time of printing.
Copyright 2021 by Conrad Electronic SE. *1405828_V7_1221_02_mxs_m_en
 Loading...