Prepare for operation
Greenstar 2000 – 6 721 820 553 (2021/02)
8
3.2 Topping up the system pressure
Your installer should have informed you where to find the filling system
and instructed you in its use.
NOTICE
System fill method
▶ You must disconnect the external filling loop after re-pressurisation,
to comply with the Water Authority regulations.
External filling loop
Once the external filling loop and pressure gauge has been located,
follow the instructions for re-pressurising the system.
Refer to figure 4.
▶ Unscrew the blanking cap [1].
▶ Attach the hose [2] to the valve.
– Usually one end of the hose is already connected to one of the
system fill isolation valves.
▶ Ensure both ends [3] of the hose are screwed on hand tight.
– The system fill isolation valves [4] are in a closed position (the
handle/screwdriver slot is across the valve).
▶ Turn the handle/screwdriver slot through 90° to open valves and
slowly fill the system to between 1 and 1.5bar.
– The system fill isolation valves [5] are opened (the handle/
screwdriver slot is in-line with the valve).
– The needle on the pressure gauge will start to rise.
▶ Turn the handles/screwdriver slots back, through 90°, to close the
valves.
– The system fill isolation valves [6] are in a closed position (the
handle/screwdriver slot is across the valve).
▶ Top up the system pressure, if as a result of the air bleeding the
pressure drops off.
▶ Remove the hose [2] and replace the blanking cap [1].
Fig. 4 External filling loop
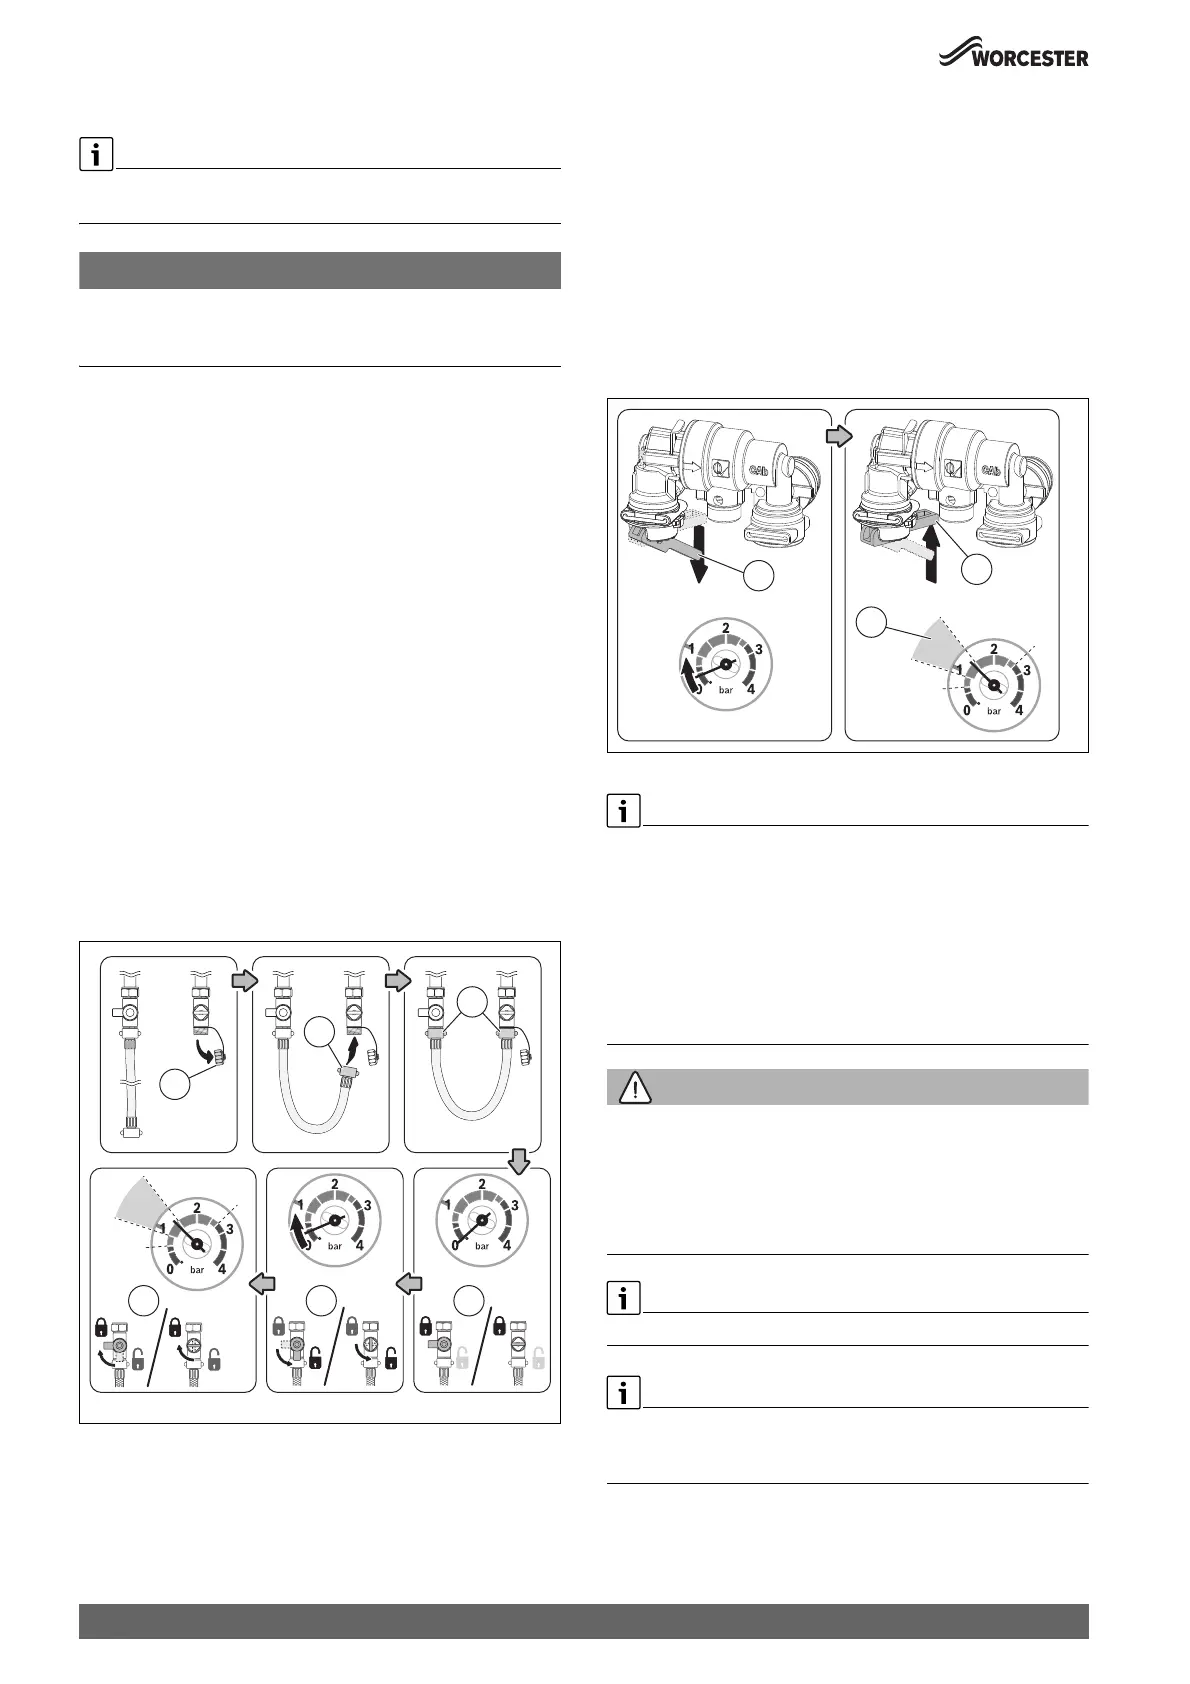
Keyless filling link
Locate the filling link (underneath the appliance on the right hand side)
and follow the instructions for re-pressurising the system.
Re-pressurise the system.
▶ To start the filling process, pull the lever [1] down.
– The needle on the pressure gauge will start to rise.
▶ To stop the filling process, release the lever [1] when:
– The pressure, shown on the pressure gauge, reaches between the
1 and 1.5 bar [2].
▶ Top up the system pressure, if as a result of the air bleeding, the
pressure drops off.
Fig. 5 Keyless filling link
If the pressure gauge reads more than 1.7 bar as a result of over filling:
▶ Bleed one radiator until the pressure gauge returns to between 1 and
1.7 bar.
▶ It is good practice to bleed any excess air that has entered the heating
system due to pressure loss. Locate and open the radiator's bleed/
vent point, closing the valve when water begins to flow.
▶ If, through normal boiler operation, the PRV pipe starts to leak, it
could be a sign of system pressure being too high. In this instance
please bleed a radiator as described above.
WARNING
Risk of damage to the system from corrosion!
If the pressure in your heating system is repeatedly rising and you are
repeatedly venting radiators, this can indicate that there is corrosion
occurring within the heating system.
To prevent serious damage to the entire system:
▶ Contact a heating engineer.
Failure to properly maintain the heating system may affect your warranty.
System pressure can be checked via the boiler’s pressure gauge/reading
when the system is cold, ensuring the reading is in the green zone at all
time.
0010015034-001
1
2
3
4
5
6
Min
1 bar
1.5 bar
Max
0010015050-001
1
1
Min
1 bar
1.5 bar
Max
2
 Loading...