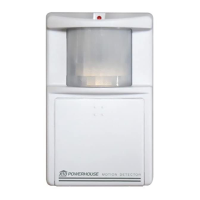
ADJUSTING YOUR MOTION DETECTOR
OPERATION SETTINGS
This procedure
adjusts
the
aim of your
Motion Detector’s sensor head and
floodlights for best coverage.
For now.
simply set the controls as instructed. For
a
detailed description of each control’s
function refer to the next section.
Before you turn on the power:
1.
Open
the
control panel cover by
turn-
2.
3.
4.
5.
6.
7.
ing the metal locking screw.
Set the DUSK
control
fully clock-
wise to
LIGHT.
Set the RANGE control fully clock-
wise to MAX.
Use a flat-bladed screwdriver to set
TIME DELAY control to 0.1.
Swivel the sensor head to point to-
ward the area you want to cover. Be
sure the sensor head remains level
from side to side and level with the
ground.
Caution:
Aim
the
sensor head below
the horizon. Direct sunlight can dam-
age the sensor. However. don’t point
the sensor head downwards. This re-
duces its range. For optimum opera-
tion, position the sensor head level
with
(parallel
to) the
ground.
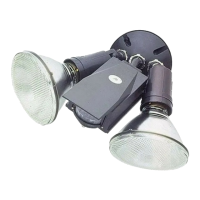
Aim the floodlights at the area you
wish to light. If necessary, loosen the
screws to swivel the lamp holders.
Turn on the power and wait for 1
minute.
8.
Walk
around the covered area.
Whenever you move, the floodlights
come on and remain on until 6 sec-
onds after you stop moving. If neces-
sary, reorient the sensor head so that
normal road
traffic
does not activate
your Motion Detector. Tighten the
locking nut on the sensor head and
proceed to the next section to set all
controls for proper operation.
*
Index
Mark
YIN
LIGHT
RANGE
TIME DELAY
I.1
0
30
0.5
t
LI
16
MINUTES
SENSOR
IN
OUT
+l
I
+2
II
+3
LT
l
4
I
DUSK
THIS
UNIT
1
SENSOR
DUSK
DUSK
IN OUT
L
+5
I
+6
1
+’
I
+6
DUSK CONTROL
The
DUSK
control
adjusts the light lev-
el for turning on and off the Motion De-
tector in the dusk-to-dawn mode and for
turning on and off the sensor. For now,
set the DUSK
contro1
at
the
index mark
(*).
This is the correct setting for most
applications. You might need to adjust
this
contro1
for
better
dusk-to-dawn op-
eration. Turn the control toward DARK
if
the
Motion Detector
turns
on too ear-
ly.
Turn
the control toward LIGHT if
the Motion Detector turns on too late.
If you
set
the control
fully
clockwise (to
LIGHT), the sensor turns on the Motion
Detector when it detects motion all
the
time (even when it is not dark).
Note: When you change
the
setting of
this control, or when the light level
changes. the new setting
does
not take
effect
until
10 minutes
after
the
setting
was changed or the light level changed.
if movement is detected just after the
change was made, the new
setting
will
not take
effect
until
10 minutes after the
delay time you set on the Motion Detec-
tor.
If you change the setting and don’t want
to wait for
10
minutes, you can bypass
this delay by turning the power off
AF-
TER you change the
setting.
Then
turn
the
power back on and wait for 1 min-
ute.
RANGE CONTROL
The RANGE control adjusts the sensi-
tivity of the
sensor
head to movement.
Make
adjustments
in small increments
and test until you reach the desired sen-
sitivity.
If
pets or
other
small
animals
activate the Motion Detector,
turn
this
control towards MIN.
TIME DELAY CONTROL
The
TIME DELAY control sets the
length of time the lights stay on after
movement in the covered area has
stopped. You can
set
this time to 0.1
minutes (6 seconds), 0.5 minutes (30
seconds), 2 minutes, 5 minutes, 15 min-
utes
a 30
minutes.
THIS UNIT SWITCH
The THIS UNIT switch determines how
the floodlights function. If you
set
the
switch to SENSOR, the floodlights turn
on whenever there is movement in the
covered area. If you set the switch to
DUSK, the floodlights
turn
on at dusk
and off at
dawn.
Note: The setting of the THIS UNIT
switch does not affect how X-10 Mod-
ules operate. Their operation is deter-
mined by the settings of the individual
“DUSK” and “SENSOR” switches and
they can operate independently of the
floodlights. See “Controlling X-IO
Modules.”
 Loading...