10. Impostazioni dei Set-Point
10.1 Come si impostano i Set-Point
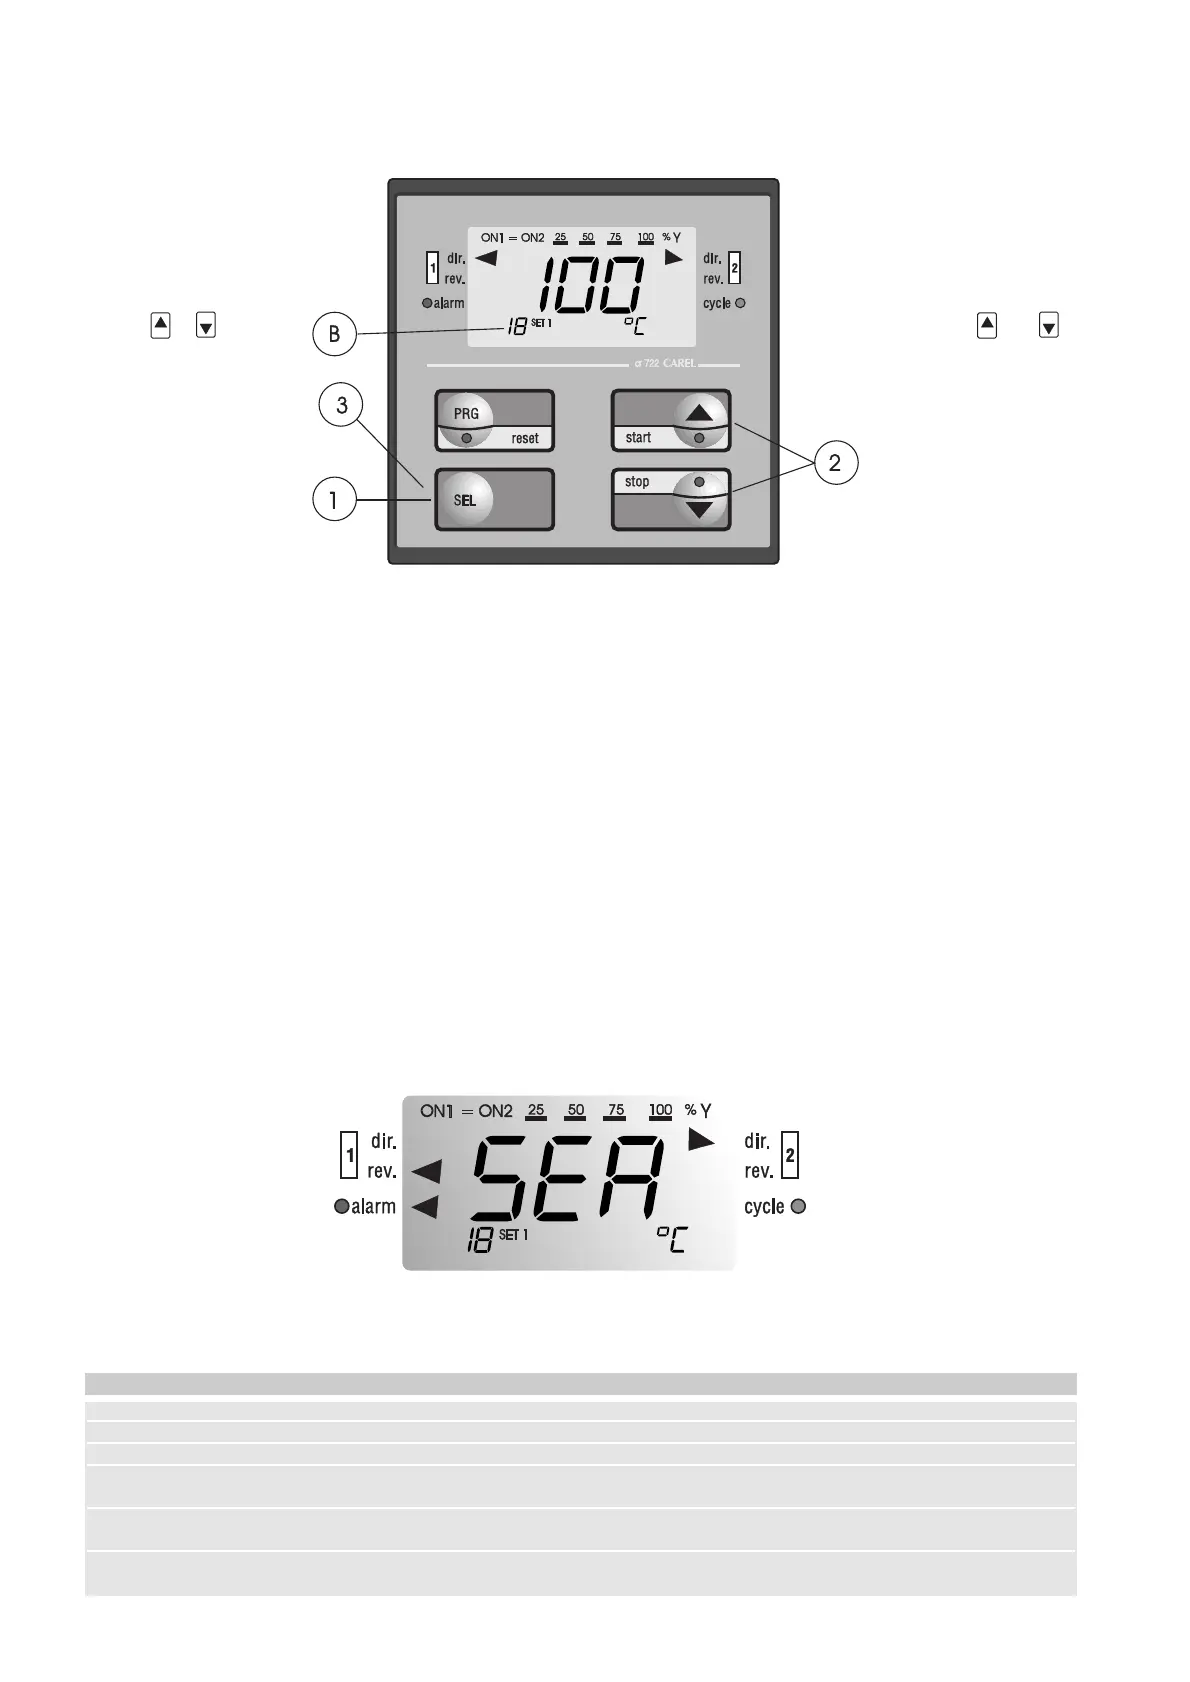
Per impostare i Set-Point (fig.
45) procedere nel modo
seguente:
1. Premere SEL per circa un
secondo. L'indicazione B
comincia a lampeggiare.
2. Con e impostare
quindi il valore desiderato.
3. Confermare il valore impo
stato premendo SEL.
Si passa così all’imposta-
zione del Set-Point 2
(quando previsto
dalla config. impostata).
4. Premere ancora SEL per
uscire dalla procedura.
La procedura si auto-disattiva
dopo 60 s di inattività, senza
registrare le modifiche effettuate.
11. Allarmi
Gli allarmi sono gestiti con reset automatico: si disattivano al cessare
della condizione di allarme. Solo nelle configurazioni con relè d'allarme
il reset è manuale.
L'attivarsi di un allarme fa comparire un'indicazione alfanumerica che si
alterna con la misura della grandezza. Si accende inoltre la freccia
ALARM. Lo stato delle uscite dipende dalle impostazioni definite nella
configurazione dei parametri C16, C18, C26, C27. Più allarmi contem-
poranei vengono visualizzati in sequenza.
Nelle configurazioni PA e 1A, l'intervento di qualsiasi allarme attiva l’u-
scita 2 (relè d'allarme) che può essere disattivata manualmente con il
tasto RESET; lo stato d'allarme iniziale permane.
11.1 Ricerca ed eliminazione dei guasti
L'attivazione di un allarme è evidenziata sul display dall'accensione
della freccia ALARM e dalla comparsa di uno dei seguenti messaggi di
errore lampeggiante in A :
SEA - Allarme Sonda
Attivato qualora la sonda sia scollegata, in corto circuito o fuori range
dipende dal tipo d'ingresso e precisamente:
10.Selection of Set-Points
10.1 How to select the Set-Points
To select the Set-Points , see
the following instructions:
1. Press SEL for at least 1
second.The indication at
position "B" will flash.
2. Select the required value
through the and
buttons.
3. Confirm the value by
pressing SEL. Selection
automatically shifts to
Set-Point 2 (if configured).
4. Press SEL again to exit the
procedure.
The procedure exits automati-
cally after a 60 seconds' inacti-
ve use, without storing the pre-
vious modifications.
11. Alarms
All alarms are automatically reset as soon as the reasons that caused
them disappear. In the configuration equipped with the alarm relay, the
alarm should be manually reset.
When an alarm goes off, an alphanumeric indication appears on the
display alternatively to the value of the parameter. Also the ALARM
arrow turns on.
The status of the outputs depends on the configuration selections.
More simultaneous alarms are displayed in sequence.
In the PA and 1A configurations any alarm causes the energization of
output 2 (alarm relay); manual reset occurs by pressing the RESET
button, but the initial alarm status persists.
11.1 Troubleshooting
In case of alarm, the ALARM arrow turns ON and the specific message
concerning the type of alarm appears.
SEA - Probe Alarm
This alarm goes off if the probe is disconnected, short-circuited or
measures out-of-range values. The type of input is also important, in
42
Tipo d'ingresso/
Type of input
Range/
Range
Limiti allarme sonda/
Probe alarm limits
NTC -40 / +90 °C -40 / +99 °C
Pt100/Pt1000 -100 / +600 °C -100 / +600 °C
Ni100 -60 / +180 °C -60 / +180 °C
Termocoppia/
Thermocouple
K -100 / +1200 °C -100 / +1200 °C
J -100 / +800 °C -100 / +800 °C
corrente/
current
0/20mA 0/20 mA -0.1/22 mA
4/20mA 4/20 mA 3/22 mA
tensione/
voltage
-1/1 Vdc -1 / 1 Vdc -1.1/1.1 Vdc
0/10 Vdc 0/10 Vdc -1/11 Vdc
Fig. 45
 Loading...