12
OPERATING TYPE
Block 2 Display Description
LOFF Local Off: the unit is halted in local mode.
L-C1 Local operation - Local On - Cooling Setpoint 1: the unit is in local
control mode and is authorised to start up in cooling mode with
setpoint 1.
L-C2* Local operation - Local On - Cooling Setpoint 2: the unit is in local
control mode and is authorised to start up in cooling mode with
setpoint 2. This is displayed if cooling setpoint 1 (item 0 in the
setpoint menu) has a different value from cooling setpoint 2 (item 1
in the setpoint menu).
L-H* Local operation - Local On - Heating Setpoint: the unit is in local
control mode and is authorised to start up in heating mode (heat
pump only).
LC1r* Local operation - Local On - Cooling Setpoint 1 - Heat Reclaim: the
unit is in local control mode and is authorised to start up in cooling
mode with setpoint 1 and the reclaim mode is selected. This is not
displayed if one of the following conditions is met:
• the unit is water-cooled and controls condenser water valves, and
the condensing setpoint (item 3 in the setpoint menu) is equal to the
reclaim setpoint (item 4 in the setpoint menu).
• the unit is air-cooled and the condensing setpoint (item 3 in the
setpoint menu) is equal to the reclaim setpoint (item 4 in the
setpoint menu).
LC2r* Local operation - Local On - Cooling Setpoint 2 - Heat Reclaim: the
unit is in local control mode and is authorised to start up in cooling
mode with setpoint 2 and the reclaim mode is selected. This is
displayed if LC1r is displayed and cooling setpoint 1 (item 0 in the
setpoint menu) has a different value from cooling setpoint 2 (item 1
in the setpoint menu).
CCn The unit is controlled by CCN commands.
rEM The unit is controlled by external remote control contacts.
Key:
* : Displayed if the configuration requires it.
Section 5.1 gives a more detailed description of the
commands to start/stop the unit, analysed by operating
type.
4.2.2.2 - Stopping the unit in local mode
The unit can be stopped in local mode at any time by
pressing the operating type selector button.
TO STOP THE UNIT
Button Action Block 1 display Block 2 display
Press the operating type selector button
for less than 4 seconds (one short press
is enough)
When the button is released, the unit
stops without the need for further
action.
4.2.2.3 - Modifying the operating type
The unit operating type can be modified at any time by the
following method:
In the example that follows, the operating type to be
selected is Local Operation - Cooling Setpoint 1 (L-C1).
CHANGING THE OPERATING TYPE
Button Action Block 1 display Block 2 display
Press the operating type selector button
for more than 4 seconds
Hold down the operating type selector
button. The available operating types are
displayed one by one until the button is
released.
Release the operating type selector button
when the operating type you want is
displayed (in this example L-C1). “C”
flashes in block 1 to show that the
controller is awaiting confirmation.
Press the
button to confirm the
operating type selected (in this
example L-C1). “t” is displayed in
block 1 to indicate the operating type
selected. If the
button is not
pressed soon enough, the controller
will cancel the change and continue
to use the previous operating type.
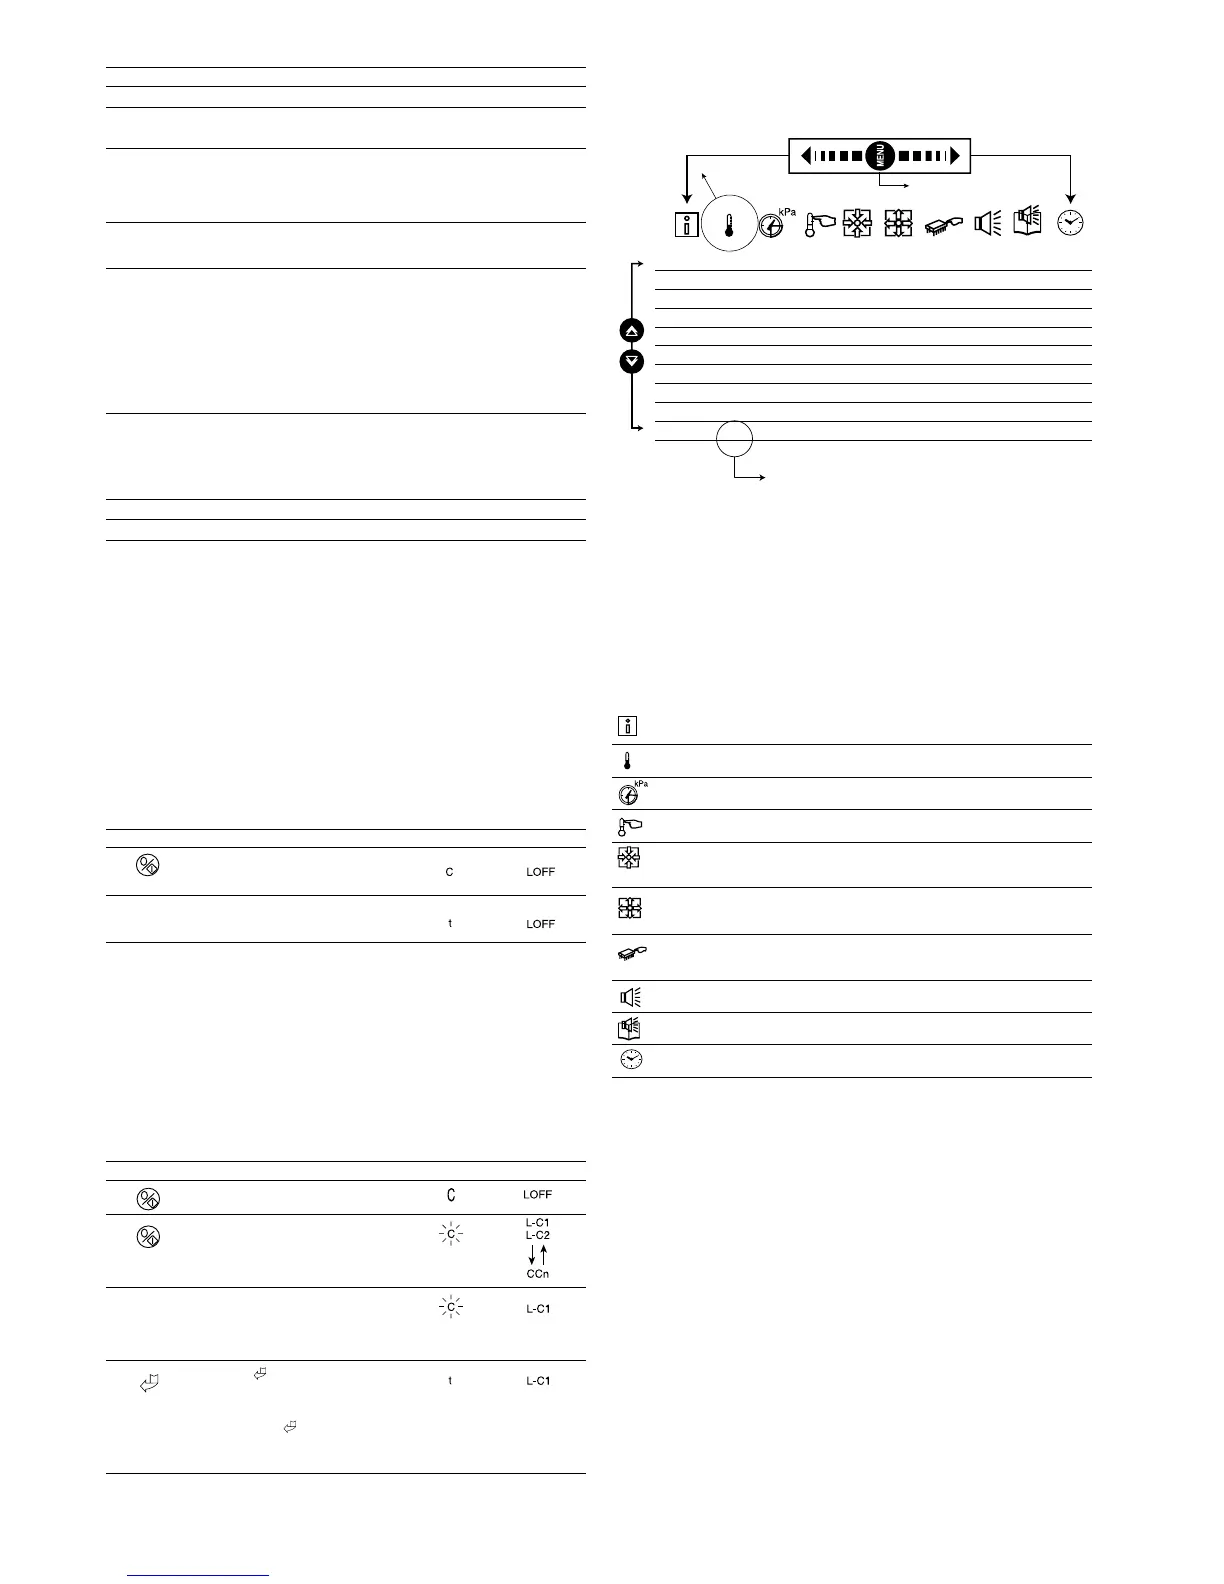
4.2.3 - Displaying/modifying a menu item
To access a menu item, first choose a menu. Each menu
gives access to up to 20 items.
0000000000
1111111111
2
3
17 17 17 17 17 17 17 17 17 17
18 18 18 18 18 18 18 18 18 18
19 19 19 19 19 19 19 19 19 19
MENU LEDS
(BLOCK 3)
SELECTION
BUTTONS BLOCK 4)
ITEM NUMBER (BLOCK 1)
MENU BUTTONS (BLOCK 3)
4.2.3.1 - Selecting a menu
The MENU button allows you to select a menu from the 10
that are available. Each time you press this button one of the 10
LEDs lights up in turn alongside each of the icons representing
a menu. The active menu is the one against which the LED is
lit.
INFORMATION menu Displays the general operating parameters for the
unit.
TEMPERATURE menu Displays the unit operating temperatures.
PRESSURE menu Displays the unit operating pressures.
SETPOINT menu Displays the unit setpoints and enables them to be
modified.
INPUT menu Displays the status of the unit digital and analogue
inputs
OUTPUT/TEST menu Displays the status of the unit outputs and enables
them to be tested.
CONFIGURATION menu Displays the unit configuration and enables it to
be modified.
ALARM menu Displays active alarms.
ALARM HISTORY menu Displays the history of alarms.
OPERATING LOG menu Displays the operating times and number of starts
for the unit and its compressors.
NOTE: To scroll quickly through the menus, hold the menu
button down.
 Loading...