9
Cisco Aironet Series Power Injectors AIR-PWRINJ-60RGD1= and AIR-PWRINJ-60RGD2= Installation Instructions
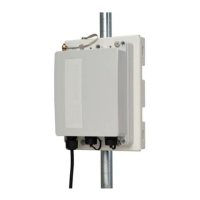
Pole Mounting the Power Injector Using AIR-PWRINJ-60-PMK=
Figure 4 Locations of Mounting Screw Holes – Marked 1, 2, 3
Pole Mounting the Power Injector Using AIR-PWRINJ-60-PMK=
You can mount the power injector on poles of up to 8 inches (25.4 mm to 203.2 mm) in diameter, using
the optional pole mount kit, AIR-PWRINJ-60-PMK=.
The AIR-PWRINJ-60-PMK= pole mount kit consists of:
• Metal bracket
• 2 x Worm screw clamps
• 3 x M5X16 countersunk head Screw
• 4 x M6*110 hexagon head screw
• 8 x M6 flat washer
• 4 x M6 lock washer
• 4 x M6 hexagon nut
Note Though there are no ventilation openings on the power injector, you are recommended to keep some
clearance around the front of the product.
To mount the power injector on a pole, use for guidance, and follow these steps:
Step 1 Mount the metal bracket of the AIR-PWRINJ-60-PMK= at the required position on the pole.
Step 2 Fasten the bracket to the pole using the worm screw clamps and the M6*110 hexagon head screw, flat
washers, lock washers, and hexagon nuts. See Figure 5.
 Loading...