7
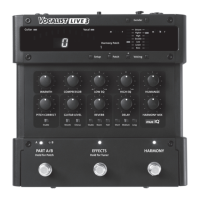
17. Harmony Mix
This adjusts the mix of the Harmony Voices with the Lead Voice
at the outputs. With the knob fully counter-clockwise, only the
Lead Voice is heard in the outputs with no Harmony Voices. With
the knob fully clockwise, only the Harmony Voices will be heard
at the outputs with no Lead Voice.
18. Humanize
This adjusts the naturalness of the Harmony Voices. The intent
is to make the harmonies sound more like real backup singers
by introducing variations in the timing and pitch. Fully coun-
terclockwise makes the harmonies follow the Lead Voice very
tightly. Fully clockwise and the harmonies are quite loose.
19. Setup Button
Press the Setup button to enter Setup Mode. Subsequent press-
es step you through the various global parameters. In Setup
Mode use the + (Voicing 1) and – (Patch) buttons to adjust the
parameter values.
20. Patch Button
This button cycles through the Vocalist Live 3’s five Harmony
Patches. To save harmony settings to the current Harmony Patch
and A/B Parts, press and hold the Harmony Patch button until
the selected Patch Number flashes.
21. Voicing Buttons
There are individual Voicing controls for each of the two Harmony
Voices. Pressing the Voicing button of the corresponding Harmony
Voice will cycle through the Voicing options.
22. Voicing Display
These LEDs display the currently selected Voicings. To disable a
Harmony Voice, press the button until none of the LEDs is lit for
that Voice.
Note: The exact harmony note choice of the various Voicing shift
settings depends on variables such as current note or chord,
chord history and lead voice note.
 Loading...