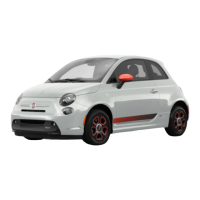
NUMBER PLATE LIGHTS
To replace the bulb proceed as follows:
❒ operate in the point indicated by
the arrow and remove the lens unit A
fig. 220;
❒ change the bulb releasing it from the
side contacts and making sure the
new bulb is correctly fastened
between the contacts;
❒ refit the snap-fitted lens unit.
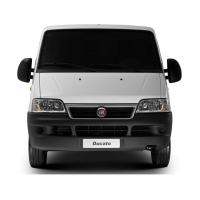
SIDE LIGHTS
(for versions/markets, where provided)
To replace the bulb proceed as follows:
❒ for extra-long van:
– undo the two fixing screws C fig. 221
and remove the light cluster;
– remove the bulb holder D on the rear
of the light cluster, turning it through
a 1/4 turn;
– remove the snap-fitted bulb and
replace.
❒ for chassis cabs with platform:
– remove the bulb-holder on the rear of
the light cluster, turning through 1/4
turn;
– remove the snap-fitted bulb and
replace.
CHANGING AN
INTERIOR BULB
For the type of bulb and relevant power
rating, see paragraph “Changing a
bulb”.
FRONT ROOF LIGHT
Proceed as follows to replace the
bulbs:
❒ operate in the point shown by the
arrow and remove roof light A fig.
222;
❒ open protective flap B fig. 223;
❒ replace the bulbs C fig. 223,
releasing them from the side contacts
and making sure that the new bulbs
are correctly secured between the
contacts;
❒ close flap B fig. 223 and fix roof light
A fig. 222 in its housing, making sure
that it locks into place.
REAR ROOF LIGHT
Proceed as follows to replace the
bulbs:
❒ operate in the points indicated by the
arrows and remove roof light D fig.
224;
❒ open protective flap E fig. 225;
220
F1A0206
221
F1A0207
221
 Loading...