Static: The wind speed and direction are assumed to be
constant for the duration of the jump. The drop altitude must
be at least 1,000 feet.
Entering Jump Information
1
Select the action key.
2
Select Jumpmaster.
3
Select a jump type (page 6).
4
Complete one or more actions to enter your jump
information:
• Select DIP to set a waypoint for the desired landing
location.
• Select Drop Alt to set the drop altitude AGL (in feet)
when the jumpmaster exits the aircraft.
• Select Open Alt to set the open altitude AGL (in feet)
when the jumpmaster opens the parachute.
• Select FWD Throw to set the horizontal distance traveled
(in meters) due to aircraft speed.
• Select Crs to HARP to set the direction traveled (in
degrees) due to aircraft speed.
• Select Wind to set the wind speed (in knots) and direction
(in degrees).
• Select Constant to fine-tune some information for the
planned jump. Depending on the jump type, you can
select Percent Max, Safety Fctr, K-Open, K-Freefall, or
K-Static and enter additional information (page 7).
• Select Auto to DIP to enable navigation to the DIP
automatically after you jump.
• Select GOTO HARP to start navigation to the HARP.
Entering Wind Information for HAHO and HALO
Jumps
1
Select the action key.
2
Select Jumpmaster.
3
Select a jump type (page 6).
4
Select Wind > Add.
5
Select an altitude.
6
Enter a wind speed in knots and select Done.
7
Enter a wind direction in degrees and select Done.
The wind value is added to the list. Only wind values
included in the list are used in calculations.
8
Repeat steps 5–7 for each available altitude.
Resetting Wind Information
1
Select the action key.
2
Select Jumpmaster.
3
Select HAHO or HALO.
4
Select Wind > Reset.
All wind values are removed from the list.
Entering Wind Information for a Static Jump
1
Select the action key.
2
Select Jumpmaster > Static > Wind.
3
Enter a wind speed in knots and select Done.
4
Enter a wind direction in degrees and select Done.
Constant Settings
Select Jumpmaster, select a jump type, and select Constant.
Percent Max: Sets the jump range for all jump types. A setting
less than 100% decreases the drift distance to the DIP, and
a setting greater than 100% increases the drift distance.
More experienced jumpmasters may want to use smaller
numbers, and less experienced skydivers may want to use
larger numbers.
Safety Fctr: Sets the margin of error for a jump (HAHO only).
Safety factors are usually integer values of two or greater,
and are determined by the jumpmaster based on
specifications for the jump.
K-Freefall: Sets the wind drag value for a parachute during
freefall, based on the parachute canopy rating (HALO only).
Each parachute should be labeled with a K value.
K-Open: Sets the wind drag value for an open parachute,
based on the parachute canopy rating (HAHO and HALO).
Each parachute should be labeled with a K value.
K-Static: Sets the wind drag value for a parachute during a
static jump, based on the parachute canopy rating (Static
only). Each parachute should be labeled with a K value.
Viewing Tide Information
NOTE: This feature is not available in all areas.
You can view information about a tide station, including the tide
height and when the next high and low tides will occur.
1
Select the action key.
2
Select Tides > Search Near.
3
Select an option:
• To search near a previously saved waypoint, select
Waypoints, and select or search for a waypoint.
• To search near a specific city, select Cities, and select or
search for a city.
A list of the tide stations near the selected location appears.
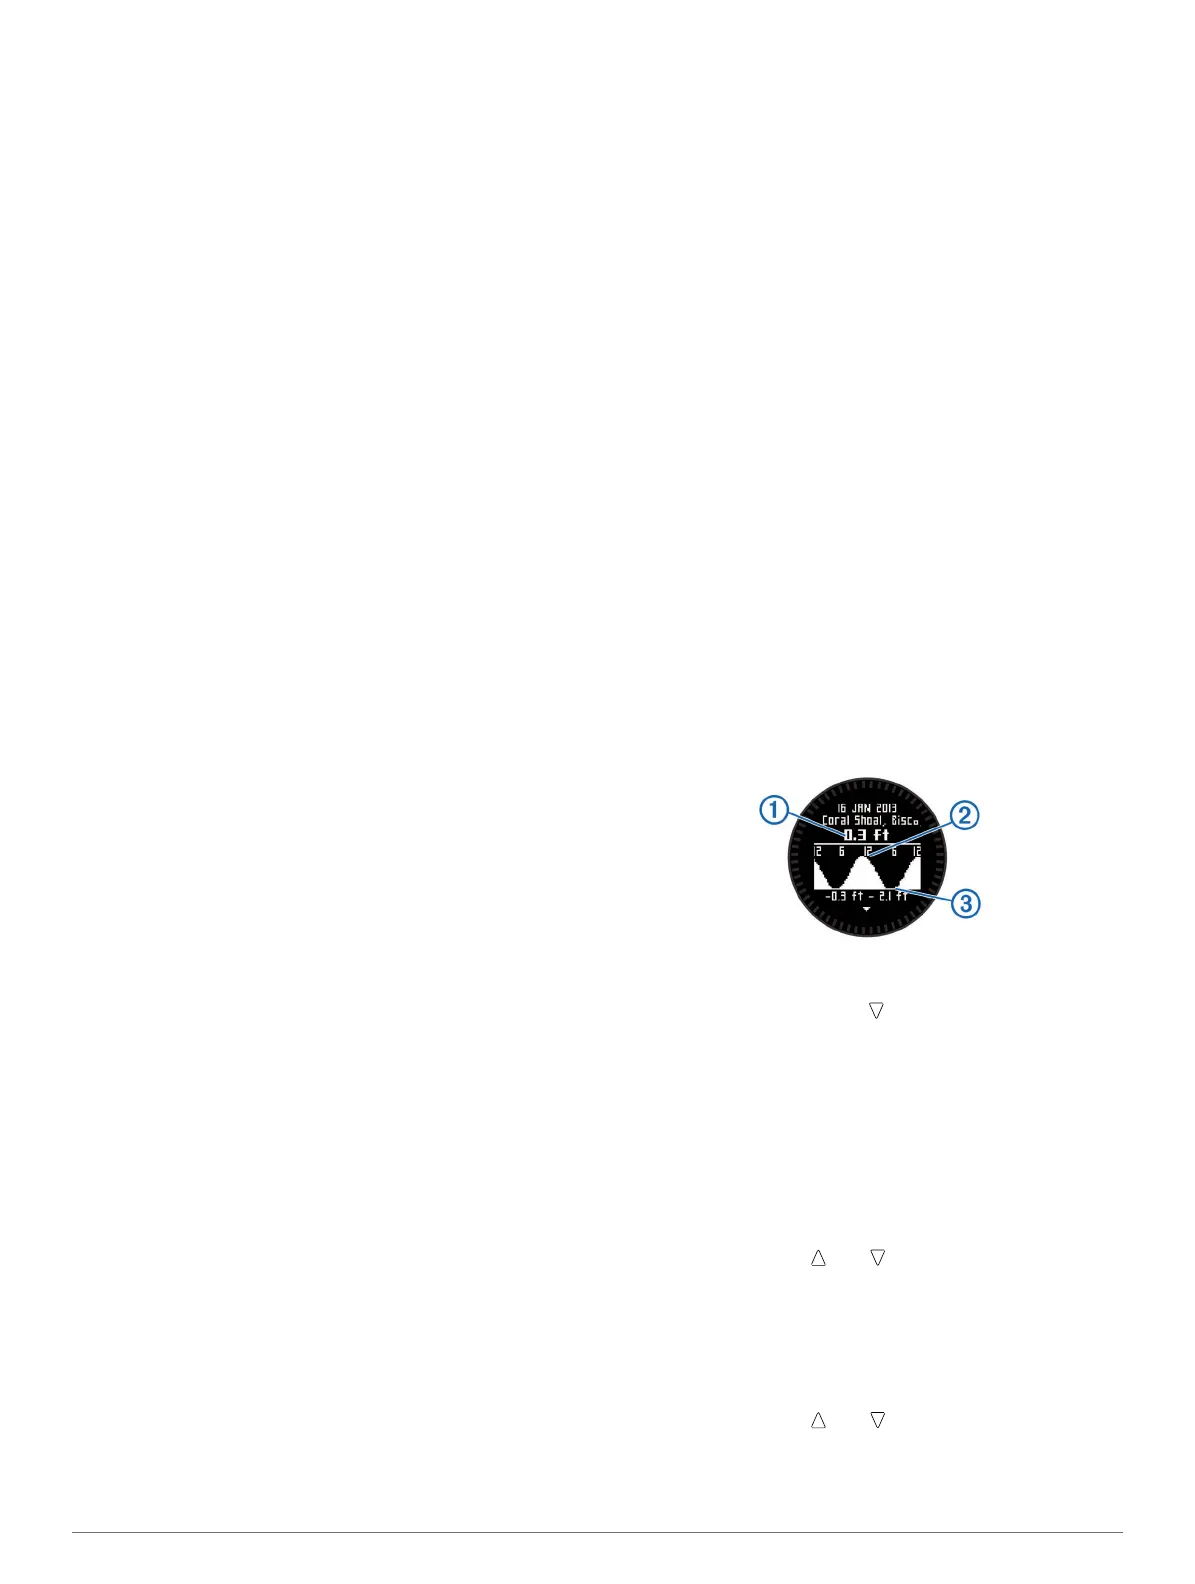
4
Select a station.
A 24-hour tide chart appears for the current date, showing
the current tide height
À
and when the next high
Á
and low
tides
Â
will occur.
5
Select an option:
• To view more detailed information about the next four tide
peaks and troughs, select .
• To pan the tide chart, select the action key, and select
Pan Chart.
• To view tide information for a different date, select the
action key, select Change Date, and select the date.
Clock
Setting the Alarm
1
Select the action key.
2
Select Clock > Alarm Clock > Add Alarm.
3
Select the action key, , and to set the time.
4
Select Tone, Vibration, or Tone & Vib..
5
Select Once, Daily, or Weekdays.
Starting the Countdown Timer
1
Select the action key.
2
Select Clock > Timer.
3
Select the action key, , and to set the time.
4
If necessary, select Notification, and select a type of
notification.
5
Select Start.
Applications 7
 Loading...