 Loading...
Do you have a question about the HIKVISION iDS-TCM403-B/0832 and is the answer not in the manual?
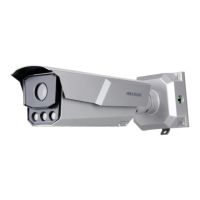
| Model | iDS-TCM403-B/0832 |
|---|---|
| Category | Security Camera |
| Sensor Type | CMOS |
| Effective Pixels | 2688 × 1520 |
| Focal Length | 2.8 mm |
| Aperture | F2.0 |
| IR Range | Up to 30 m |
| Bit Rate | 32 kbps to 16 Mbps |
| Protection Level | IP67 |
| Ingress Protection | IP67 |
| Image Sensor | 1/3" Progressive Scan CMOS |
| Day/Night | ICR |
| Video Compression | H.265/H.264/MJPEG |
| Audio Compression | G.711/G.726 |
| Frame Rate | 25/30 fps |
| Network Interface | RJ-45 10/100 Base-T |
| Operating Temperature | -30 °C to +60 °C |
| Operating Conditions | Humidity: 95% or less (non-condensing) |
| Power Supply | PoE (802.3af) |
| Dimensions | Φ 100 mm |
Details about the manual's content and purpose.
Lists Hikvision's trademarks and other mentioned trademarks.
Legal disclaimer regarding product use, liability, and warranties.
Details on FCC compliance for the device's radio frequency emissions.
Conditions under which the device complies with FCC Rules.
Statements regarding compliance with European directives (EMC, LVD, RoHS).
Information regarding compliance and legal requirements for device operation.
Guidance on complying with local laws and regulations during device use.
Instructions and warnings related to safe power supply connection and usage.
Guidelines for handling, operating, and storing the device safely.
Process for activating the device by setting an admin password.
Provides default IP address and username for the device.
Instructions for activating the device using the SADP software.
Steps to activate the device using a web browser interface.
How to log into the device via a web browser for operations.
Overview and controls for viewing live video feeds from the camera.
Instructions to start and stop the live view stream.
How to choose different display modes for the live image.
Options for dividing the screen into multiple viewing windows.
Choosing between main, sub, or custom streams for video quality.
Procedure to capture and save still images from the live view.
Procedure to manually record video clips from the live view.
Enabling and disabling two-way audio communication with the device.
Managing audio input and output for the video stream.
Using digital zoom to magnify specific areas of the live image.
Focusing on specific regions within the live view image.
Adjusting exposure for specific regions in the live view.
Setting the video mode for optimal focus during setup.
Controls for Pan-Tilt-Zoom (PTZ) functionality of the camera.
Configuring local settings like live view parameters and save paths.
Configuring the storage path for recorded files and captured images.
Steps to insert, format, and manage the SD storage card.
Configuring FTP parameters for uploading captured pictures to a server.
Setting up SDK listening for receiving alarm information and pictures.
Configuring the device to upload captured pictures via an arm host.
Configuring ISAPI listening for image uploads, mutually exclusive with SDK listening.
Setting up cloud storage for extending storage capacity for captured pictures.
Defining the video and picture ratio within the storage capacity.
Configuring the device to record video automatically at scheduled times.
Adjusting parameters for live view and recording quality and fluency.
Adjusting camera parameters for optimal image clarity.
Managing the IR filter for day/night image effect.
Configuring Region of Interest (ROI) for prioritized encoding.
Concealing parts of the image for privacy protection.
Customizing On-Screen Display (OSD) information on live view.
Configuring IPv4 and IPv6 addresses for network connectivity.
Connecting the device to the ISUP platform for remote access.
Configuring Dynamic DNS for network access via a domain name.
Setting up SNMP for network management and receiving alarm messages.
Configuring IEEE 802.1X for port-based network access control.
Modifying device ports to avoid conflicts and ensure network access.
Configuring RS-485 serial port parameters for peripheral devices.
Configuring RS-232 serial port parameters for debugging the device.
Adding, modifying, and deleting user accounts with different permissions.
Configuring IP addresses allowed or disallowed for device access.
Locking the current IP address to enhance data security.
Configuring HTTPS for secure remote access with certificates.
Steps to create and install a self-signed SSL certificate.
Installing an authorized SSL certificate for enhanced data security.
Disabling SSH service for security unless needed for professional debugging.
Improving network access security by setting RTSP authentication.
Automatically logging out users after a period of inactivity.
Setting validity periods for user passwords to enhance security.
Accessing basic information and status of the device.
Managing and searching system and security audit logs.
Enabling the service to upload security audit logs to a log server.
Locating and troubleshooting problems by searching log files.
Analyzing security log files to detect intrusions and troubleshoot events.
Uploading radar debugging information to the platform.
Updating the device's system software with a new version.
Restarting the device via software for maintenance.
Restoring device parameters to default or factory settings.
Synchronizing the device's internal time with external sources.
Configuring Daylight Saving Time (DST) settings for the device.
Accessing debug configurations for professional troubleshooting.
Overlaying algorithm POS info and positioning frames on images.
Setting filters to control which capture information is recorded.
Enabling smartJPEG for efficient image storage.
Exporting device parameters for backup or transfer.
Importing configuration files from other devices.
Exporting debug files for troubleshooting and maintenance.
Exporting diagnosis information for device troubleshooting.