– 4 –
5.ATTACHING THE NEEDLE
6.WINDING A BOBBIN
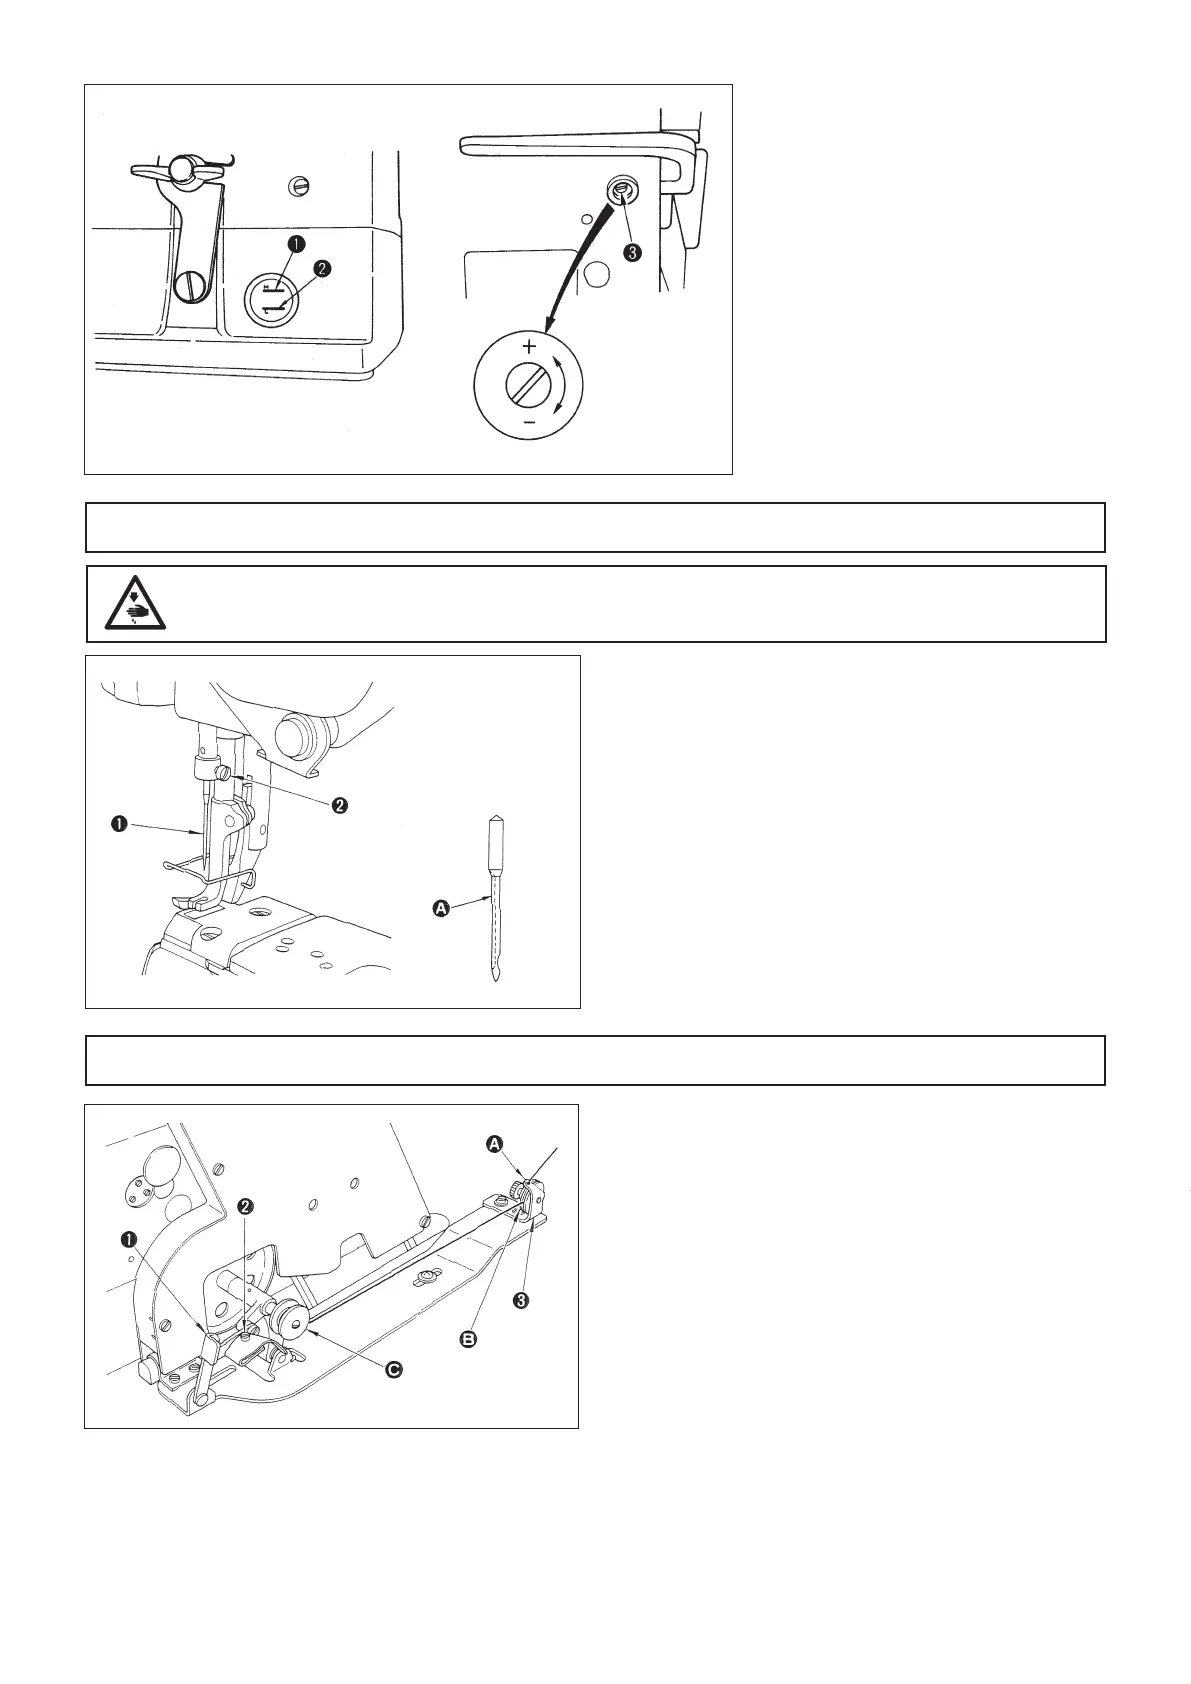
● Lubricating the bed support base
1. Pour JUKI Defrix Oil No.1 into the
bed support base until H mark
❶
is
reached.
2. If the level of the oil surface has
come down below L mark
❷
,add
some amount of oil accordingly.
●
Adjusting the amount of oi I in the hook
1. Tum the oil amount adjustment
screw
❸
mounted on the arm in the
direction of the"
⊖
" to decrease the
amount of oil in the hook,or in the
direction of the "
⊕
" to increase it.
1. Route the thread in the order of
A
,
B
and
C
before
winding it round the bobbin several times.
2. Set bobbin presser
❶
down to bring the winder in
contact with the belt.
3. Adjust screw
❷
so that the bobbin is wound with
thread about 80%.Turning the screw
❷
clockwise
increases the amount of thread wound on the bob-
bin,and vice versa.
4. If thread is wound unevenly,move winder tension ad-
juster base
❸
to the right or left to correct it.
5. The moment the bobbin has been wound up,the bob-
bin presser
❶
is released,and the bobbin winder will
stop automatically.
WARNING :
Turn OFF the power before starting the work so as to prevent accidents caused by abrupt start of the
sewing machine.
1. Turn the handwheel to move the needle bar up to its
highest position.
2. Loosen the needle setscrew
❷
,and hold needle
❶
so
that long groove
A
faces exactly to the left.
3. Insert the needle
❶
into the needle bar until it will go
no further. Securely tighten the needle setscrew
❷
.
The standard needle is Groz 135 x 17 Nm 110.
– 9 –
16.ADJUSTING THE WALKING FOOT AND THE PRESSER FOOT
● Alternate vertical motions of the walking foot
and the presser foot
1. The alternate vertical strokes of the walking
foot and the presser foot are normally equal.
2. Depending on the type of material,however,the
vertical strokes of the presser foot and walking
foot should be changed.
3.
For instance,when sewing slippery material or sewing
many overlapping sections,a better result may be ob-
tained by adjusting the vertical stroke of the walking
foot larger than that of the presser foot.
1
)
Remove the walking foot cover (front),and turn
the handwheel by hand until the thread take-up
reaches its lowest point.
2
)
Lower hand lifter
❶
.
3
)
Loosen screw
❷
.
4
)
As you move top feed crank
❸
to the left (in-
direction
A
),the vertical stroke of the presser
foot decreases
D
),whereas the vertical stroke
of the walking foot increases
E
.
5
)
On the contrary,as you move the top feed crank
to the right (in direction
B
),the vertical stroke
of the walking foot becomes closer
C
to that of
the presser foot when the walking foot sole is in
contact with the throat plate surface.
6
)
After adjustment,securely tighten screw
❷
.
7
)
Reinstall the walking foot cover (front).
● Height of the walking foot and the presser foot
When sewing elastic material or overlapping sections,a better
result may be obtained by changing the height of the presser
foot and walking foot.
1) Loosen nut
❶
.
2) When you move the cam rod boss toward
A
within the
slot,the height is increased.
3)
When you move it toward
B
,the height is decreased.
4) After adjustment,securely tighten nut
❶
.
● Adjusting the longitudinal position of the needle bar frame
1. Tum the feed regulator dial to maximum.
2.
Turning the handwheel slowly to this side,loosen and adjust screw
❶
in the rear arm of the feed bar frame so that the
feed does not contact with the front and back of the slot of the throat plate at the time of normal/reverse stitch motion.
3.
Next,tum the feed regulator dial clockwise,set the feed pitch at "0" and loosen screw
❷
in the rear arm of the needle bar frame.
4.
Turning the handwheel,move the needle bar frame so that the needle enters the center of needle hole,and tighten the screw.
WARNING :
Turn OFF the power before starting the work so as to prevent accidents caused by abrupt start of the
sewing machine.
 Loading...