SAFETY PRECAUTIONS
1. Whenitisnecessarytoopenthecontrolboxcontainingelectricalparts,besuretoturnthepower
offandwaitforveminutesormorebeforeopeningthecoverinordertopreventaccidentleadingto
electricalshock.
Accidentmeans"tocause
personalinjuryordeathor
damagetoproperty."
DANGER
CAUTION
Basicprecaution
1. Besuretoreadtheinstructionmanualandotherexplanatorydocumentssuppliedwithaccessoriesof
themachinebeforeusingthemachine.Carefullykeeptheinstructionmanualandtheexplanatorydocu-
mentsathandforquickreference.
2. Thecontentofthissectionincludesitemswhicharenotcontainedinthespecicationsofyourproduct.
3. Besuretowearsafetygogglestoprotectagainstaccidentcausedbyneedlebreakage.
4. Thosewhouseaheartpacerhavetousethemachineafterconsultationwithamedicalspecialist.
Safetydevicesandwarninglabels
1. Besuretooperatethemachineafterverifyingthatsafetydevice(s)iscorrectlyinstalledinplaceand
worksnormallyinordertopreventaccidentcausedbylackofthedevice(s).
2. Ifanyofthesafetydevicesisremoved,besuretoreplaceitandverifythatitworksnormallyinorderto
preventaccidentthatcanresultinpersonalinjuryordeath.
3. Besuretokeepthewarninglabelsadheredonthemachineclearlyvisibleinordertopreventaccident
thatcanresultinpersonalinjuryordeath.Ifanyofthelabelshasstainedorcomeunstuck,besureto
changeitwithanewone.
Applicationandmodication
1. Neverusethemachineforanyapplicationotherthanitsintendedoneandinanymannerotherthanthat
prescribedintheinstructionmanualinordertopreventaccidentthatcanresultinpersonalinjuryor
death.JUKIassumesnoresponsibilityfordamagesorpersonalinjuryordeathresultingfromtheuseof
themachineforanyapplicationotherthantheintendedone.
2. Nevermodifyandalterthemachineinordertopreventaccidentthatcanresultinpersonalinjuryor
death.JUKIassumesnoresponsibilityfordamagesorpersonalinjuryordeathresultingfromthema-
chinewhichhasbeenmodiedoraltered.
Educationandtraining
1. Inordertopreventaccidentresultingfromunfamiliaritywiththemachine,themachinehastobeused
onlybytheoperatorwhohasbeentrained/educatedbytheemployerwithrespecttothemachineoper-
ationandhowtooperatethemachinewithsafetytoacquireadequateknowledgeandoperationskill.To
ensuretheabove,theemployerhastoestablishaneducation/trainingplanfortheoperatorsandedu-
cate/trainthembeforehand.
Itemsforwhichthepowertothemachinehastobeturnedoff
Turningthepoweroff: Turningthepowerswitchoff,thenremovingthepowerplugfromtheoutlet.
Thisappliestothefollowing.
1. Besuretoimmediatelyturnthepoweroffifanyabnormalityorfailureisfoundorinthecaseofpower
failureinordertoprotectagainstaccidentthatcanresultinpersonalinjuryordeath.
2. Toprotectagainstaccidentresultingfromabruptstartofthemachine,besuretocarryoutthefollow-
ingoperationsafterturningthepoweroff.Forthemachineincorporatingaclutchmotor,inparticular,
besuretocarryoutthefollowingoperationsafterturningthepoweroffandverifyingthatthemachine
stopscompletely.
2-1. Forexample,threadingthepartssuchastheneedle,looper,spreaderetc.whichhavetobethread-
ed,orchangingthebobbin.
2-2. Forexample,changingoradjustingallcomponentpartsofthemachine.
2-3. Forexample,wheninspecting,repairingorcleaningthemachineorleavingthemachine.
3. Besuretoremovethepowerplugbyholdingtheplugsectioninsteadofthecordsectioninordertopre-
ventelectrical-shock,earth-leakageorreaccident.
4. Besuretoturnthepoweroffwheneverthemachineisleftunattendedbetweenworks.
5. Besuretoturnthepoweroffinthecaseofpowerfailureinordertopreventaccidentresultingofbreak-
ageofelectricalcomponents.
– 19 –
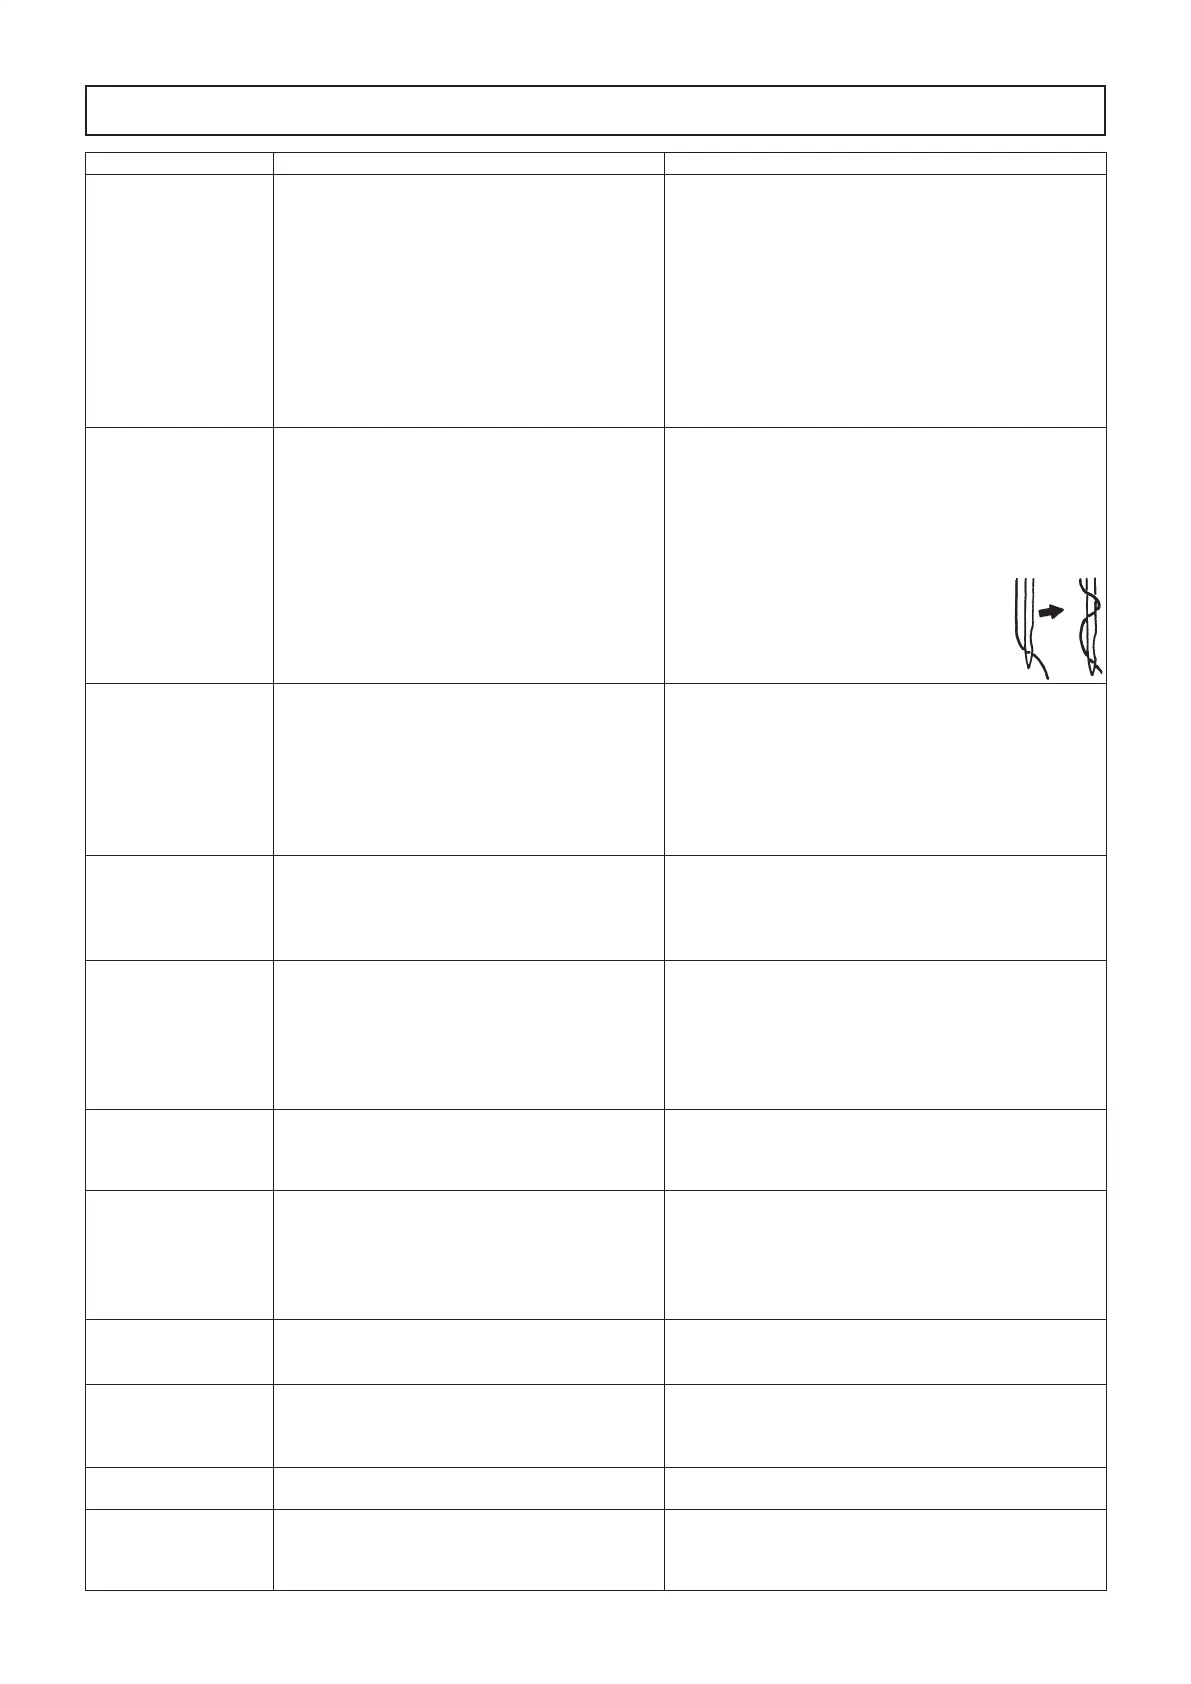
29.TROUBLES AND CORRECTIVE MEASURES
Trouble Cause Corrective measures
1. Thread breakage
(Thread frays or
wears out.)
①
The thread path,needle point,hook point or bobbin
case positioning nger has scratches.
○ Remove the scratches on the hook point using a ne sand
paper
.
Buff the bobbin case positioning nger.
②
The needle thread tension is too high. ○ Properly adjust the needle thread tension.
③
The needle hits the hook point. ○ See
"17.NEEDLE-TO-HOOK RELATIONSHIP"
.
④
Lubrication to hook is inadequate. ○ Properly adjust the lubrication. See
"4.LUBRICATION"
.
(Needle thread
remains 2 to 3 cm on
the wrong side of the
cloth.)
⑤
The needle thread tension is too low. ○ Properly adjust the needle thread tension.
⑥
The thread take-up spring has an excessively high
tension while it has an excessively small stroke.
○ Decrease the tension,and increase the stroke.
⑦
The timing between the needle and hook is too
early or late.
○ See
"17.NEEDLE-TO-HOOK RELATIONSHIP"
.
⑧
The bobbin races frequently. ○ Increase the spring pressure. Alternatively,reduce the
thread trimming speed.
2. Stitch skipping
①
The clearance between the needle and the hook
point is too large.
○ See
"17.NEEDLE-TO-HOOK RELATIONSHIP"
.
②
The timing between the needle and the hook point
is too early or late.
○ See
"17.NEEDLE-TO-HOOK RELATIONSHIP"
.
③
The presser foot pressure is too low. ○ Increase the presser foot pressure.
④
The clearance between the top edge of the needle
eyelet and the hook point is not correct.
○ See
"17.NEEDLE-TO-HOOK RELATIONSHIP"
.
⑤
The size of the needle is wrong. ○ Replace the needle by one which is one
grade thicker.
⑥
A synthetic ber thread or thin thread is used. ○ Wind the thread round the needle as illustrat-
ed.
3. Loose stitches
①
The thread has not been passed through the notch
of the bobbin case tension spring.
○ Properly thread the bobbin case.
②
The thread path is poorly nished. ○ Grind it using a ne sand paper or a buff.
③
The bobbin does not rotate smoothly. ○ Replace the bobbin or hook.
④
The bobbin thread tension is too low. ○ Properly adjust the tension.
⑤
The bobbin thread has been wound too tight. ○ Properly adjust the needle thread tension.
⑥
An untwisted synthetic thread is used. ○ Slightly reduce the sewing speed.(2,000 sti/min)
⑦
A coated cloth or nylon yarn is used. ○ Use a ball-point needle..
4. A few stitches are
skipped
.
①
The bobbin thread is too short. ○ Replace the bobbin by a standard one (aluminum).
②
The bobbin thread breaks. ○ Decrease the bobbin thread tension and the thread trim-
ming speed.
③
A nylon thread is used when sewing lightweight
material.
○ Use the soft start function.
5. The thread slips off
①
The tension of the auxiliary thread tension ○ Decrease the tension.
②
Thread take-up timing is too early. ○ See
"21.ADJUSTING THE THREAD TRIMMING CAM"
.
③
Returning force of the thread take-up spring is
excessively strong.
○ See
"9.THREAD THE MACHINE HEAD"
. Replace the
thread guide with an appropriate one.
④
The feed dog and walking foot trims thread. ○ Replace the walking foot with an appropriate one.
⑤
Actuating quantity of the picker is inadequate. ○ See
"24.ADJUSTING THE OPERATING STROKE OF
THE PICKER"
.
6. The needle thread
cannot be trimmed.
(The bobbin thread
can be trimmed.)
①
The last stitch has been skipped.(The clearance
between the needle and the hook is too large.)
○ See
"17.NEEDLE-TO-HOOK RELATIONSHIP"
.
7. Both needle and bob-
bin threads cannot be
trimmed.
①
The thread trimming timing is wrong. ○ See
"21.ADJUSTING THE THREAD TRIMMING TIMING"
.
②
The knife has been damaged. ○ Replace the knife.
③
The knife pressure is inadequate. ○ Increase the knife pressure.
④
The movement of the rotary knife is short. ○ See
"23.ADJUSTING MAX. MOVING POSITION OF THE
ROTARY KNIFE"
.
⑤
The thread trimming solenoid fails to work. ○ Check the motor solenoid for proper operation.
8. Thread cannot be
trimmed sharply.
①
The thread trimming timing is wrong. ○ See
"22.ADJUSTING THE THREAD TRIMMING TIMING"
.
②
The knife pressure is inadequate. ○ Increase the knife pressure.
③
The knife blade is blunt. ○ Replace the knife.
9. Chain off thread
doesn't come out
.
①
Breakage due to thread frayed caused by standing
and apping of thread.
○ Use the furnished thread guide and the presser foot with a
slot.
②
Breakage between the bottom face of the presser
foot and the contact face with throat plate.
10. Stepped part is
clogged.
①
The presser foot slips when riding on the stepped
part.
○ Use B15242450AB presser foot (option) and B147024500B
walking foot (option).
11. When the alternate lift
is increased,the pitch
cannot be achieved
as per the scale.
①
Sewing speed is too fast,resulting in reducing the
feed force.
○ Reduce the sewing speed.
 Loading...