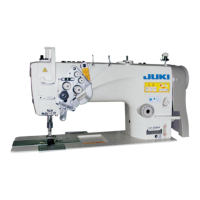
6-9. Position of the wiper
6-10. Caution when installing the attachments
1) Adjust engraved marker dot
1
on the machine arm to white engraved marker dot
2
on the
handwheel (second white engraved marker dot in the rotating direction of the sewing machine).
2) Move rod
3
in the direction of the arrow, and adjust with two clamping screws
5
so that the
clearance between the top end of needle and wiper
4
is approximately 2 mm.
Be careful that screw
A
does not protrude in the
rear of the bed slide when xing the attachment to
the bed slide with the screw.
When it protrudes as shown in
the figure, the screw interferes
with other components and break-
down will be caused.
Needle
2mm
3
5
4
2
A
WARNING :
To protect against possible personal injury due to abrupt start of the machine, be sure to start the
following work after turning the power off and ascertaining that the motor is at rest.
1
 Loading...