EN 43
MasterPage: Start_Right
Connections/Editing
ENGLISH
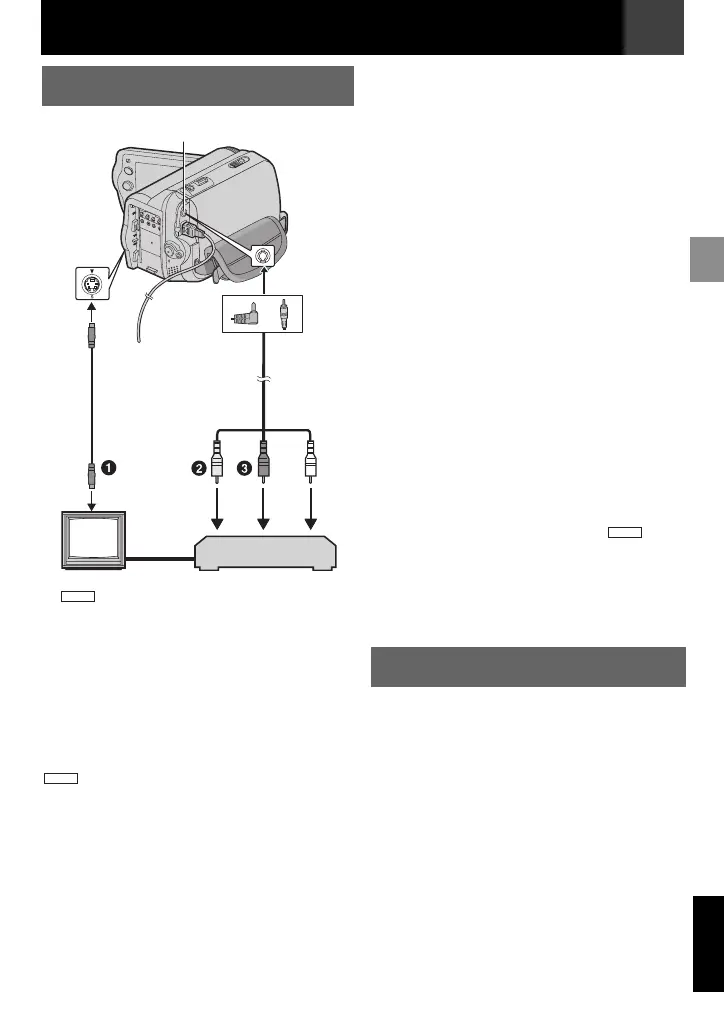
A Black to S-VIDEO IN (Connect when
your TV/VCR has S-VIDEO in and A/V input
connectors. In this case, it is not necessary
to connect the yellow video cable).
B Yellow to VIDEO IN (Connect when your
TV/VCR has only A/V input connectors).
C Red to AUDIO R IN*.
D White to AUDIO L IN*.
* Not required for watching still images only.
Note:
The S-Video cable is optional. Be sure to
use the YTU94146A S-Video cable. Consult the
JVC Service Centre described on the sheet
included in the package for details on its
availability. Make sure to connect the end with a
core filter to the camera. The core filter reduces
interference.
Make sure all units are turned off.
Connect the camcorder to a TV or VCR
as shown in the illustration.
If using a VCR, go to step .
If not, go to step .
Connect the VCR output to the TV input,
referring to your VCR’s instruction
manual.
Turn on the camcorder, the VCR and the
TV.
Set the VCR to its AUX input mode, and
set the TV to its VIDEO mode.
Start playback on the camcorder
(墌 23).
● Please set “WIDE TV” of Playback Menus so
that the image may suit your TV (16:9 or
4:3 (墌 31, 34).
To choose whether or not the following
displays appear on the connected TV
● Date/Time
Set “DATE/TIME” to “ON”, “AUTO” or “OFF”
(墌 34).
● Time Code
Set “TIME CODE” to “ON” or “OFF” (墌 34).
● On Screen
Set “ON SCREEN” to “OFF”, “LCD” or “LCD/
TV” (墌 34).
Notes:
● It is recommended to use the AC Adapter as
the power supply instead of the battery pack
(墌 18).
● To monitor the picture and sound from the
camcorder without inserting a tape
or a
memory card, set the camcorder’s Power
Switch to “REC”, then set your TV to the
appropriate input mode.
● Make sure you adjust the TV sound volume to
its minimum level to avoid a sudden burst of
sound when the camcorder is turned on.
To use this camcorder as a player
Following the illustration, (墌 43)
“Connections To A TV Or VCR”, connect
the camcorder and the VCR’s input
connectors.
Perform steps – “Connections To
A TV Or VCR” (墌 43).
At the point you want to start dubbing,
start recording on the VCR. (Refer to the
VCR’s instruction manual).
To stop dubbing, stop recording on the
VCR, then stop playback on the
camcorder.
Connections To A TV Or VCR
4
TV
VCR
Audio/Video Cable
(provided)
To AV Connector
or
S-Video Cable
(optional)
GR-D860
GR-D860
1
1
2
2
3
3
4
4
Dubbing To A VCR
3
3
4
4
5
5
6
6
GR-D860
1
1
2
2
1
1
6
6
3
3
4
4
Connections/Editing
GR-D820EK_GR-D860EK.book Page 43 Monday, November 19, 2007 10:15 AM
 Loading...