Rev: 10.20.20 Page 9 CCD-0001526
Automatic Leveling Procedure
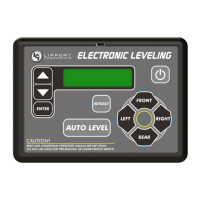
NOTE: Refer to (Fig.10) for questions regarding location and functions of the Lippert Components, Inc.
Electronic Leveling System. Coach must be running and parking brake must be engaged for LCI
Electronic Leveling System to operate.
1. Push ON/OFF (Fig.10N) button on touchpad. The system is now operational and the electronic level
lights will become active.
2. Check to see that the touchpad ENGAGE PARK BRAKE (Fig.10H) light is not flashing.
3. Push the AUTO (Fig.10C) button to begin the automatic leveling cycle.
NOTE: After starting the automatic leveling cycle it is very important that you do not move around in the
coach until the coach is level. This could have an affect on the performance of the leveling system.
4. If further adjustments are necessary, refer to the Manual Leveling Procedures section.
5. Push power button to turn off the system.
6. Visually inspect all jacks to ensure all shoes are touching ground. Should one of the rear jack shoes not
be touching the ground. Push the corresponding LEFT (Fig.10K) or RIGHT (Fig.10L) buttons to lower the
corresponding jack to the ground.
Manual Leveling Procedures
NOTE: When leveling your coach, the coach should be leveled from front to rear first. When the coach
is level from front to rear, then level the coach from left to right. Coach must be running for LCI
Electronic Leveling System to operate.
1. Push ON/OFF (Fig.10N) button on touchpad. The system is now operational, ON/OFF light will be lit.
2. Push and hold MAN (Fig.10A) button for 5 seconds.
3. Push FRONT (Fig.10J) button until jacks contact the ground and lift the front of the coach 1-2 inches.
4. Push REAR (Fig.10M) button until jacks contact the ground and lift rear of coach.
5. Press FRONT (Fig.10J) or REAR (Fig.10M) button; if light is on at the FRONT button press the FRONT
(Fig.10J) button; if the light is on at REAR button press the REAR (Fig.10M) button. Continue to hold
until the light goes out.
6. Push LEFT (Fig.10K) or RIGHT (Fig.10L) button: If light is on at RIGHT button, push RIGHT button; if the
light is on at LEFT button push LEFT button. Continue to hold until the light goes out.
7. The right and left jacks are used to level the coach side to side. Pushing the LEFT button on the
touchpad will extend both left jacks. Pushing the RIGHT button on the touchpad will extend both right
jacks. Jacks always work in pairs, both front jacks; both right side jacks, etc.
8. Repeat steps 2 through 6 if needed.
9. Turn power off to leveling system by pushing ON/OFF (Fig.10N) button.
10. Visually inspect all jacks to ensure all shoes are touching ground. Should one of the rear jack shoes not
be touching the ground, press the corresponding LEFT (Fig.10K) or RIGHT (Fig.10L) rear jack buttons to
lower the corresponding jack to the ground.
 Loading...