If a wind radio sensor measures that the wind speed is above the threshold set on the sensor, the wind sensor sends the message of "wind alarm": the modules
tuned to it makes an upward manoeuvre and commands are inhibited as long as it remains the dangerous situation.
As soon as in the module is stored a wind sensor is automatically activated control of communication between the wind sensor and the module. If communication
is lost for more than 60 minutes, the module performs an upward movement for the protection of the roller. This manoeuvre is performed automatically every 60
minutes until the restoration of radio communication. The factory recommends keeping the "radio test" in order to identify in good time any malfunction of the radio
sensor. With the following procedure you can enable or disable the "test radio":
05. OPERATING LOGIC OF WIND SENSOR
05.1 TEST RADIO FUNCTION
10.1 UTILIZZANDO IL TRASMETTITORE (solo Atom e Leg)
ARCO
FLUTE, KUADRO, KORT
VISIO Other transmitters...
01. Bring the motor in an intermediate position
02. Press MENU for about 5 sec, until «rS»
appears on display
03. Press 1 time PREV / 7 times NEXT.
«17» appears on display
04. Press STOP. The motor signals:
1 up = active, 1 down = inactive
05. To deactivate: press PREV
To activate: press NEXT
06. Press STOP. The motor signals:
1 up = active, 1 down = inactive
01. Bring the motor in an intermediate position
02. Holding down STOP, press PROG for
about 1 sec, until LEDs light
03. Press 1 time UP / 7 times DOWN.
04. Press STOP. The motor signals:
1 up = active, 1 down = inactive
05. To deactivate: press DOWN
To activate: press UP
06. Press STOP. The motor signals:
1 up = active, 1 down = inactive
01. Bring the motor in an intermediate position
02. Press MENU, «Menu rx» appears on
display
03. Press 1 time PREV / 7 times NEXT.
«17» appears on display
04. Press STOP. The motor signals:
1 up = active, 1 down = inactive
05. To deactivate: press DOWN
To activate: press UP
06. Press STOP. The motor signals:
1 up = active, 1 down = inactive
See the User manual of
the transmitter at
section:
«RECEIVER MENU -
Function 17 -
Test radio»
If the sun sensor measures a brightness above the threshold set for at least 2.5 minutes, sends the message "sun" and modules, tuned to it, command a
downward movement. If the sun sensor measures a brightness below the threshold set for at least 18 minutes, sends the message of "no sun" and modules MIR
24, tuned to it, command an upward movement.
The "sun function" can be activated / deactivated from the transmitter (see transmitter manual under "sun function"). If the "sun function" is deactive, MIR 24
ignores the commands about the sun sent from the radio sensor.
06. OPERATING LOGIC OF SUN SENSOR
If the rain sensor measures a rain intensity exceeds the threshold set on the sensor, the rain sensor sends the message "rain" and modules MIR 24, tuned to it,
performs an upward or downward manoeuvre, according to how is set the rain sensor. The manual controls are still active. More rain sensors can be stored in the
same MIR 24.
07. OPERATING LOGIC OF RAIN SENSOR
09. TILTING FUNCTION
This feature can be useful, for example in the handling of sun protection. If
the function is activated, the RIGHT and LEFT function of the transmitters
will command short movements which will allow easy orientation of the sun
protection. The command can also be given by any buttons connected to
the module; to use the function, press a button (less than 0.5 sec), then
press it again and hold it until you reach the desired orientation. The
factory sets the function to inactive.
To set the function:
ARCO
ARCO
ARCO
FLUTE, KUADRO, KORT
FLUTE, KUADRO, KORT
FLUTE, KUADRO, KORT
VISIO
VISIO
VISIO
Other transmitters...
Other transmitters...
Other transmitters...
01. Bring the motor in an intermediate position
02. Press MENU for about 5 sec, until «rS»
appears on display
03. Press 1 time PREV / 2 times NEXT.
«12» appears on display
04. Press STOP. The motor signals the current
value (1 to 5 movements)
05. Press NEXT the number of times equal to
the desired setting (1 to 5)
06. Press STOP. The motor signals the new
value (1 to 5 movements)
01. Bring the motor in an intermediate position
02. Press MENU for about 5 sec, until «rS»
appears on display
03. Press 7 times NEXT.
«07» appears on display
04. Press STOP. The motor signals the current
value (1)
05. Press PREV and NEXT to set a new
value(2)
06. Press STOP. The motor signals the new
value (1)
01. Bring the motor in an intermediate position
02. Press MENU for about 5 sec, until «rS»
appears on display
03. Press 8 times NEXT.
«08» appears on display
04. Press STOP. The motor signals the current
value (1 to 7 movements)
05. Press NEXT the number of times equal to
the desired setting (1 to 7)
06. Press STOP. The motor signals the new
value (1 to 7 movements)
01. Bring the motor in an intermediate position
02. Holding down STOP, press PROG for about
1 sec, until LEDs light
03. Press 1 time UP / 2 times DOWN.
04. Press STOP. The motor signals the current
value (1 to 5 movements)
05. Press DOWN the number of times equal to
the desired setting (1 to 5)
06. Press STOP. The motor signals the new
value (1 to 5 movements)
01. Bring the motor in an intermediate position
02. Holding down STOP, press PROG for about
1 sec, until LEDs light
03. Press 7 times DOWN.
04. Press STOP. The motor signals the current
value (1)
05. Press UP and DOWN to set a new value (3)
06. Press STOP. The motor signals the new
value (1)
01. Bring the motor in an intermediate position
02. Holding down STOP, press PROG for about
1 sec, until LEDs light
03. Press 8 times DOWN.
04. Press STOP. The motor signals the current
value (1 to 7 movements)
05. Press DOWN the number of times equal to
the desired setting (1 to 7)
06. Press STOP. The motor signals the newt
value (1 to 7 movements)
01. Bring the motor in an intermediate position
02. Press MENU, «Menu rx» appears on
display
03. Press 1 time PREV / 2 times NEXT.
«12» appears on display
04. Press STOP. The motor signals the current
value (1 to 5 movements)
05. Press UP the number of times equal to the
desired setting (1 to 5)
06. Press STOP. The motor signals the new
value (1 to 5 movements)
01. Bring the motor in an intermediate position
02. Press MENU, «Menu rx» appears on
display
03. Press 7 times NEXT.
«07» appears on display
04. Press STOP. The motor signals the current
value (1)
05. Press UP and DOWN to set a new value (3)
06. Press STOP. The motor signals the new
value (1)
01. Bring the motor in an intermediate position
02. Press MENU, «Menu rx» appears on
display
03. Press 8 times NEXT.
«08» appears on display
04. Press STOP. The motor signals the current
value (1 to 7 movements)
05. Press UP the number of times equal to the
desired setting (1 to 7)
06. Press STOP. The motor signals the new
value (1 to 7 movements)
See the User manual of
the transmitter at
section:
«RECEIVER MENU -
Function 12 -
Orientation»
See the User manual of
the transmitter at
section:
«RECEIVER MENU -
Function 07»
See the User manual of
the transmitter at
section:
«RECEIVER MENU -
Function 08»
ü If you try to set «Orientation time» greater than level 5, the value is rejected and the motor makes 2 short movements down.
ü When «Orientation time» is set on level 1 (inactive), if you command the orientation movements by transmitter or by command buttons, the motor will not
move.
ü If you try to set «AIR Change» greater than level 7, the value is rejected and the motor makes 2 short movements down.
ü When «AIR Change» is set on level 1 (inactive), if you command the orientation movements by transmitter or by command buttons, the motor will not
move.
N° of movements
Duration of movement
1
inactive
2
slow
3
>
4
>>
5
fast
This feature is especially useful if you want to identify a favorite position
of the roller blind. Recalling the intermediate limit switch function by a
stored portable transmitter, a complete operation of descent is carried
out and elapsed the work time, a short upward movement is carried out
whose duration can be set via this parameter.
08. “AIR CHANGE“ FUNCTION
N° of movements
AIR CHANGE
1
inactive
2
01 sec
3
02 sec
4
03 sec
5
04 sec
6
05 sec
7
06 sec
Is the closure time of the relays when a manoeuvre is commanded; the working time can be set from 5 to 240 seconds. The factory sets the "working time" to 120
sec.
10. WORKING TIME
If you try to set «Working time» lower than 5s or greater than 240s, the value is rejected and the motor makes 2 short movements down
11. OPERATION LOGIC OF COMMAND BUTTONS
The buttons can be operated either in PULSE logic or HOLD-TO-RUN logic.
PULSE: to activate the motor press a button for at least 0.5 seconds, to stop the motor press briefly (less than 0.5 seconds) one of the two buttons.
HOLD-TO-RUN: to activate the motor press a button for at least 0.5 seconds, to stop the motor release the button.
The factory sets the device to work in PULSE logic. To change this setting:
ARCO
FLUTE, KUADRO, KORT
VISIO Other transmitters...
01. Bring the motor in an intermediate position
02. Press MENU for about 5 sec, until «rS»
appears on display
03. Press 1 time PREV / 8 times NEXT.
«18» appears on display
04. Press STOP. The motor signals:
1 up = hold-to-run, 1 down = pulse
05. To select PULSE: press PREV
To select HOLD-TO-RUN: press NEXT
06. Press STOP. The motor signals:
1 up = hold-to-run, 1 down = pulse
01. Bring the motor in an intermediate position
02. Holding down STOP, press PROG for
about 1 sec, until LEDs light
03. Press 1 time UP / 8 times DOWN.
04. Press STOP. The motor signals:
1 up = hold-to-run, 1 down = pulse
05. To select PULSE: press DOWN
To select HOLD-TO-RUN: press UP
06. Press STOP. The motor signals:
1 up = hold-to-run, 1 down = pulse
01. Bring the motor in an intermediate position
02. Press MENU, «Menu rx» appears on
display
03. Press 1 time PREV / 8 times NEXT.
«18» appears on display
04. Press STOP. The motor signals:
1 up = hold-to-run, 1 down = pulse
05. To select PULSE: press DOWN
To select HOLD-TO-RUN: press UP
06. Press STOP. The motor signals:
1 up = hold-to-run, 1 down = pulse
See the User manual of
the transmitter at
section:
«RECEIVER MENU -
Function 18 -
Buttons logic»
(1) Example: 1 movement - pause - 5 movements = 15 sec ● Example: 2 movements - pause - 1 movement - pause - 1 long movement = 210 sec
(2) Example: 15 sec = press PREV 1 time and NEXT 5 times ● Example: 210 sec = press PREV 21 times
(3) Example: 15 sec = press UP 1 time and DOWN 5 times ● Example: 210 sec = press UP 21 times
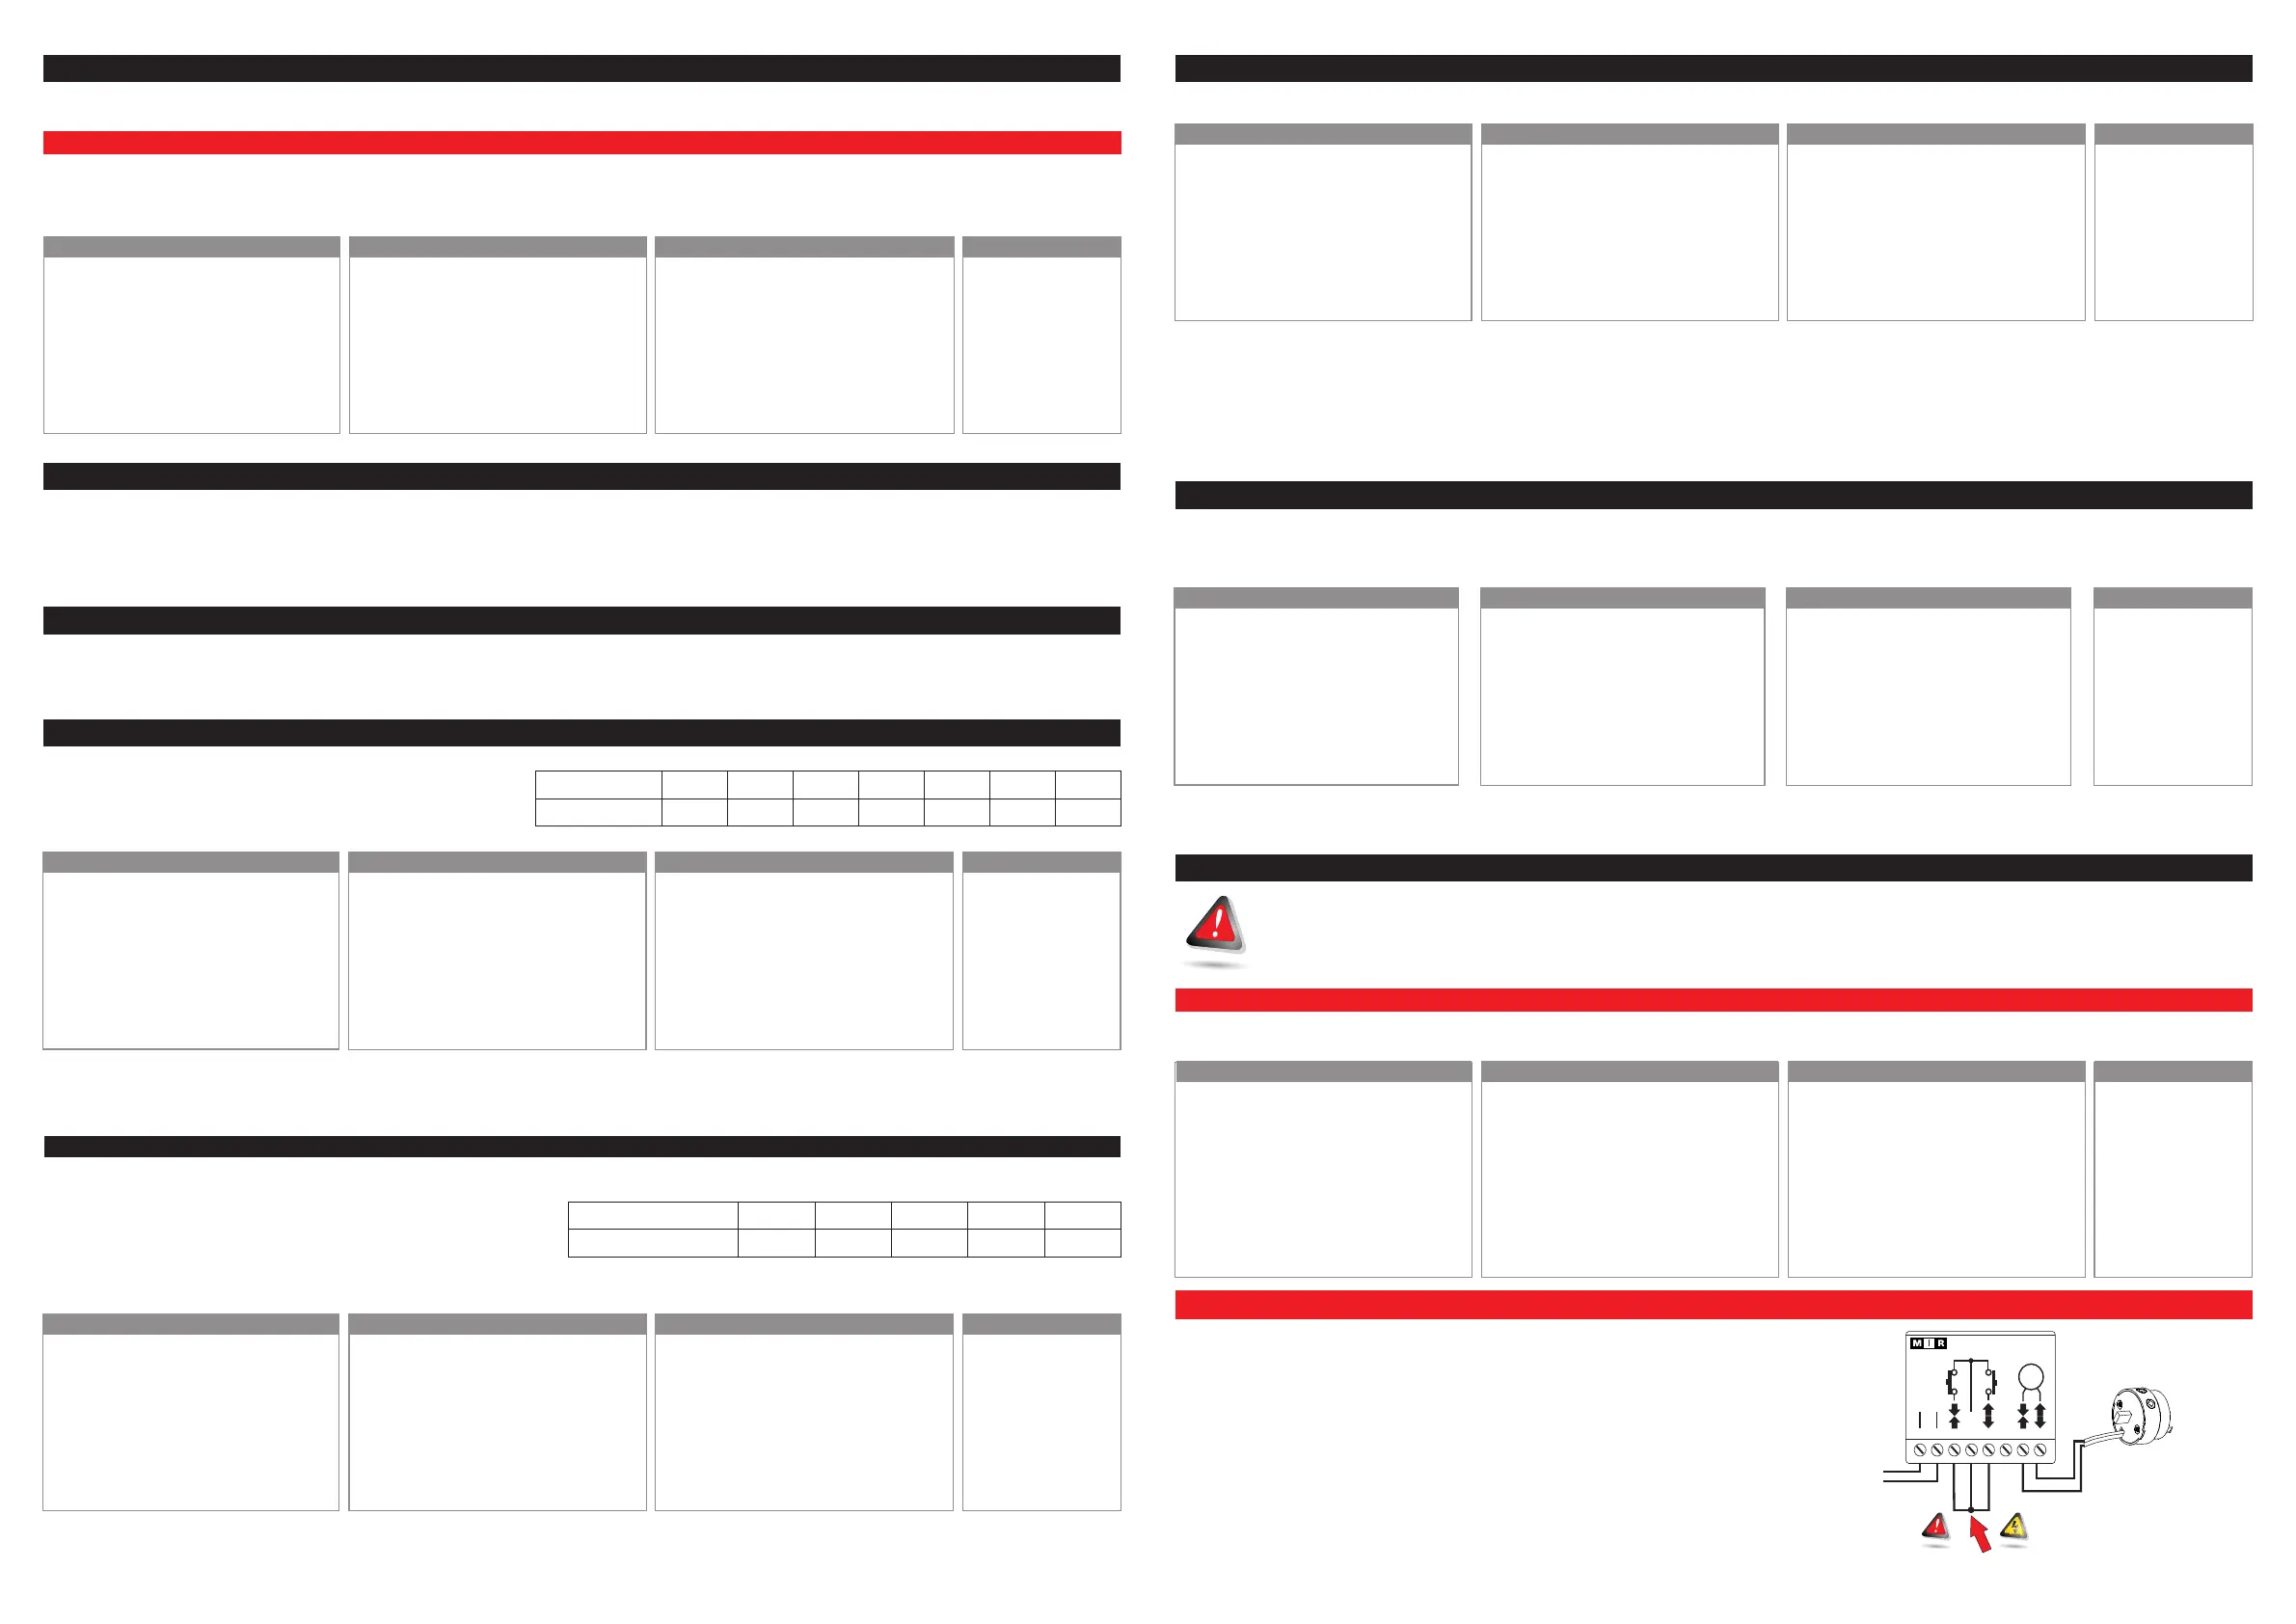
ü Switch off power supply to the module
ü Connect as show in figure
ü Switch ON power supply and wait 30 seconds until the motor makes 2 alternating
movements, to indicate that factory conditions are restored.
ü Switch off power supply to the module
ü Restore the connections (see section 02. ELECTRICAL CONNECTIONS)
ü Follow the instruction at section 03. FIRST INSTALLATION
12A. RESET USING A MEMORIZED TRANSMITTER
12B. RESET USING THE BUTTON INPUT
12. RESET
This procedure restores the receiver to the default conditions (factory settings). This procedure must only be carried out by qualified
technical staff. Having carried out the reset procedure, the qualified technician must promptly carry out all the installation operations
described at section 03. FIRST INSTALLATION
ü Select, on the transmitter, the radio channel that controls the device you want to reset.
ü Make sure that this radio channel controls only the device you want to reset.
ARCO
FLUTE, KUADRO, KORT
VISIO Other transmitters...
01. Bring the motor in an intermediate position.
02. Press MENU for about 5 sec, until «rS»
appears on display
03. Press 2 time PREV / 9 times NEXT.
«29» appears on display
04. Press STOP. The display flashes, the
motor performs some movement
05. Press together PREV and NEXT for about
2 seconds until the motor indicates that the
reset was performed (1 moving up / down).
06. Disconnect the power supply and reinstall
the motor (see section 3).
01. Bring the motor in an intermediate position.
02. Holding down STOP, press PROG for
about 1 sec, until LEDs light
03. Press 2 time UP / 9 times DOWN.
04. Press STOP. The LEDs flash, the motor
performs some movement
05. Press together UP and DOWN for about 2
seconds until the motor indicates that the
reset was performed (1 moving up /
down).
06. Disconnect the power supply and reinstall
the motor (see section 3).
01. Bring the motor in an intermediate position.
02. Press MENU, «Menu rx» appears on
display
03. Press 2 time PREV / 9 times NEXT.
«29» appears on display
04. Press STOP. The display flashes, the motor
performs some movement
05. Press together PREV and NEXT for about 2
seconds until the motor indicates that the
reset was performed (1 moving up / down).
06. Disconnect the power supply and reinstall
the motor (see section 3).
See the User manual of
the transmitter at
section:
«RECEIVER MENU -
Function 29 -
Receiver reset»
C
24 Vdc
M
cc
1 2 3 4 5 6 7 8
24
Power supply
+
-
 Loading...