You can utilize the REVERB in three ways, “on” all the time, manually activated using the included Footswitch and engaged automati-
cally under MIDI Programs.
In the REV ON position the circuit is active all the time and the REVERB controls determine the dry/wet blend of each Channel. In
the OFF/FTSW Position, the REVERB circuit is off until triggered on with the REVERB Button on the included Footswitch or via a
previously written MIDI program.
Programming the REVERB under a MIDI Program number is quick and easy with the following simple procedure:
1. Select a MIDI Program Number with your MIDI Controller.
2. Select the Channel, and Feature combination you wish to include in the MIDI Program at that Program Number location using the
Front Panel Channel Select and these Rear Panel MIDI Control switches by turning them OFF and then ON once.
3. Press The Rear Panel STORE Key.
The REVERB will now be called up under the MIDI Program location you have just stored it in.
NOTE: See the MIDI section of this manual to control the REVERB with MIDI commands.
SOLO SWITCH
The SOLO feature enables a pre-settable boost in volume to be engaged by either the SOLO button on the
included Footswitch or by storing it “ON” under a MIDI program number. It is essentially an additional OUTPUT control that is wired
in series and can achieve levels above that of the setting on the OUTPUT.
This footswitchable/MIDI programmable feature allows “on the fly” showcasing of parts at the click of a switch or allows you to have
to different levels of the same preamp sound, thus adding flexibility and even more footswitchable sounds.
NOTE: When using the MESA Footswitch to control all the Channels and features, set the Rear Panel SOLO switch to the OFF posi-
tion. This allows activation of the SOLO from the included MESA Footswitch.
Programming it to be active under MIDI programs is easy and is achieved in this manner:
1. Select a MIDI Program number on your MIDI Controller where you wish the SOLO to be active.
2. Toggle the SOLO mini toggle on the Rear Panel (in the row of switches near the BIAS switch) OFF, then ON once to trigger the
SOLO Feature.
3. Press the STORE Key.
The SOLO will be active under that (just Stored) program number along with the Channel, REVERB and LOOP configuration you
chose before pressing STORE.
NOTE: When the SOLO is active (switch set to SOLO ON) but the MESA Footswitch is NOT connected, both the SOLO and the
OUTPUT will have an effect on the signal with the OUTPUT being the determining factor of what is possible, as in, if the OUTPUT is
either on zero or all the way up, the SOLO will have no effect on the signal. With the OUTPUT in the usable range of its sweep, the
SOLO will allow an increase in volume.
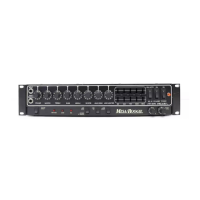
EFX LOOP (SERIES)
These two ¼” jacks provide the interfacing patch points for your processing needs. The Effects Loop is
basically a circuit bridge from the end of the preamp to the Driver stage, with the SEND interrupting the signal at the preamp’s end
and the RETURN feeding the power section just before the Driver tube.
Using this patch point usually ensures the best sonic performance as well as signal to noise ratio with your outboard processors.
PAGE 12
 Loading...