minnkotamotors.com | 15
©2023 Johnson Outdoors Marine Electronics, Inc.
IDENTIFYING TROLLING MOTOR FEATURES AND THEIR ASSOCIATED CABLES
e. Holding the end of the Armature Shaft with a Flat
Blade Screwdriver, tighten the Prop Nut with a 9/16"
Open End Wrench.
f. Tighten the Prop Nut 1/4 turn past snug to
25-35 in-lbs.
3
CAUTION
Do not over tighten as this can damage the prop.
PropellerPropeller
Prop NutProp Nut
Prop WasherProp Washer
Drive PinDrive Pin
IDENTIFYING TROLLING MOTOR FEATURES AND THEIR ASSOCIATED CABLES
Ethernet Cable Ethernet Cable
from Trolling Motorfrom Trolling Motor
Threaded CollarThreaded Collar
Eight Pin ConnectorEight Pin Connector
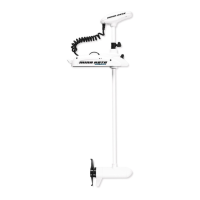
The Riptide PowerDrive is pre-installed with Advanced GPS
Navigation - including the ability to connect via Ethernet to a
Humminbird fish finder. To get the full benefit of this feature, it is
necessary to connect the Accessory Cables to an output device.
The connectors are present on the trolling motor and have cables
that exit below the Control Head or exit the Coil Cord at the base of
the Mount. To better identify cables present, refer to the diagrams
that detail what the Advanced GPS Navigation connectors look like.
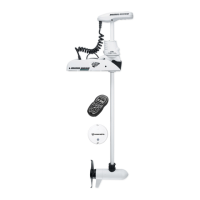
Advanced GPS Navigation
Feature & Cable Identification
Identifying Connectors
Control HeadControl Head
Coil CordCoil Cord
MountMount
Advanced Advanced
GPS GPS
Ethernet Ethernet
ConnectorConnector
Advanced Advanced
GPS CableGPS Cable
Advanced Advanced
GPS CableGPS Cable
TWO Connectors
Foot Pedal Foot Pedal
Power Power
ConnectorConnector
Eight Pin Eight Pin
ConnectorConnector
Power Leads
TWO connectors are present below the Control Head for Riptide
PowerDrive trolling motors equipped with:
Advanced GPS Navigation - When Advanced GPS Navigation is
pre-installed on your trolling motor, one eight pin Advanced GPS
Ethernet Connector will exit the base of the Control Head and
rest just below the Control Head next to the Coil Cord and one
Advanced GPS Cable will exit the base of the Control Head and
run down the center of the Coil Cord. The Advanced GPS Cable
will come to a "Y" near the Mount of the trolling motor. One half
of the "Y" will enter the Mount next to the Power Leads and the
main portion of the cable will be attached from the factory to
the Foot Pedal Power Connector. If a trolling motor is equipped
with Advanced GPS Navigation, it will not be equipped with
a Foot Pedal. If the Advanced GPS Navigation on the trolling
motor will be used with a fish finder, an Ethernet Cable may be
attached to the Advanced GPS Ethernet Connector below the
Control Head. See the "Advanced GPS Navigation" section of
this document for details on how to install the Advanced GPS
Ethernet Connector to a Humminbird.
 Loading...