5
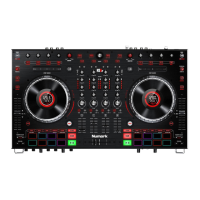
PLAYBACK CONTROLS
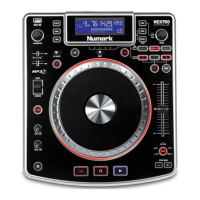
12. LAYER – Selects which Layer in the software is controlled by that hardware Deck. Deck A can control Layer 1 or 3; Deck B can
control Layer 2 or 4.
13. PLATTER – This platter controls the Audio Pointer in the software.
14. PLAY / PAUSE – Starts or resumes playback if the Deck is paused. Pauses playback if the Deck is playing. (The rate at which
the playback shifts from “play” to “pause” and from “pause” to “play” is controlled by the START TIME and STOP TIME knobs.)
15. CUE – If no Temporary Cue Point is assigned, or if the Deck is paused, press CUE to set a Temporary Cue Point. While the track
is playing, press it again to return to the Temporary Cue Point and pause playback.
You can hold down CUE to start playback from the Temporary Cue Point. Release it to return to the Temporary Cue Point and
pause playback.
You can hold down CUE and PLAY / PAUSE simultaneously to start playback from the Temporary Cue Point. Release both
buttons to allow playback to continue.
16. SYNC – Automatically matches the corresponding Deck’s tempo with the MASTER BPM.
17. BLEEP / REVERSE – Reverses audio playback of the track on the corresponding deck.
• When using the button as a REVERSE button, the playback of the track will be reversed. Returning the switch to its center
(deactivated) position will resume normal playback from wherever the Audio Pointer stops.
• When using the button as a BLEEP button (while holding SHIFT and pressing this button), the playback of the track will be
reversed. Returning the switch to its center (deactivated) position will resume normal playback from where it would have been
if you had never engaged the BLEEP function (i.e., as if the track had been playing forward the whole time).
18. SCRATCH – Press this to turn Scratch Mode on/off. When in Scratch Mode, the button will be lit, and moving the PLATTER will
scratch the track. When not in Scratch Mode, moving the PLATTER will bend the track's pitch.
19. SKIP – Press and hold this button then turn the PLATTER to skip forward or backward through the track by beat. (Scratch Mode
will be disabled while this button is pressed.)
CUE CONTROLS
20. DELETE CUE / SHIFT – Press or hold this to enable Delete Cue Mode, so you can erase assigned Cue Points from the HOT CUE
BUTTONS. When the DELETE CUE button is lit bright red, it is in Delete Cue Mode. You can then press a red HOT CUE
BUTTON to delete its assigned Cue Point. (Pressing the DELETE CUE button to enable Delete Cue Mode will let you delete one
Cue Point at a time. Holding the DELETE CUE button to enable Delete Cue Mode will let you delete multiple Cue Points.)
Pressing and holding this button also allows you to access secondary ("shift") functions of other buttons on NS6.
21. HOT CUE BUTTONS (1-5) – Assigns a Cue Point or returns the track to that Cue Point. When a HOT CUE BUTTON is unlit, you
can assign a Cue Point by pressing it at the desired point in your track. Once it is assigned, the HOT CUE BUTTON will light up
white. To return to that Cue Point, simply press it.
Tip: If the Deck is paused, holding a lit HOT CUE BUTTON will start playback from that Cue Point. Releasing it will return the track
to that Cue Point and pause playback.
Note: Cue Points cannot be overwritten. You must first erase a Cue Point by pressing or holding the DELETE CUE button while
pressing the appropriate HOT CUE BUTTON.
LOOP CONTROLS
22. ON / OFF – Press this to turn a loop on or off. If the Deck is already looping, it will
exit the loop. If the Deck is not looping, the currently selected loop will be enabled
(once the Audio Pointer enters the loop region). If no loop is set, nothing will
happen.
23. IN – Press this to set a “Loop In” point where your loop will begin. If you are already
in a loop when you press it, you can “fine tune” the placement of the “Loop In” point
by moving the PLATTER. If no track is assigned to the Deck, nothing will happen.
24. OUT – Press this to set a “Loop Out” point where your loop will end. If you are
already in a loop when you press it, you can “fine tune” the placement of the “Loop
Out” point by moving the PLATTER. If no track is assigned to the Deck, nothing will
happen.
25. SELECT – Press this to rotate through the loops set in the track. From here, you
can edit, reloop, or enable the loop you have selected. (Also, if you pressed LOOP IN but want to cancel the loop before
completing it, press SELECT, which will toggle out of it.)
26. RELOOP – Press this to jump to the start of the loop and enable it. If the Deck is already looping when you press it, the Audio
Pointer will jump to the start of the loop and continue. If no loop is set, nothing will happen.
Hold DELETE CUE / SHIFT and any of
these buttons to access their alternate
functions:
IN, OUT, SELECT, RELOOP: Triggers
Loop Roll in eighth, quarter, half, or one
note measurements.
1/2 X, 2 X, SHIFT LEFT, SHIFT RIGHT:
Jumps to stored loops 1, 2, 3, or 4
(respectively) and instantly reloops them.
 Loading...