Page 11
ENG
93 94 95 SERIES
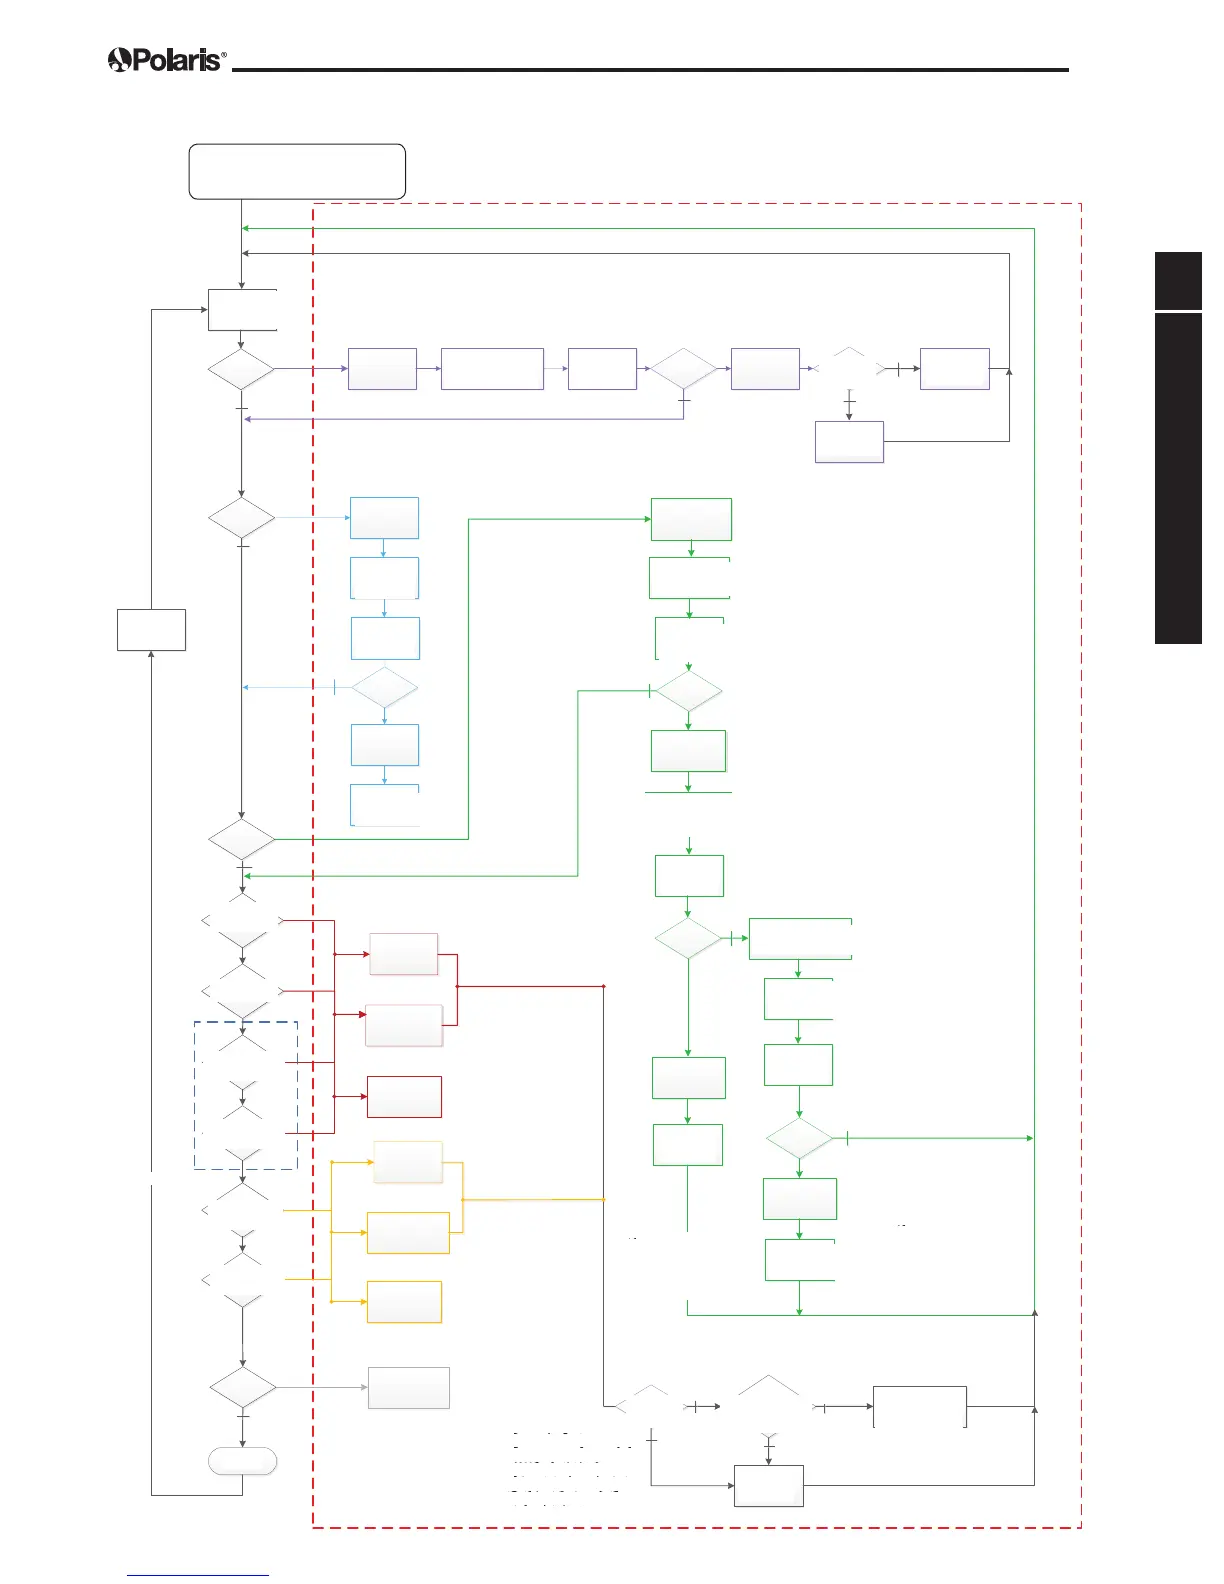
2.5 93 94 95 Series Cleaner Test
Famille Vortex uniquement
Brancher la diag box
Connecter le robot à la diag
box (avec l’adaptateur gris
pour le CyclonX)
Appuyer sur
« Cleaner » puis
« Start/Stop »
Fin
Appuyer sur « Start/
stop » ou « OK » ou
« Cancel »
t fd
t bd
test
P on
Poff
End
Test du robot Vortex/CyclonX
Changer la diagbox
Fail- aT
Fail- Com
Test effectué
Fail- trac
Fail- pump
TEST
Débrancher/
rebrancher la
diagbox
Appuyer sur
« Cleaner » puis
« Start/Stop »
Fail- aT
TEST
Débrancher/rebrancher
l’ensemble robot/
diagbox
Appuyer sur
« Cleaner » puis
« Start/Stop »
Moteur traction
marche avant
Moteur traction
marche arrière
Démarrage du
moteur pompe
Arrêt du moteur
pompe
TEST
OK
OK
OK
OK
TEST
TEST
SC
OK
Appuyer sur Cleaner
puis « Start/Stop »
TEST
SC
Test rotation droite
Test rotation
gauche
tcl
Tcc
Débrancher le robot et
brancher le bloc moteur à
la diagbox à l’aide du
connecteur marron
Appuyer sur
« Cleaner » puis »
Start/Stop »
Changer le bloc
moteur
Fail- Com
Fail- Com
TEST
OK
TEST
OK
Fail- At
*
*
Se reporter à la description du
défaut en haut du logigramme
Dia6
Fail- Com
**
Se reporter à la description du
défaut en haut du logigramme
Fail- Com
**
Se reporter à la description du
défaut en haut du logigramme
**
Tester le bloc
moteur
Changer le bloc
moteur
Changer le câble du
robot
Bloc OK
Bloc pas OK
Vérifier dans le connecteur
côté câble que les fils sont
correctement branchés
Vérifier dans le connecteur
côté câble que les fils sont
correctement branchés
OK
Appuyer sur Cleaner
puis « Start/Stop »
TEST
Fail- Com
Changer le câble
OK
*
*
*
SC
SC
Tester le bloc
moteur
Vérifier le système de
transmission et l’hélice
Changer le système de
transmission et/ou nettoyer
les débris de l’hélice
Changer le bloc
moteur
Bloc OK
Bloc pas OK
Vérification
OK
Problème sur la
transmission et/
ou l’hélice
Débrancher le bloc
moteur et
rebrancher le robot
à la diagbox
Press
[CLEANER]
then Start/Stop
Press
[CLEANER]
then Start/Stop
Press
[CLEANER]
then Start/
Press [CLEANER]
then Start/Stop
Press
[CLEANER]
then Start/
Press
[CLEANER]
then Start/Stop
Press Start/
Stop or [OK]
or [CANCEL]
END
1. Plug in Diagnostic Box
2. Connect the Cleaner DIRECTLY to the
Diagnostic Box.
Check the cable
connections.
Replace the
Motor Block
Test the
Motor Block
Replace the
Floating Cable
Contact Polaris
Customer Service
Disconnect /
Reconnect
Diag Box
Disconnect / Reconnect
Control Box and Diag Box
1. Unplug the cleaner and dissassemble.
2. Connect the Motor Block to the Diag box using
the BROWN test cable.
OK
Not OK
Forward
Traction Motor
Backward
Traction Motor
Testing Clockwise
Rotation
Start Pump
Motor Test
Testing Counter
Clockwise
Stop Pump
Motor Test
See explanation for
same error message above.
See explanation for
same error message above.
See explanation for
same error message
above.
Replace the
Motor Block
Replace the
Floating Cable
Replace the
Motor Block
Test the
Motor Block
Check the
transmission and the
impeller
Problem with transmission
and/or impeller
Replace the
transmission and/or
clean debris from the
impeller
OK
not OK OK
Disconnect the Motor Block
and connect the Cleaner to the
Diag Box
Check that the fl oating cable is
connected correctly.
SERIES 93 94 95 only
NOTE:
After replacing with functioning
Motor Block test again. If FAIL,
replace the Floating Cable.
NOTE:
If Motor Block test reaches
END with no Fail messages,
replace the Floating Cable.
1. Unplug the Cleaner.
2. Dissassemble Cleaner to
access the Motor Block.
3. Connect the Motor Block
to the Diag Box using the
BROWN test cable.
 Loading...