Home
Roland
Drums
V-DRUMS TD-10
Roland V-DRUMS TD-10 User Manual
4
of 1
of 1 rating
180 pages
Give review
Manual
Specs
To Next Page
To Next Page
To Previous Page
To Previous Page
Loading...
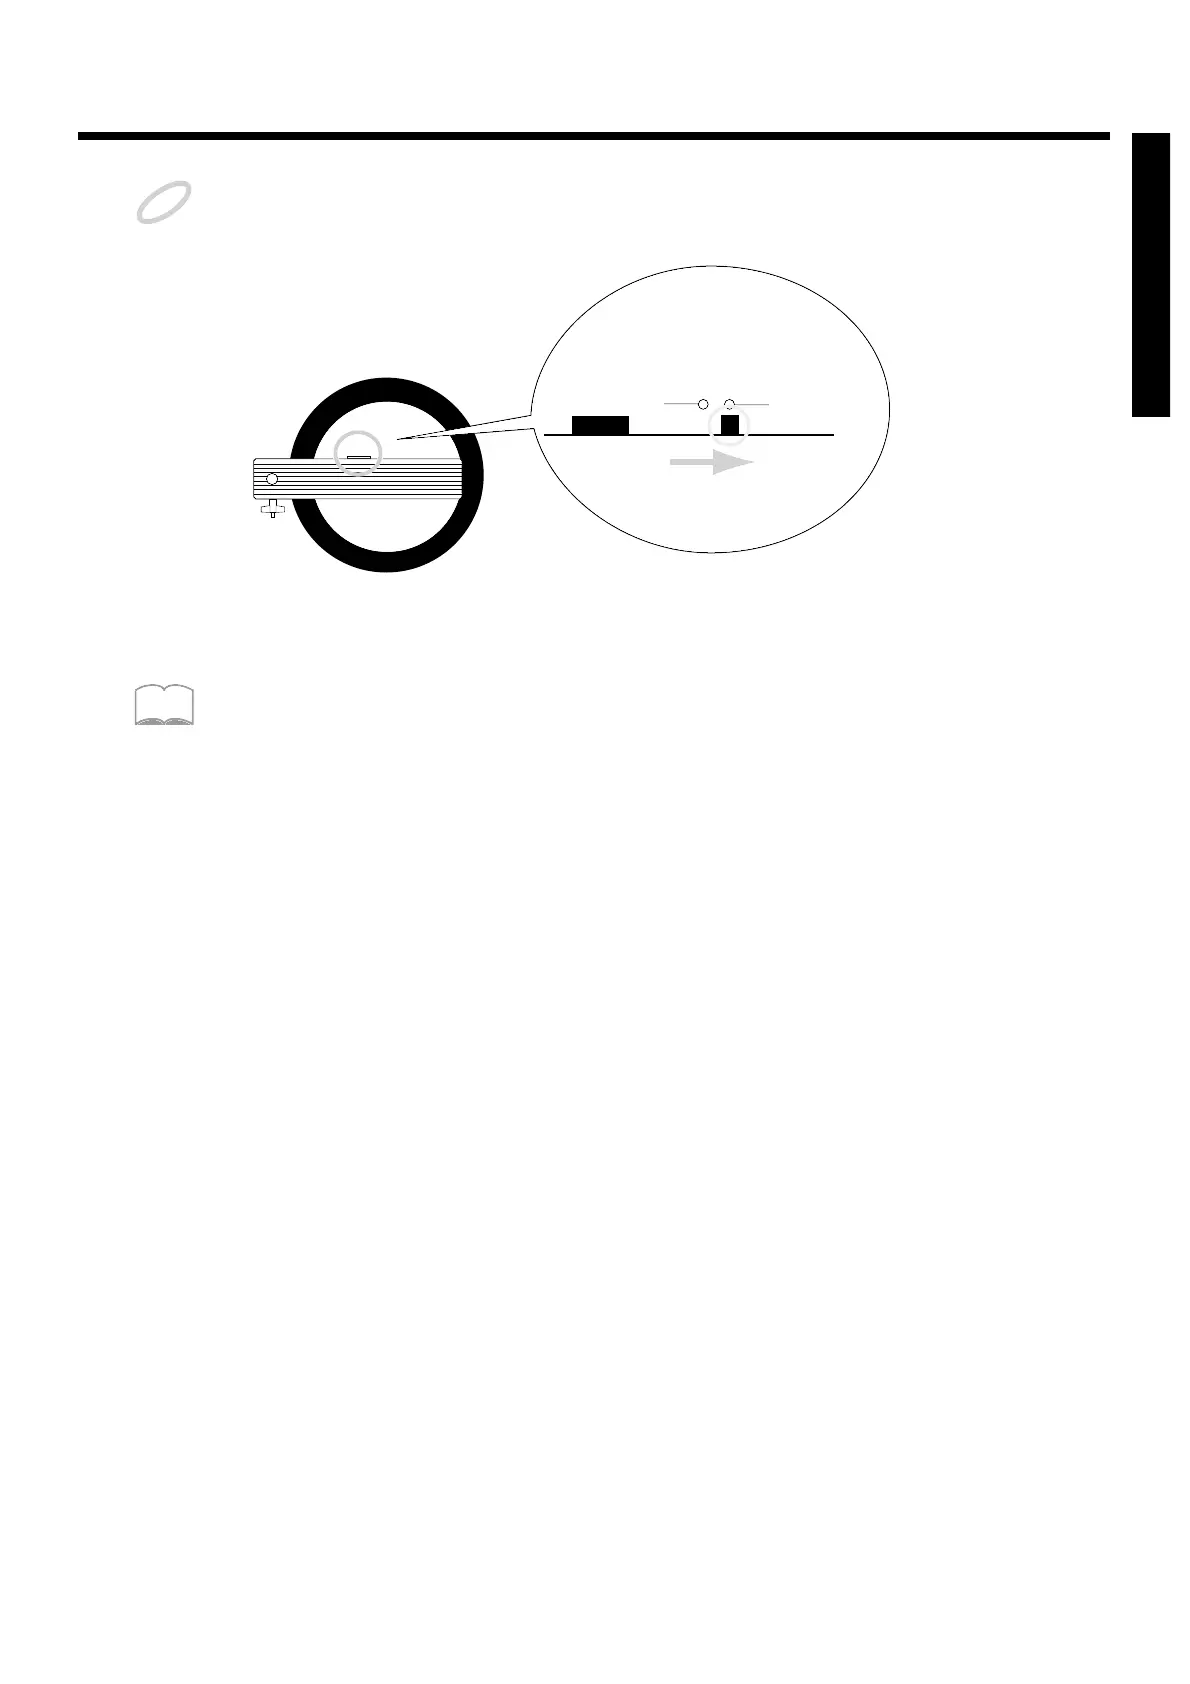
If you are using a PD-7 or PD-9, move the polarity switch located on the back of the pad to the “-(Roland)”
position. When using a KD-7, either position will do.
fig.00-012
To have the most expressive performance, we recommend the use of the Roland pads (PD-5, PD-7, PD-9, PD-
100, PD-120) and kick trigger units (KD-7).
NOTE
PD-7, PD-9
OUTPUT
POLARITY
+
- (Roland)
MEMO
Before you begin playing
25
Quick Start
24
26
Table of Contents
Default Chapter
2
Important Safety Instructions
2
Using the Unit Safely
3
How to Read this Owner's Manual
5
Table of Contents
6
Features
12
Front and Rear Panel
14
Group Faders
15
Power Switch
16
Rear Panel
16
Important Notes
17
About Button Operations and the Screen Displays
18
About the Preset Drum Kits
20
Quick Start
21
Before You Begin Playing
22
Mounting the TD-10 to the Stand
22
Connect Your Audio System or Amp
23
Connecting Pads and Pedals
24
Turning on the Power
26
To Turn the Power off
27
Listening to the Internal Demo Playback
28
Specify the Pads that the TD-10 will Use
29
If You Have Purchased the "V-Basic Kit" or "V-Standard Kit
29
If You Have Purchased the PD-5, PD-7, PD-9, PD-100 or PD-120 Individually
30
Adjusting the Head Tension
31
Using Triggers on an Acoustic Drum to Play the TD-10
33
Check the Settings
34
For a Better Performance
35
Concerning the Performance & Expressiveness of the Pads
35
Rim Shots
35
Choking
35
Positional Sensing
36
Playing with Brushes
36
Hi-Hat Control Pedal
36
TD-10 Operating Procedure
37
Adjusting the Volume
37
Selecting a Drum Kit
38
Adjusting the Sensitivity of a Pad
39
Master Equalizer
40
Effect On/Off
41
Help Function
42
About Expansion Boards
43
À Propos des Cartes D'extension
44
(French Language for Canadian Safety Standard)
44
Troubleshooting Connections and Settings
45
Features of the Preset Drum Kits
47
How Sounds Are Created on the V-Drums
47
No.36: 70'S Rock Drum Kit
48
No.37: Brush Kit
50
No.38: Electronic Drum Kit
52
Modifying a Drum Kit
54
[INST]: Creating Drum Sounds
55
Selecting an Instrument
55
Modify the Material and Depth of the Body
56
Change the Material and Tuning of the Head
58
Adjust the Muffling (Muting) and Snare Strainer Tension
60
[STUDIO]: Adjusting the Acoustics of the Room
62
Decide "Where" the Drums Are Played
63
Change the Size of the Room
64
[CONTROL ROOM]: Adding Finishing Touches to the Sound
65
Using the Equalizer to Modify the Sound
65
Adjusting the Volume Balance of the Instruments
67
Examples and Convenient Tips
68
Perform with the On-Board Sequencer
68
Playing Back a Preset Pattern
68
Play the Pads Along with a Preset Pattern
69
Drum Kit Chain-Selecting Drum Kits in the Desired Order
70
Using a Foot Switch to Select Kits
72
Using a Pad to Playback Patterns
72
Using Headphones to Hear the Click Sound
73
Using the TD-10 as a MIDI Sound Module
74
Advanced Use
75
Chapter 1. Overview of the TD-10 V-Drums
76
How the V-Drums System Is Organized
76
How to Select Pads
77
Using Pads to Select the Pad/Sound for Editing
77
Using the TD-10 to Select the Pad/Sound for Editing
77
Chapter 2. Settings for the Entire Drum Kit
78
Selecting a Kit
78
Selecting Kits from the List Display
78
Naming a Kit
78
Making Settings for Brush Performance
79
Effect Switches for the Entire Kit
79
Chapter 3. Instrument Settings
80
Selecting an Instrument
80
Selecting Instruments from the List Display
80
Editing an Acoustic Drum Kit (V-EDIT)
81
Selecting the Shell Material
81
Changing the Shell Depth
82
Selecting the Head Material
82
Tuning the Head
82
Muffling Settings (Muting)
83
Adjusting the Snare Strainer Tension
83
Editing an Electronic Drum Kit (V-EDIT)
84
Editing a TR-808/909 (V-EDIT)
85
Editing Hi-Hat, Cymbals and Percussion
86
Chapter 4. Studio Settings
87
Settings for the Entire Drum Kit
87
Selecting the Studio/Room
87
Changing the Size of the Room
87
Changing the Wall Material
87
Selecting the Ambience Mike Location
87
Adjusting the Volume and Output Assignments of the Ambience
88
Settings for each Instrument
88
Adjusting the Amount of Ambience
88
Selecting the Type of Mike and Its Location
88
Settings for each Group
89
Adjusting the Amount of Ambience Send Level for each Group
89
Chapter 5. Control Room Settings
90
Settings for each Instrument
90
Adjusting Volume (Level)
90
Adjusting Pan (Stereo Location)
90
Adjusting Effect Send Level
90
Selecting Output Assignments
91
Controlling Variations in Volume (Compressor)
91
Customizing the Tone (Equalizer)
92
Settings for the Entire Drum Kit
93
Adjusting Effect Return Level
93
Selecting the Type of Effect
93
Editing the Effects
94
Settings for an Entire Group
96
Adjusting Effect Send Level for an Entire Group
96
Adjusting the Volume by Group
96
Chapter 6. Sequencer
97
Basic Sequencer Operation
97
Using Preset Patterns
97
Setting the Tempo
97
Setting the Tempo for each Pattern
97
Temporarily Changing the Tempo of the Currently-Playing Pattern
97
Playback Functions
98
Selecting a Pattern
98
Selecting Patterns from the List
98
Selecting How a Pattern will Playback
98
Click Settings
99
Click On/Off and Volume Settings
99
Setting the Tempo
99
Setting the Time Signature and Click Interval
99
Selecting the Click Sound
100
Using Ambience
100
Using Effects
100
Adjusting the Pan (Stereo Location)
100
Selecting the Output Destination
100
Recording
101
Basic Recording Procedure
101
The Rehearsal Function
102
Using a Count-In
102
Start Recording the Moment that You Strike a Pad
102
Correcting Timing as You Record (Quantize)
103
Importing Data from Another Sequencer into the TD-10
103
Editing a Pattern
103
Naming a Pattern
103
Erasing a Pattern
104
Erasing Selected Measures of a Pattern
104
Copying a Pattern
104
Copying Selected Measures of a Pattern
105
Clearing a Pattern
105
Clearing Selected Measures of a Pattern
105
Connecting Two Patterns
106
Settings for Part Instruments
106
Adjusting the Master Tuning
106
Instrument Selection and Settings for each Part
106
Mixer Settings for each Part
107
Muting a Specific Part
107
Chapter 7. Settings for the Entire TD-10
108
Changing Output Assignment for Audio Received by the MIX in Jack
108
Specifying the Type of Pad
108
Basic Settings for the Trigger Parameters (BASIC)
109
Detailed Settings for the Trigger Parameters (ADVNCD)
111
The Order in Which Trigger Parameters Should be Set When Using Drum Triggers
112
Adjusting the Brightness of the Display
113
Setting the Master Equalizer
113
Saving Data to a Memory Card
114
Loading Data from a Memory Card
115
Automatically Switching the Display (Note Chase)
115
Chapter 8. Convenient Functions
116
Selecting Kits in the Desired Order (Drum Kit Chain)
116
Specifying a Drum Kit Chain
116
Naming a Drum Kit Chain
116
Copying
117
The UNDO Function
117
Getting Help
118
Specifying How the Preview Button Functions
118
Chapter 9. Operations Using Pads and Foot Switches
119
Using Pads to Play Patterns (Pad Pattern)
119
Using Pads to Perform Button Operations (Pad Switch)
119
Using Foot Switches to Perform Button Operations (Foot Switch)
120
Chapter 10. Functions Using MIDI
121
Saving/Loading Data To/From an External Device (Bulk Dump)
121
Saving Data
121
Loading Saved Data to the TD-10
121
Setting the Device ID-Transmitting Saved Data to Two or more TD-10 Units
122
Using Pads to Play an External MIDI Sound Module
122
Selecting the Note Number Transmitted by each Pad
122
Setting the Gate Time
123
Setting the MIDI Channel
123
Using the TD-10 with the Roland SPD-11
123
MIDI Settings for the Entire TD-10
124
Setting the MIDI Channels for each Part
124
Turning off Local Control
124
Disabling Reception or Transmission of Program Changes
124
Reducing the Amount of Data Transmitted by the FD-7 (Pedal Data Thin)
124
Using the TD-10 as a Sound Module
125
Setting the Instrument for each Part
125
Adjusting the Mixer Settings for each Part
125
Regarding Note Numbers for the Drum Kit Sounds
125
Using the Percussion Group
126
Changing the Kit Number that Is Selected by a Program Change
128
MIDI Messages for Detailed Performance Expressions
128
Messages for Hi-Hat Control
128
Messages for Positional Sensing (Snare Drum and Ride Cymbal Only)
129
Synchronization with External MIDI Devices
129
Appendices
131
Troubleshooting
132
Display Is too Light or too Dark
135
Instruments that Can be Used with each Trigger
136
Restoring the Factory Settings (INITIALIZE)
137
Message / Error Message List
138
About MIDI
140
Using Drum Triggers
142
Preset List
143
Drum Instrument List
144
Drum Kit
150
Preset Pattern List
153
MIDI Implementation
155
Song Select
158
MIDI Implementation Chart
165
Specifications
168
Glossary
169
Index of Screen Displays
173
Index
176
4
Based on 1 rating
Ask a question
Give review
Questions and Answers:
Need help?
Do you have a question about the Roland V-DRUMS TD-10 and is the answer not in the manual?
Ask a question
Roland V-DRUMS TD-10 Specifications
General
Polyphony
64 voices
MIDI
In, Out, Thru
Display
LCD
Power Supply
AC Adaptor
Effects
Reverb, EQ
Trigger Inputs
12 (10 standard, 2 optional)
Related product manuals
Roland V-Drums TD-1
12 pages
Roland V-Drums TD-1K
17 pages
Roland V-Drums TD-1KV
17 pages
Roland V-Drums TD-17K
2 pages
Roland V-Drums TD-1KPX
2 pages
Roland V-Drums TD-17KV
2 pages
Roland V-Drums TD-17KV2
2 pages
Roland V-Drums V-Tour TD-15K
2 pages
Roland V-Drums V-Compact TD-11K
2 pages
Roland V-Drums TD-3
76 pages
Roland V-Drums TD-30
160 pages
Roland V-Drums TD-07KVX
2 pages

 Loading...