U
ri
LO
CT1
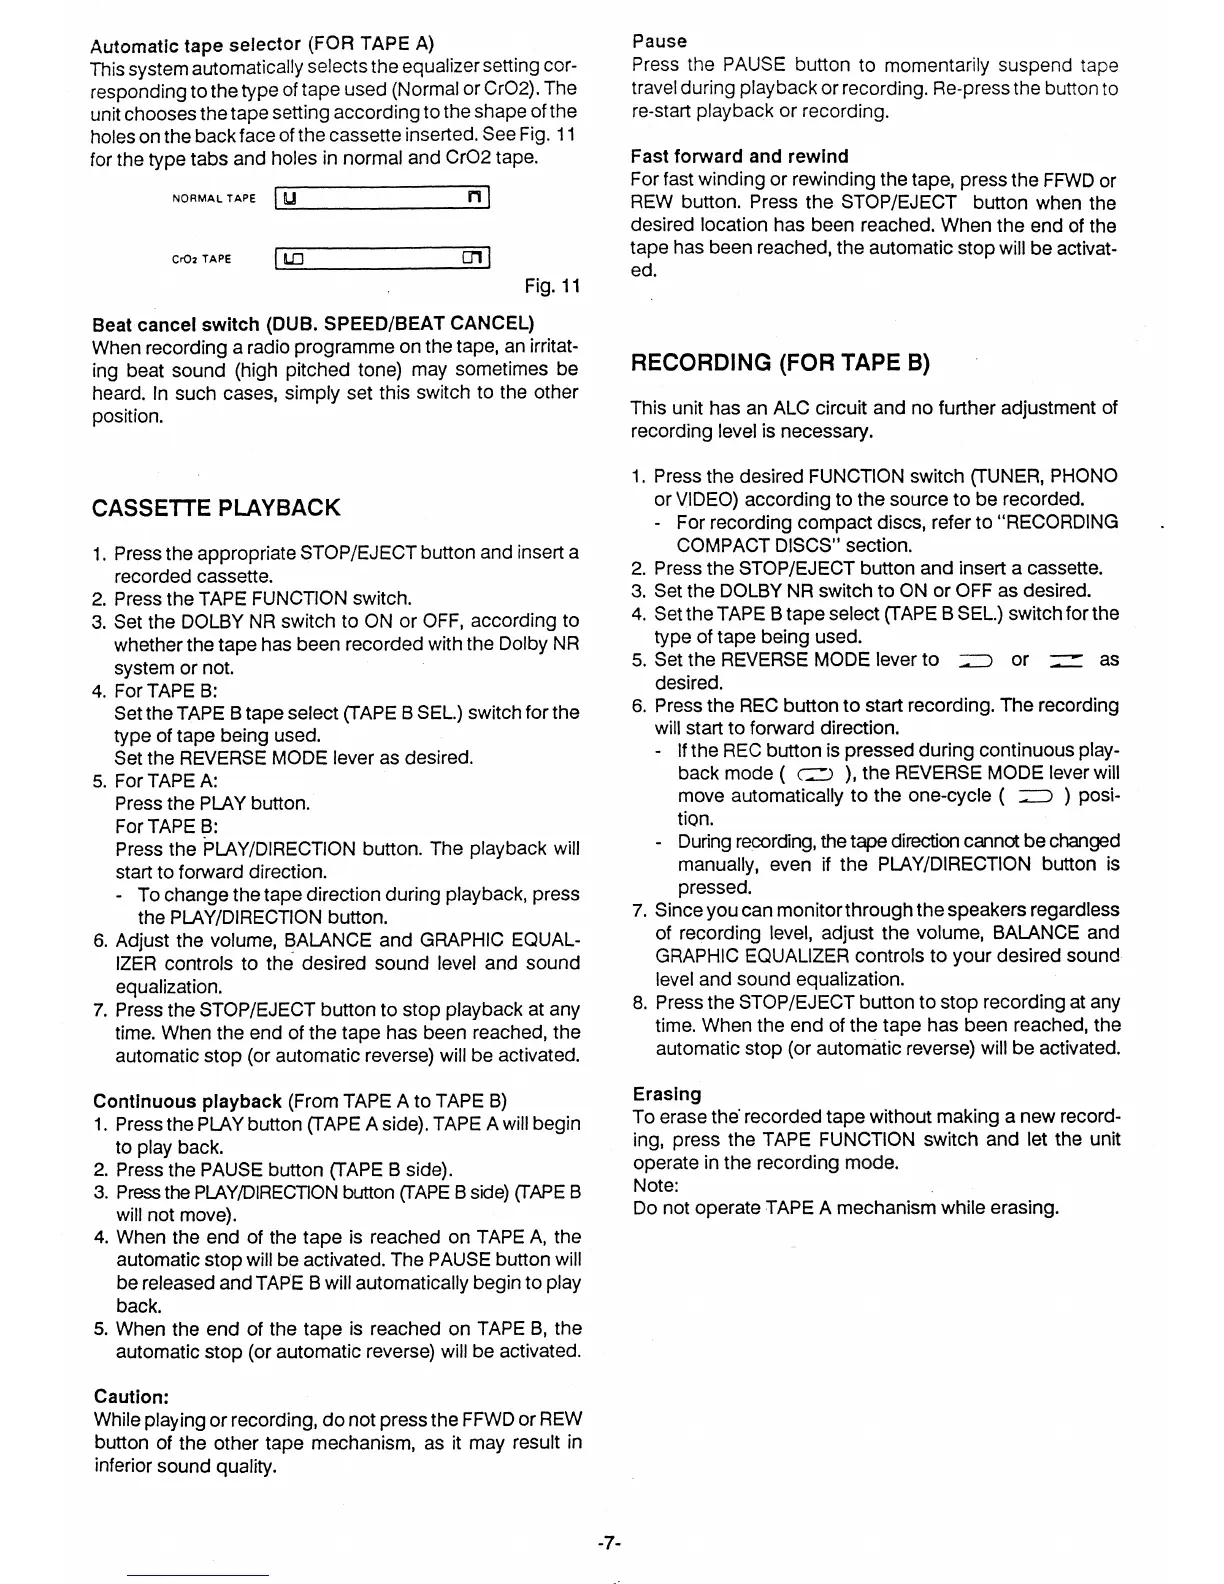
Automatic tape selector (FOR TAPE A)
This system automatically selects the equalizer setting cor-
responding to the type of tape used (Normal or Cr02). The
unit chooses the tape setting according to the shape of the
holes on the back face of the cassette inserted. See Fig.
11
for the type tabs and holes in normal and Cr02 tape.
NORMAL TAPE
Cr02 TAPE
Fig. 11
Beat cancel switch (DUB. SPEED/BEAT CANCEL)
When recording a radio programme on the tape, an irritat-
ing beat sound (high pitched tone) may sometimes be
heard. In such cases, simply set this switch to the other
position.
CASSETTE PLAYBACK
1.
Press the appropriate STOP/EJECT button and insert a
recorded cassette.
2.
Press the TAPE FUNCTION switch.
3.
Set the DOLBY NR switch to ON or OFF, according to
whether the tape has been recorded with the Dolby NR
system or not.
4.
For TAPE B:
Set the TAPE B tape select (TAPE B SEL.) switch for the
type of tape being used.
Set the REVERSE MODE lever as desired.
5.
For TAPE A:
Press the PLAY button.
For TAPE B:
Press the PLAY/DIRECTION button. The playback will
start to forward direction.
- To change the tape direction during playback, press
the PLAY/DIRECTION button.
6.
Adjust the volume, BALANCE and GRAPHIC EQUAL-
IZER controls to the desired sound level and sound
equalization.
7.
Press the STOP/EJECT button to stop playback at any
time. When the end of the tape has been reached, the
automatic stop (or automatic reverse) will be activated.
Continuous playback
(From TAPE A to TAPE B)
1.
Press the PLAY button (TAPE A side). TAPE A will begin
to play back.
2.
Press the PAUSE button (TAPE B side).
3.
Press the PLAY/DIRECTION button (TAPE B side) (TAPE B
will not move).
4.
When the end of the tape is reached on TAPE A, the
automatic stop will be activated. The PAUSE button will
be released and TAPE B will automatically begin to play
back.
5.
When the end of the tape is reached on TAPE B, the
automatic stop (or automatic reverse) will be activated.
Caution:
While playing or recording, do not press the FFWD or REW
button of the other tape mechanism, as it may result in
inferior sound quality.
Pause
Press the PAUSE button to momentarily suspend tape
travel during playback or recording. Re-press the button to
re-start playback or recording.
Fast forward and rewind
For fast winding or rewinding the tape, press the FFWD or
REW button. Press the
STOP/EJECT
button when the
desired location has been reached. When the end of the
tape has been reached, the automatic stop will be activat-
ed.
RECORDING (FOR TAPE B)
This unit has an ALC circuit and no further adjustment of
recording level is necessary.
1.
Press the desired FUNCTION switch (TUNER, PHONO
or VIDEO) according to the source to be recorded.
- For recording compact discs, refer to "RECORDING
COMPACT DISCS" section.
2.
Press the STOP/EJECT button and insert a cassette.
3.
Set the DOLBY NR switch to ON or OFF as desired.
4.
Set the TAPE B tape select (TAPE B SEL.) switch for the
type of tape being used.
5.
Set the REVERSE MODE lever to
or = as
desired.
6.
Press the
REC
button to start recording. The recording
will start to forward direction.
-
If the REC button is pressed during continuous play-
back mode ( ci ), the REVERSE MODE lever will
move automatically to the one-cycle (
) posi-
tion.
- During recording, the tape direction cannot be changed
manually, even if the PLAY/DIRECTION button is
pressed.
7.
Since you can monitor through the speakers regardless
of recording level, adjust the volume, BALANCE and
GRAPHIC EQUALIZER controls to your desired sound
level and sound equalization.
8.
Press the STOP/EJECT button to stop recording at any
time. When the end of the tape has been reached, the
automatic stop (or automatic reverse) will be activated.
Erasing
To erase the recorded tape without making a new record-
ing, press the TAPE FUNCTION switch and let the unit
operate in the recording mode.
Note:
Do not operate TAPE A mechanism while erasing.
-7-
 Loading...