■
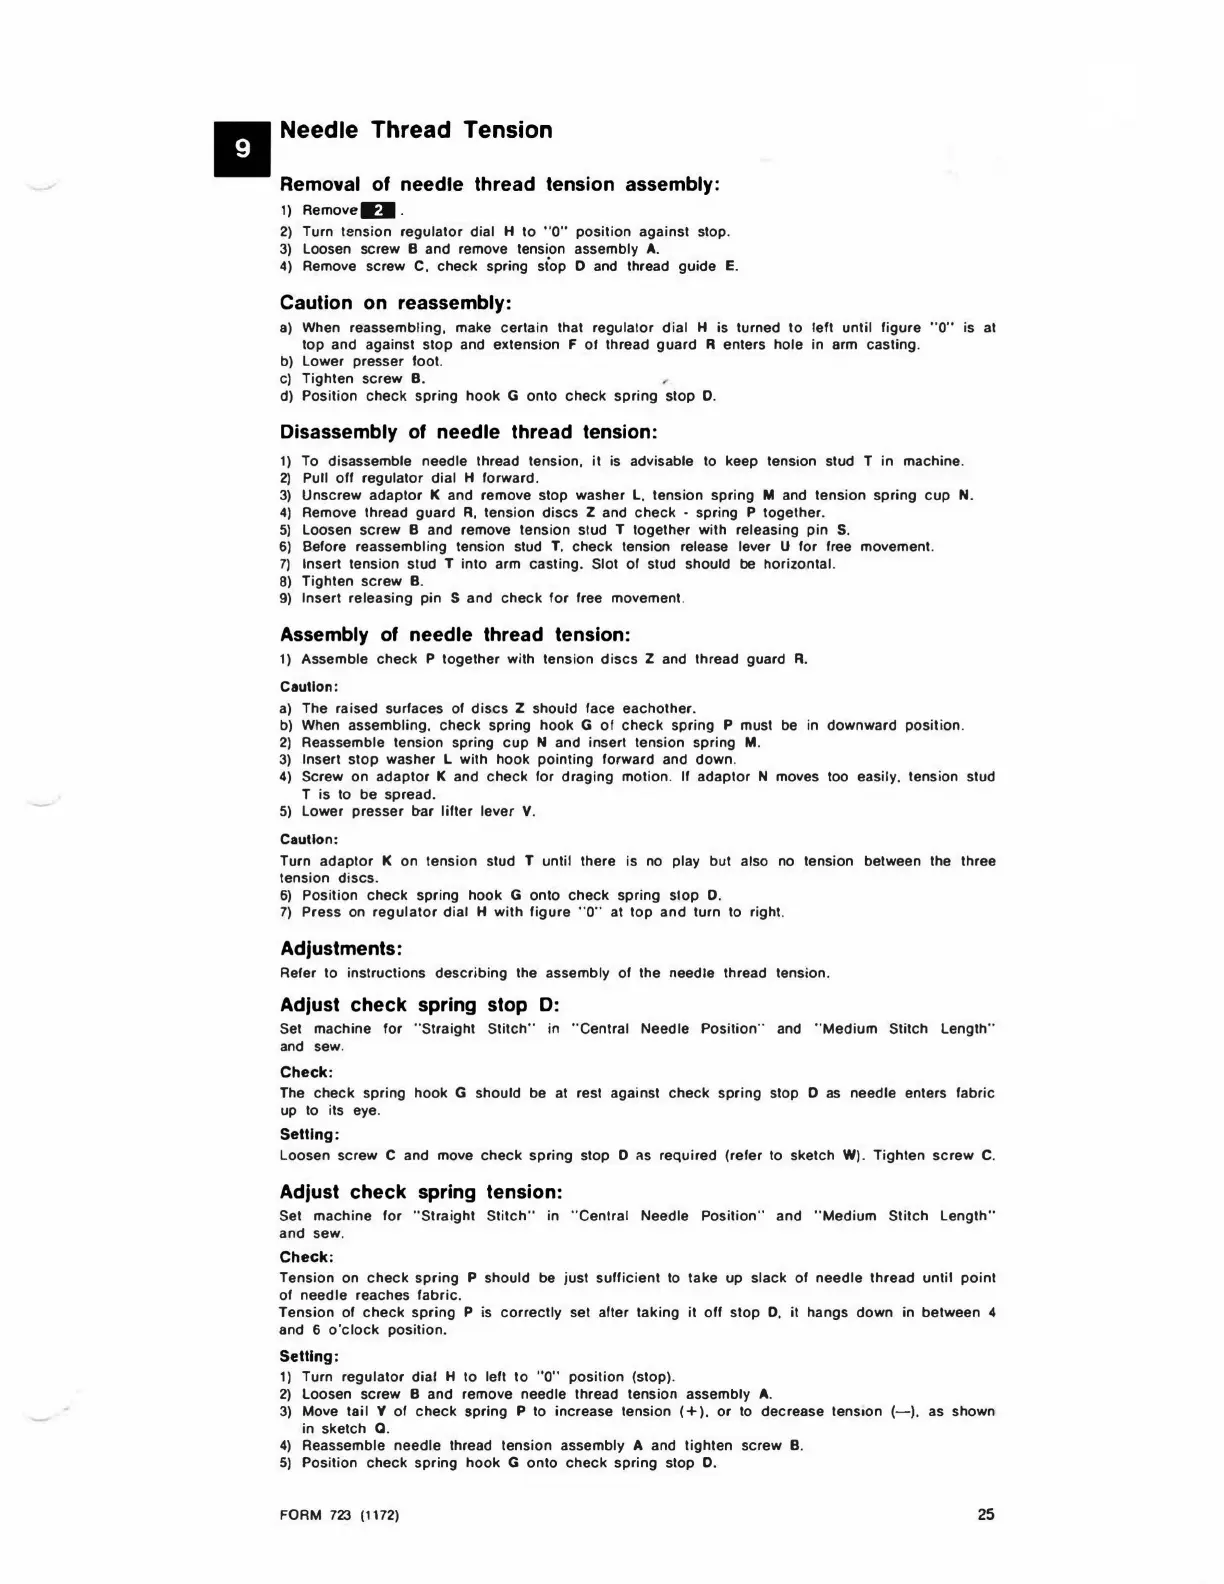
Needle Thread Tension
Removal
of
needle
thread
tension
assembly:
1)
RemoveU.
2) Turn 1ension regula1or
dial
H
10
"O"
position
against stop.
3)
Loosen screw B and remove tension assembly A.
4) Remove screw
C.
check
spring
siop
0 and thread guide E.
Caution on reassembly:
a)
When reassembling, make
certain
that regulator
dial
H is turned
to
left
until
figure
"O"
is at
top and against
stop
and
extension
F
of
thread
guard
R enters hole in arm
casting
.
b)
Lower
presser
fool.
c)
Tighten
screw
B.
d)
Position
check
spring
hook
G
onto
check
spring
stop
0.
Disassembly
of
needle thread tension:
1) To disassemble needle thread tension,
it
is advisable to keep tension stud T in machine.
2)
Pull
off
regulator
dial
H forward.
3)
Unscrew
adaptor
K and remove stop washer L.
tension
spring
M and
tension
spring
cup
N.
4) Remove thread
guard
R,
tension
discs
Z and
check
• spring P
together
.
5)
Loosen
screw
B and remove
tension
stud T
together
with releasing
pin
S.
6) Before reassembling tension stud T.
check
tension release lever U for free movement.
7)
Insert tension stud T
into
arm casting. Slot
of
stud should be horizontal.
8) Tighten
screw
B.
9)
Insert
releasing
pin
S
and
check
for
free movement.
Assembly
of
needle thread tension:
1) Assemble
check
P
together
with
tension
discs
Z and thread guard
R.
Cau
ti
on:
a)
The raised surfaces of
discs
Z should face
eachother
.
b) When
assembling,
check
spring
hook
G
of
check
spring
P must be in
downward
position
.
2) Reassemble tension spring
cup
N and insert tension spring M.
3) Insert
stop
washer L with
hook
pointing
forward and
down
.
4) Screw
on
adaptor
K and
check
for
draging
motion
.
If
adaptor
N moves too easily, tension stud
T is to
be
spread.
5)
Lower
presser
b-ar
lifter
lever V.
Caution:
Turn
adaptor
K
on
tension
stud T until there is no play but also no tension between the three
tension
discs.
6)
Position
check
spring
hook
G
onto
check
spring
stop
0 .
7)
Press on
regulator
dial
H
with
figure
"O" at
top
and
turn to right.
Adjustments:
Refer
lo
instructions
describing
the assembly
of
the needle thread tension.
Adjust check spring stop
D:
Set
machine
for
" Straight
Stitch"
in
"Central
Needle
Position
" and
"Med
i
um
Stitch
Length"
and sew.
Check:
The
check
spring
hook
G should be at rest against
check
spring
stop 0
as
needle enters fabric
up to its eye.
Setting:
Loosen screw C and move
check
spring
stop 0
11s
required
(refer to sketch
W)
. Ti
ghten
screw
C.
Adjust check spring tension:
Set
machine
for
"Straight
Stitch"
in
"Central
Needle Position"
and
"Medium
Stitch
Length"
and
sew
.
Check:
Tension on
check
spring
P should be just
sufficient
to take up
slack
of
needle
thread
until
point
of
needle
reaches
fabric
.
Tension
of
check
spring
P is
correctly
set
alter
taking
it
off
stop
0,
it
hangs
down
in
between
4
and 6
o'clock
position.
Setting:
1)
Turn
regulator
dial
H
to
left
to
"O"
position
(stop).
2) Loosen screw B and remove needle thread tension assembly A.
3) Move
tail
V
of
check
spring P to increase tension ( +
).
or
to decrease
tension
(-).
as shown
in sketch a.
4)
Reassemble
needle
thread
tension
assembly A and
tighten
screw
B.
5)
Position
check
spring
hook
G
onto
check
spring
stop
0.
FORM
7Z3
(1172)
25
 Loading...