26
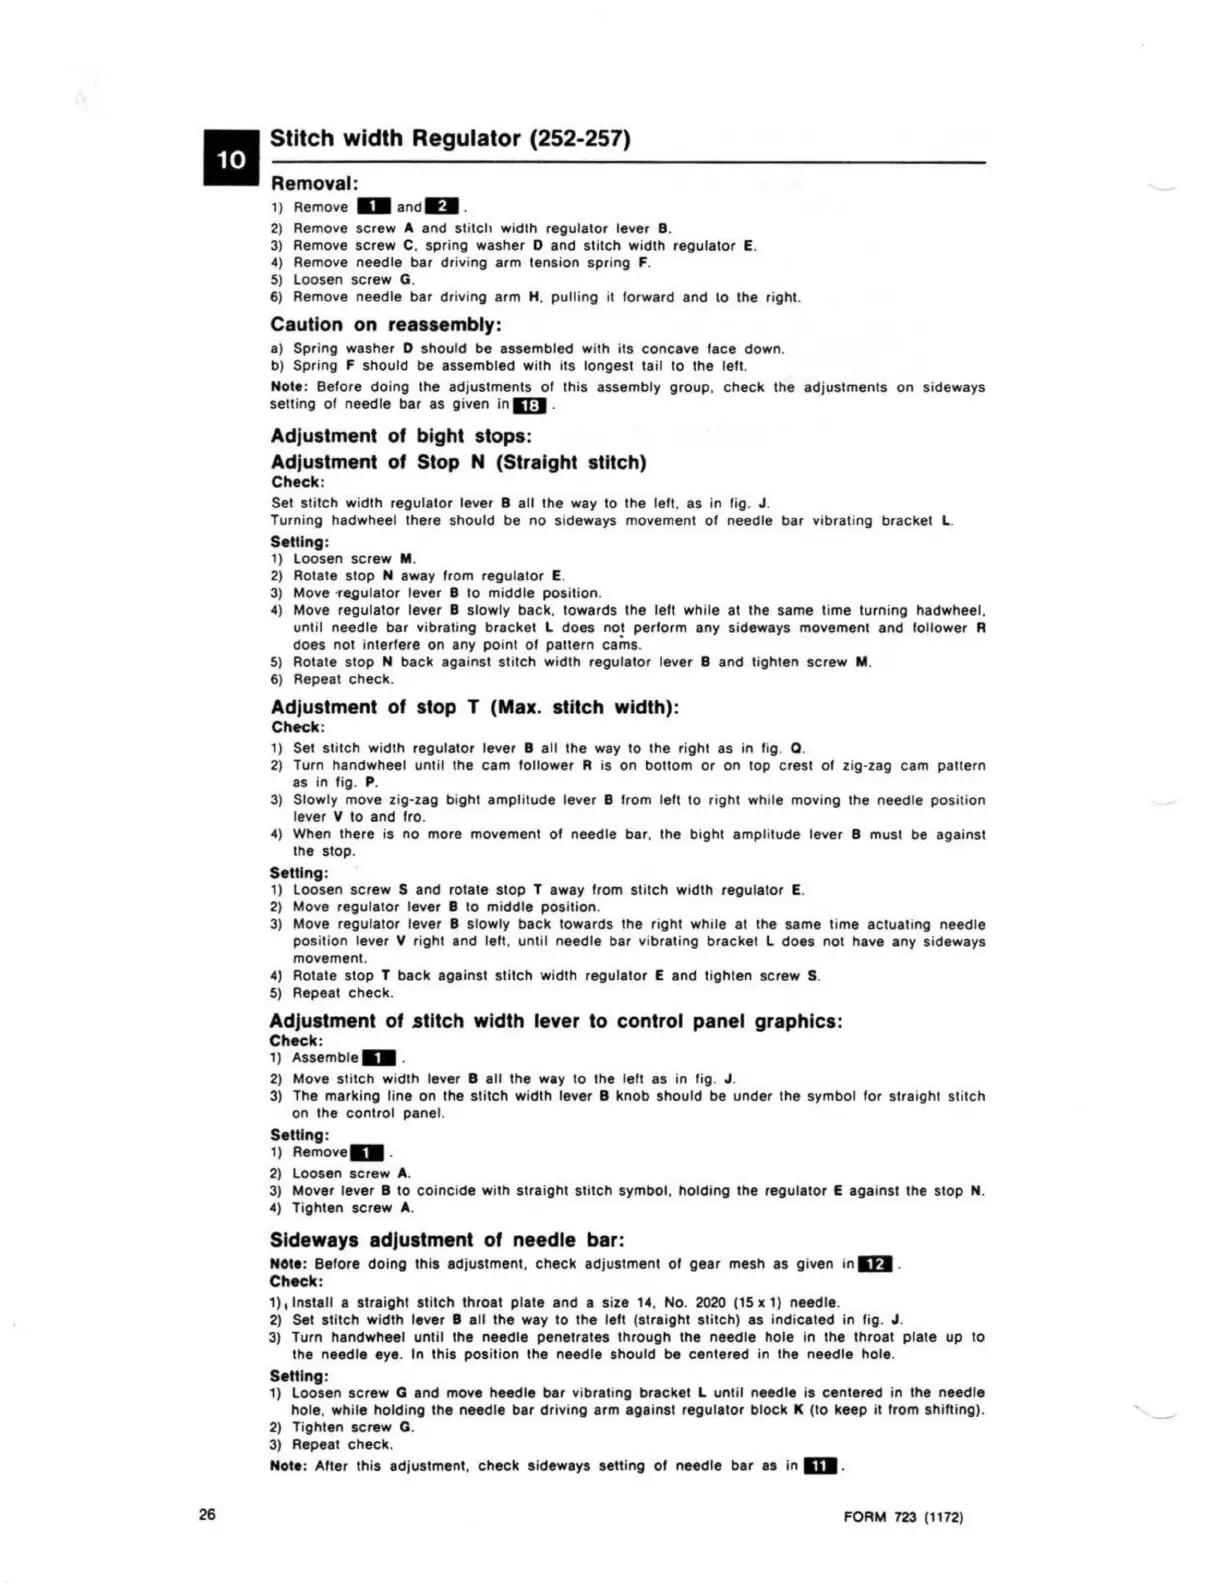
Stitch width Regulator (252-257)
Removal:
1)
Remove D and llfll ,
2) Remove
screw
A and
stitch
width
regulator
lever
B.
3) Remove
screw
C,
spr
ing washer D and
stitch
width
regulator
E.
4) Remove
needle
bar
driving
arm tension
spring
F.
5) Loosen
screw
G.
6) Remove needle bar
driving
arm
H,
putting it forward and to
lhe
right.
Caution
on
reassembly:
a)
Spring washer D
should
be assembled with its
concave
lace
down.
b) Spring F
should
be
assembled with its longest tail to the left.
Note: Before
doing
the adjustments
of
this assembly
group
,
check
the
adjustments
on
sideways
setting of needle bar as given in IIlJ .
Adjustment
of
bight stops:
Adjustment of Stop N (Straight stitch)
Check:
Set
stitch
wi
dth
regulator
lever B all the way to the left, as in fig. J.
Turning hadwheel there should
be
no
sideways movement of needle bar vibrating bracket L.
Setting:
1) Loosen
screw
M.
2) Rotate
stop
N away from
regulator
E.
3)
Move ·
regulator
lever B 10
middle
position.
4)
Move
regulator
lever B
slowly
back, towards the left
wh
i
le
at the same time
turning
hadwheel,
until needle bar
vibrating
bracket
L
does
not
perform
any sideways movement and
follower
R
does not interfere on any
point
of pattern cams.
5) Rotate
stop
N
back
aga
in
st stitch
width
regulator
lever B and tighten
screw
M.
6) Repeat
check.
Adjustment
of
stop T (Max. stitch width):
Check:
1) Set
stitch
wi
dth
regulator lever B all the way to the right as
in
fig. 0 .
2) Turn handwheel
until
the cam
follower
R is on bottom
or
on top crest of zig-zag cam pattern
BS
in
fig. P.
3) Slowly move zig-zag bi
ght
amplitude lever B from left to right while moving the needle position
lever V
to
and fro.
4) When there is no more movement
of
needle
bar, the
bight
ampl
i
tude
lever
B must be against
the
stop
.
Setting:
1) Loosen
screw
S and rotate
stop
T away from
stitch
width
regulator
E.
2) Move
regulator
lever B to
middle
position
.
3) Move
regulator
lever
B
slowly
back towards the right while at the same time actuating needle
pos
iti
on lever V right and left, until
needle
bar vi
brating
bracket
L
does
not
have any sideways
movement.
4) Rotate
stop
T
back
against
stitch
wi
dth
regulator
E and ti
ghten
screw S.
5) Repeat
check
.
Adjustment
of
.stitch
width lever
to
control panel graphics:
Check:
1) Assemble D .
2) Move
stitch
width
lever B all the way to the left as in fig. J .
3) The
marking
line on the
stitch
width
lever B
knob
should
be under the symbol for straight
stitch
on the
control
panel.
Setting:
1) Remove U .
2) Loosen
screw
A.
3) Mover lever B
to
coinc
i
de
with
straight
stitch
symbol,
holding
the
regulator
E against the stop N.
4) Tighten
screw
A.
Sideways adjustment
of
needle bar:
NOie: Before
doing
this adjustment,
check
adjustment of
gear
mesh as
given
in m .
Check:
1)
1
Install a
straight
stitch
throat plate and a size 14,
No
. 2020 (15 x 1)
needle
.
2) Set
stitch
width
lever
8 all the way
to
the left (straight
stitch)
as i
ndicated
in fig. J.
3) Turn handwheel
until
the
needle
penetrates
through
the needle hole in the throat plate
up
to
the
needle
eye. In
this
posit
ion the
needle
should
be
centered
in the needle
hole
.
Setting:
1) Loosen
screw
G and move heedle
bar
vibrating
bracket
L
until
needle is
centered
in the
needle
hole
,
while
holding
the
needle
bar
driv
ing
arm against
regulator
block
K (to keep
it
from shifting).
2) Ti
ghten
screw
G.
3) Repeat
check
.
Note:
Alter
this adjustment,
check
sideways setting of
needle
bar
as
in
m .
FORM
723
(1172)
 Loading...