Operating Your Machine – 17
English
Operating Your Machine – 17
English
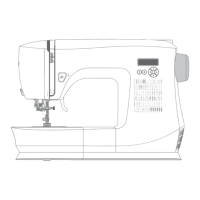
When the machine is turned on, straight stitch is selected and
pop-up screen for individual preference settings appears on
the display. To select stitch patterns, use left button for stitch
number selection to select left digit and right button to select
the right digit referring to stitch number reference guide. The
corresponding stitch numbers are shown on the Stitch Charts
available at the lower right of the machine, under the Control
Panel.
Your sewing machine will produce your stitching requirements
at an Default stitch Length and Width. Default settings of stitch
length and width are underlined on the display. You can man-
ually change the length, width or needle position for straight
stitch according to your preference by pressing the manual
adjustment buttons.
The position of the needle when sewing straight stitch may be
adjusted to any of the 13 dierent positions with the Stitch
Width Control. Press the left control button to position the
needle to the left, and press the right button to move the needle
to the right.
NOTE: Some patterns oer more options for manual adjust-
ments than others.
Stitch Number Selection Buttons
Stitch Length and Stitch Width / Needle Position
 Loading...